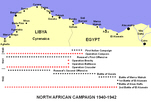
North African Campaign,
1940-1942
|
|
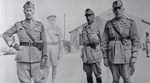
Rommel
Allied Forces
Allied Equipment
The Allied Plan
The Battle
Phase One – The Break In
Phase Two - The Dogfight – 25 October-1 November
Phase Three - Operation Supercharge – 2 November onwards
The Pursuit
Conclusion
The second battle of El Alamein (23 October-4 November 1942) was Montgomery's first great offensive victory, and forced Rommel to begin a retreat that didn't end until he had reached the Mareth Line in Tunisia, ending any last Axis hopes of conquering Egypt (North African Campaign).
At the start of 1942 Rommel had been pushed back to El Algeila, at the western end of Cyrenaica, but the pursuing British forces were badly stretched. When Rommel launched a minor raid to improve his position he discovered how weak the British position was, and turned the raid into a major offensive (Rommel's Second Offensive, 21 January-4 February 1942). The British retreat ended at Gazala, just to the west of Tobruk, where they were able to take advantage existing Axis fortifications to stop Rommel's advance. A period of stability then followed, as both sides prepared for their next offensive. Rommel moved first, and the battle of Gazala (26 May-14 June 1942) turned into one of his most significant victories. After some hard fighting the British were forced in a fairly chaotic retreat back towards Egypt. General Auchinleck, the Commander-in-Chief in the Middle East, took command of the Eighth Army soon after the end of the battle, but his first time in command began with a further defeat at Mersa Matruh (27-28 June 1942), until then seen as the last defensive position before the Nile Delta. Fortunately a new defensive position was already under construction at El Alamein, but it was by no means complete when Rommel launched his first attack on it (1-5 July). By now Rommel's army was also exhausted, and skilful handling of his troops on Auchinleck's part meant that the attack failed. The fighting continued for the rest of July, and was largely dominated by a series of British counterattacks, which also made little if any progress. This first battle of El Alamein (1-27 July 1942) was a clear British victory, and stopped Rommel's victorious march into Cairo (Mussolini had been so confident that he had flown to Africa ready for his victory march in Cairo, but then had to fly home on 20 July when it became clear that the attacks had failed).
Auchinleck's time in command soon came to an end. Churchill visited the Middle East on his way to a meeting with Stalin in Moscow. He had decided to change the command structure in the Middle East, although at first Auchinleck was to retain his position as commander-in-chief. After a number of alternative plans came to nothing, Auchinleck was replaced by the partnership of General Alexander as Commander-in-Chief in the Middle East and General Montgomery as commander of the Eighth Army. Montgomery took command on 13 August, and only two weeks later was able to stop Rommel's last offensive in Egypt (Battle of Alam Halfa, 31 August-7 September 1942).
Once again both sides settled down to prepare for the next battle. Although one of the reasons that Auchinleck had been removed was his insistence that he wouldn't be ready to go onto the offensive until mid-September, Montgomery insisted on a longer period of preparation. He aimed at the October full moon, and a start date of 23 October. Although this is portrayed as a long gap, Montgomery was still committing to launching a major offensive only two months after taking command of a strange army and six weeks after the end of Rommel's last offensive.
Montgomery had an immediate impact on the Eighth Army. He visited most of his units, and explained each of his plans to all of his senior officers (down to lieutenant-colonel), so that they all understood their role in each of his battles. He also spoke to large numbers of the men, establishing a more direct connection with them than his predecessors (not everyone who saw Montgomery was impressed with him, but the overall impact was undoubtable). Publicly he announced that there would be no thought of any further retreat (although work to defend the Nile did actually continue). The mood in the army changed, as large parts of it began to share Montgomery's confidence that Rommel could actually be defeated in an offensive battle, not just resisted on the defensive.
Montgomery also confirmed a number of Auchinleck's changes and decisions. The use of 'boxes', isolated strongpoints in the desert, was to be abandoned. 'Jock' columns, small mixed arms groups that had been useful earlier in the Desert War, were largely abandoned as they tended to produce forces that were too small to deal with Rommel's strong formations. Artillery control was to be centralised. The 'cavalry charge' method of tank attack was to end, and where possible Rommel's tanks were to be lured forwards and hit by anti-tank guns and hull-down Allied tanks. Auchinleck had also approved a number of deception operations, and these continued under Montgomery.
Rommel had fourteen divisions under his command in October 1942. This included two German armoured divisions (15 Panzer and 21 Panzer), two Italian armoured divisions (Littorio and Ariete), two German infantry divisions (90th Light and 164th Infantry) and eight Italian infantry divisions (including Trento, Bologna, Brescia, Folgore (parachute), Pavia and Trieste (mobile division)). The Pistoria division occurred the Bardia position at the time of the battle, while the Giovani Fascisti (Young Fascists) were mainly based away at the oasis of Siwa, deep in the desert, so only six of the Italian infantry divisions fought at El Alamein. He also had four battalions of paratroops, formed into the Ramcke Parachute Brigade.
Rommel was badly outnumbered in armour, and for once couldn't make up for that with quality. His best tanks were 88 Panzer III 'specials' and 30 Panzer IV 'specials', both armed with long guns that were effective anti-tank weapons (especially the long 75mm gun of the Panzer IV. As well as these 118 'specials' he had 85 Panzer IIIs with a shorter anti-tank gun and 8 of the older Panzer IV infantry support tanks with the short 75mm gun, for a total of 211 effective German tanks. He also had 278 Italian tanks, mainly the obsolescent M13/40.
Rommel had 475 field and medium artillery guns (200 German and 275 Italian), 300 Italian anti-tank guns and 290 50mm, 68 76.2mm and 86 of the dual purpose 88mm anti-aircraft and anti-tank weapons.
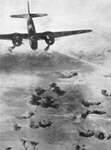
In the air the two sides were more numerically balanced, with around 350 aircraft serviceable on the German side. However the German fighter tactics worked against them at this point, with many of the aces focusing on fighter-vs-fighter battles and achieving high personal scores, while ignoring the far more significant Allied bombers.
One of the biggest problems on the Axis side was that Rommel was unwell, having pushed himself rather too much during the desert campaign. On 16 September General Georg Stumme arrived to serve as his second in command, and this allowed Rommel to go on sick leave on 23 September. During this period he visited Hitler in East Prussia, where he was given his Field Marshal's baton. He was still on sick leave when the battle broke out, leaving Stumme in command. The situation got worse when Stumme died of a heart attack early in the battle, leaving the army without a commander until General von Thoma took over.
Montgomery's careful build-up also gave Rommel time to construct a strong defensive line from the coast to the Qattara Depression, secure in the knowledge that he couldn't be outflanked to the south. The Qattara Depression is often mentioned in accounts of the earlier British defensive battles, but even at Alam Halfa the defensive line only ran about half way across the gap, and Rommel was able to begin that battle with an attempt to outflank the main British line. It would actually be Rommel who benefited from having no open flanks. His army constructed a massive minefield, containing about half a million mines in total (the 'Devil's Gardens'). Small outposts were scattered around the minefield, with dogs to give warning of any intruders. The infantry defended a deep defensive position just behind the minefields, anything up to 1,000-3,000m wide. The Panzers were located further to the rear as a mobile reserve.
Rommel's defensive plan mixed German and Italian troops, a process known as 'corseting' to the British. The Italian XXI Corps (Trento and Bologna) was posted in the northern part of the line, and the X Corps in the south (Brescia, Folgore and Pavia).
At the very north of the line was part of Ramcke's paratroop brigade and a force of elite Italian Bersaglieri.
From the railway line to Kidney Ridge (Hill 28 to Rommel's men), covering the area of Miteiriya Ridge was covered by the 164th Division and Trento.
Kidney Ridge was actually a slight depression in the desert, but with raised lips. On British maps it appeared as a kidney shaped contour line, thus its name.
Bologna and more of Ramcke's men covered the area between Miteiriya Ridge and Ruweisat Ridge.
The area between Ruweisat Ridge and Munassib was covered by Brescia and two paratroop battalions recently arrived from Crete.
From Munassib to the area just north of the Qatet el Himeimat was covered by the elite Folgore parachute division.
The Pavia division covered the area around Himeimat.
Finally the gap between Himeimat and the edge of the Qattara Depression was covered by Reconnaissance Battalion 33 and the Keil (or Kielh) Combat Group.
The armoured troops of the Afrika Korps and the Italian XX Corps were split between the north and south of the line. 15 Panzer and Littorio were in the north, 21 Panzer and Ariete were in the south.
The only reserves in the immediate area were the 90th Light Division and the Trieste division, which were posted further west along the coast, where they could also guard against any Allied amphibious attack.
Montgomery's main attacks, at the northern end of the line, would hit the 164th Division, Trento and some of Ramcke's paratroops.
The Allies had nine infantry and two armoured divisions, all of which were at full strength.
XXX Corps (Leese)
XXX Corps was posted on the Allied right. From right to left it contained the 9th Australian, 51st Highland, 2nd New Zealand, 1st South African and 4th Indian Divisions. The first four were to take part in the initial attack.
The 9th Australian Division contained the 20th, 24th and 26th Australian Infantry Brigades.
The 51st Highland Division contained the 152nd, 153rd and 154th Infantry Brigades.
The 2nd New Zealand Division contained the 5th and 6th New Zealand Brigades and the 9th Armoured Brigade.
The 1st South African Division contained the 1st, 2nd and 3rd South African Brigades.
The 4th Indian Division contained the 5th, 7th and 161st Indian Infantry Brigades.
The Corps also included the 23rd Armoured Brigade,
XIII Corps (Horrocks)
XIII Corps was posted on the Allied left. It contained the 7th Armoured Division, 44th Infantry Division (on the left) and 50th Infantry Division on the right.
7th Armoured Division had the 22nd Armoured Brigade, transferred from the 1st Armoured Division before the battle, and the 4th Armoured Brigade, which had been with it since the start of the Desert War.
The 44th Infantry division contained the 131st, 132nd and 133rd Infantry Brigades.
The 50th Infantry division contained the 69th and 151th Infantry Brigades and the 1st Greek Infantry Brigade.
The Corps also contained the 1st and 2nd Free French Groups.
X Corps (Lumsden)
X Corps contained the 1st Armoured Division and 10th Armoured Division during the second battle of El Alamein, with three armoured brigades between them.
The 1st Armoured Division only commanded one armoured brigade, the 2nd, during the battle. Its second brigade, the 22nd, was transferred to the 7th Armoured Division before the battle. The division's infantry was provided by the 7th Motorised Brigade.
The 10th Armoured Division contained the 8th and 24th Armoured Brigades during the battle. Its 9th Armoured Brigade was placed under the command of the 2nd New Zealand Division. Its infantry was provided by the 133th Lorried Infantry Brigade.
The 8th Armoured Division had moved to Egypt in 1942, but was split up before the battle. The 23rd Armoured Brigade was used in the infantry support role, while the 24th Armoured Brigade was given to the 10th Armoured Division.
The Allies massively outnumbered Rommel in tanks, with as many as 1,200 of various types.
Just over half of the Eighth Army's tanks were American – 385 M4 Shermans, 246 M3 Grants and 167 M3 Stuart light tanks (with 252 Shermans and 170 Grants available with the units committed at the start of the battle). The Shermans and Grants were both armed with a 75mm gun capable of firing a good anti-tank shell and an excellent high explosive shell, and could carry out indirect fire missions. The Sherman could also be placed into hull-down positions, making them much less vulnerable to enemy fire than the Grant.
The British made tanks included around 100 Crusader IIIs with a 6-pounder gun (57mm). This was a decent anti-tank gun, but lacked a good HE shell and was still unreliable. There were more of the older 2-pounder crusader, and nearly 200 Valentines.
The 1st (Army) Tank Brigade operated two detachments of Scorpion mine clearing tanks.
The Artillery included 100 M7 Priests, 830 25-pounder field guns and 750 6-pounder anti-tank guns.
The Americans had made a great effort to provide their latest tank, the M4 Sherman, to the British. At first President Roosevelt had offered to send the US 2nd Armored Division, but it soon became clear that this unit wouldn't arrive in time. Instead 300 M4A1s and M4A2s were withdrawn from US training units and shipped to the Mediterranean (along with 100 of the M7 105mm GMC (Priest). One ship was sunk by a U-boat attack, but it was replaced by a fast transport carrying another 52 Shermans. By 11 September the British in Egypt had received 318 Shermans. Of these 285 were issued to the Eighth Army in time for the start of the battle. The Sherman was a great improvement over the Grant, carrying its main gun in a fully rotating turret instead of in the hull, and in late 1942 was one of the best tanks in the world.
Overall Montgomery had around 200,000 men.
In the Air British have support of US Desert Air Force, under direct command of General Brereton. The Allies had around 530 serviceable aircraft at the start of the battle, including nine squadrons of Hurricanes. The Allied fighters were generally inferior to the German fighters, but Allied air power was better used.
Montgomery's first plan was for two flanks attacks. XXX Corps (General Leese) was to attack in the north and break two gaps in the line. X Corps (Lumsden) would pass through the gaps, take up defensive positions and defeat the inevitable Axis armoured counterattacks. In the south XIII Corps (Horrocks) was to mount diversionary attacks to keep some of the Axis armoured pinned down in the south, while 7th Armoured Division was kept ready for a 'destructive pursuit'. The emphasis here was on the tank battle, which would be followed by the destruction of the isolated Axis infantry.
Montgomery was worried that this plan was too ambitious for his troops, and on 6 October replaced it with a new plan. A deception campaign would attempt to convince the Germans that the main attack would come in the south. XIII Corps would still carry out its diversionary attacks, to keep 21 Panzer pinned down in the south. XXX Corps would drive two corridor through the enemy lines. X Corps would deploy through the gaps and take up a defensive position in a less advanced position than in the first plan. XXX Corps would begin a 'crumbling' process, destroying the Axis infantry and leaving Rommel's armour dangerously isolated. The armour's role would be to protect the infantry during this phase of the battle. Any breakout would follow the destruction of the infantry. The attack would be carried out on the night of 23-24 October, and Montgomery expected the battle to take about ten days.
The two plans weren't actually terribly different. The key chance was the order in which Rommel's men were to be defeated. In the first plan the aim was to destroy the Axis armour first, and then mop up the isolated armour. In the second plan the aim was to destroy the Axis infantry first, and then destroy the isolated armour.
The attack was supported by two deception plans, both of which aimed to convince the Germans that the attack wouldn't come before mid-November, and that the main attack would come in the south. Brigade Dudley Clarke's 'A Force' was responsible for these plans. Operation Treatment was the strategic level plan, and involved things such as arranging a high level conference to be held in Iran in late October. Operation Bertram was the tactical level plan, and involved the creation of dummy equipment, hiding the movement of units and the construction of a false water pipe, heading for the southern flank. How much impact this all had is hard to tell, but Rommel and his subordinates did keep half of their armour on the southern half of the front until several days into the battle.
There was also a determined effort to win air superiority, and to cut Rommel's supply lines. A number of key fuel tankers were sunk in the days before the battle, and during the fighting itself, greatly reducing Rommel's options.
The move to the assembly areas was completed on the night of 22-23 October. By first light on 23 October all of the attacking units were in place, dug in and camouflaged, and were able to rest for the day, undetected by the Germans.
The first part of the battle was given the codename Operation Lightfoot, partly because it would be led by the infantry, who would be too light on their feet to trigger anti-tank mines. However the minefield also contained anti-personnel mines, so was still a significant barrier.
The artillery barrage started at 2140 hours on 23 October. It is normally described as a 1,000 gun barrage, although probably actually involved nearer to 800 medium and field guns. This was a carefully planned bombardment, with some of the guns dedicated to counter-battery fire and others used to create a creeping barrage to support the infantry attack.
Next to move was the infantry. There were attacks along long parts of the line.
On the coastal flank an Australian brigade from 9th Australian Division made a feint north of Tel el Eisa.
To the south of Tel el Eisa the main 9th Australian Division attack went in to the south of Tel el Eisa, with the 51st Highland Division to their south. These two divisions were to cover the clearance of the 1st Armoured Division corridor.
Next in line was the 2nd New Zealand Division, attacking towards Miteirya Ridge, with the 1st South African Division on their left. These two divisions were to cover the 10th Armoured Division corridor.
To their south the 4th Indian Division carried out a raid from Ruweisat Ridge.
On the XIII Corps front two attacks were launched on the 7th Division front in the area north of Himeimat, while the 1st Fighting French Brigade was to attack around the southern side of Himeimat.
In the main assault the Australians on the right and the South Africans on the left both reached their objectives. The two central columns were less successful. The 51st Division advanced along six attack lanes, but only the left-hand column, the 5th Cameron Highlands and 7th Black Watch, reached their final objectives. The other columns made good progress, but ended up short of the 'blue line'. The 2nd New Zealand Division made good progress. By the morning the infantry had reached their target positions.
The most important part of the first night's plan was the minesweeping. A great deal of effort had gone into improving minesweeping techniques, but the plan was still rather ambitious. The idea had been to clear columns all the way through the minefields, in order to allow the armour to be established on the enemy side by dawn. In the northern corridor one lane kept up with the advancing Australians, while in the southern corridor four reached the Miteirya Ridge.
The armour began to move at 0200 hours on 24 October. The leading 2nd Armoured Brigade in the 1st Armoured Division was still in the corridor at dawn, and had to disperse into the minefield to avoid being battered by enemy gunfire. Luckily they had reached a dummy minefield. They now faced west towards Kidney Ridge, an area of slightly higher group occupied by German guns.
The 9th Armoured Brigade led the 10th Armoured Division advance. On this front a number of armoured units reached the end of the minefields, but resistance was heavy, and the attack over Miteirya Ridge wasn't a success. At dawn most of the surviving tanks were in hull down positions on the northern side of the ridge. The 10th Armoured Division commander, Major-General Alex Gatehouse, decided to spend the day in defensive positions, to protect the infantry during the 'crumbling' phase.
The southern feint involved the 131st Lorried Infantry Brigade, which was to break a gap in two lines of minefield (January and February). The 44th Reconnaissance Regiment would pass though this gap, followed by the 22nd Armoured Brigade. Their aim wasn't to make a breakthrough, but to keep 21 Panzer pinned down in the south. This advance was opposed by the Folgore parachute division, and the Italians put up a determined fight. The advancing British columns, limited to four corridors in the minefield, suffered heavy losses. The attackers got through the first minefield, but were stopped in the gap between the two.
In the far south the Free French managed to reach the high ground around Himeimat, but were then forced to retreat by German counterattack.
Daylight, 24 October
At daylight on 24 October the 2nd Armoured Brigade was still in the minefield. Fortunately it was equipped with Shermans, Grants and Priests, so was able to engage in an artillery duel with the Germans, something that wasn't possible with British tanks.
During the morning the British commanders examined the situation. Good progress had been made, but not as much as Montgomery had expected. Montgomery and Leese agreed a plan for continued infantry attacks, supported by three armoured brigades.
The morning saw the first significant German counterattack, by two Kampfgruppen from 15 Panzer and part of Littorio. This produced the Sherman's combat debut in North Africa, and the new tank lived up to expectations. The hull down turret armed Shermans were able to deal with the German tanks at much longer range than earlier British tanks, and the attack was repulsed. A new method of dealing with the 88s was also evolving, taking advantage of their duel purpose role. If they were in use as anti-aircraft guns then they were vulnerable to tank and artillery fire.
After ordering the counterattack General Stumme visited the 164th Infantry, on his left. He then went forward to far forward, and his car came under fire. Colonel Buechtring, the only staff officer with him was shot through the head and killed. Stumme jumped out of his car to take cover. The car was turned around, and Stumme attempted to cling onto the side during the ride to safety. He then suffered a fatal heart attack and fell off the car. He was reported as missing, presumed captured, and for several hours the army was without an active commander. General Wilhelm von Thoma, the commander of the Afrika Korps then took over. In the meantime Rommel had been contacted in Germany to see if he was fit to return.
Late in the day 10th Armoured Division launched an attack over the Miteiriya Ridge, but without much luck. The ridge was heavily mined, and the attackers suffered heavy losses.
The Dogfight – 25 October-1 November
25 October
By 0200 on the morning of 25 October Montgomery's chief of staff, General Guingand, began to worry that the corps and divisional commanders were considering halting the attack. He woke Montgomery, and an early morning meeting involving Montgomery, Guingand, Leese and Lumsden followed. Montgomery insisted that the armoured units should continue to push on, and remain on the enemy side of the minefield. This determination probably played a major part in the Allied victory – during the day the two armoured divisions made contact, and the New Zealanders passed through the minefields and attacked south-west. This provided a number of counterattacks by 15 Panzer, which were repulsed at some cost to the Germans. By the morning of 26 October 15 Panzer only had thirty-two tanks left.
Montgomery now demonstrated his flexible command style. The 'crumbling' attacks on the New Zealand front were proving to be very expensive. There was now an alternative – the Australian advance had left part of the 164th Infantry and Ramcke's paratroops dangerously isolated in a salient on the coast. Montgomery decided to switch his main effort to this front. The Australians were ordered to attack north, behind the Axis minefield, to cut off the troops in the salient. The 1st Armoured Division was to push west to cut the Rahman track, which ran south from Sidi Abd el Rahman behind the Axis lines.
In the south Montgomery agreed to cancel the XIII Corps attack, which was now making no progress. At first he insisted that the tanks stayed between the two mine fields, but later in the day Montgomery relented and the leading troops were allowed to withdraw.
On the Axis side Rommel reached his HQ during the evening of 25 October, and at 23.25 issued a morale boosting but simple order - 'I have taken over the army again. Rommel'. Rommel then decided to continue with the costly armoured counterattacks, ordering 15 Panzer and Littorio to attack on the following day, and summoning 90th Light Division and Trieste up to the front.
On the night of 25-26 October the Australians began their new attack. This began with a very important success – the capture of Point 29, a key part of the German defensive line. The area was defended by Panzergrenadier-Regiment 125, but the German defence was undermined when the Australians captured the regimental command along with sketch plans of the defensive minefields just before the attack. The attack was supported by eight artillery regiments,
26 October
The first Axis counterattack began at dawn. Despite the support of every available artillery gun, 15 Panzer and Littorio were repulsed easily. Larger scale attacks later in the day also failed. Rommel decided to summon the southern armoured group north to take part in what was clearly the key front. 21 panzer and Ariete wouldn't arrive until the following day.
On the original main line of attack the New Zealanders and South Africans made limited progress across Miteirya Ridge, advancing about 1,000 yards. Montgomery decided that this was not longer worth the cost, and decided to reorganise his lines. That evening the New Zealanders were ordered put of the line to regroup and rest before the next stage of the battle. The South Africans and Indians moved north to fill the gap. 10th Armoured Division and 9th Armoured Brigades were also to join this new reserve, while plans were put in place to move the 7th Armoured Division north if 21 Panzer moved. General Freyberg, commander of the New Zealand division, was given the task of planning the new attack. Freyberg insisted that he needed reinforcements, and was given the British 151st and 152nd Infantry Brigades. At this stage the new attack was to begin on the night of 31 October-1 November. Eventually Operation Supercharge, as it became known, would begin early on 2 November.
On the night of 26-27 October the 7th Motor Brigade (1st Armoured Division) attacked towards Kidney Ridge, aiming at positions 'Snipe' and 'Woodcock', to the south-west and north-west of the ridge. The infantry successfully advanced some way, and occupied positions that were believed to be 'Snipe' and 'Woodcock'.
27 October
During the day the German armour attacked the new British positions around Kidney Ridge. The first attack was launched by 15 Panzer and Littorio, and was repelled by the 6-pounder anti-tank guns. The position continued to come under attack all day, and also involved 21 Panzer. The British held on all day.
At 1400 hours Montgomery held a command conference in which his new plan was explained. XIII Corps was to move 7th Armoured Division north, while the Australian attack north was to be continued.
28 October
On 28 October the 21 Panzer assembly area was detected before they could attack, and hit by the Desert Air Force.
On the night of 28-29 October the Australians attacked again, and almost reached the road between Sidi Abd el Rahman and Tell el Eisa, and thus isolating the German salient. This attack was supported by an artillery bombardment described by the Germans as the 'heaviest artillery fire which has so far been experienced', and reached its objectives despite suffering heavy losses,
29 October
The key development on 29 October was the emergence of the final version of Operation Supercharge. Montgomery's original plan was to attack along the coast road. XXX Corps was to attack along the coast road and railway line, heading for Sidi Abd el Rahman, with X Corps protecting their left flank. During the morning Montgomery had to entertain a delegation from Cairo, made up of General Alexander, his chief of staff General McCreery, and Minister of State Casey, sent at the prompting of General Brooke in London, who wanted to make sure that the battle was progressing well.
This was actually what Rommel was expecting Montgomery to do, and on the same day he moved the 90th Light Division to the coast, placed 21 Panzer in reserve north of Tel el Aqqaqir (west of Kidney Ridge), and Trieste a little further south. Luckily General Guingand, Montgomery's very able chief of staff, was worried about the northern attack, and gathered support for a more southerly attack from McCreery and the Eighth Army's Chief of Intelligence, Brigadier Edgar 'Bill' Williams. Montgomery was quickly convinced, and the plan was modified accordingly. Operation Supercharge would now be launched in the area north of Kidney Ridge, heading towards Tel el Aqqaqir.
During the day Rommel launched unsuccessful counterattacks against the Australians, drawing ever more of his troops to the northern end of the line.
30 October
On the night of 30-31 October the Australians attacked north towards the coast, threatening to cut off part of the German 164th Infantry Division (Panzergrenadier-Regiment 125). Despite a great deal of muddle in the nighttime attack, the Australians broke through between the 164th Infantry and the Trento division.
31 October
Rommel reacted to the threat to the 164th with a major counterattack. 15 Panzer, 21 Panzer and Ariete were to attack south of the road, while the 90th Light Division and Trieste attacked along the road. After some heavy fighting the Axis forces managed to rescue Panzergrenadier-Regiment 125, but once again this attack had shifted the focus of Rommel's attention north, and his armoured units were now concentrated to the north of the target area for Supercharge. The Australians fought a determined defensive battle, and managed to hold onto much of the ground they had captured, so Rommel was unable to redistribute his troops.
Operation Supercharge – 2 November onwards
The plan for Operation Supercharge was for the 151st Infantry Brigade (Durham Light Infantry) and 152nd Infantry Brigade (Highland) to lead the attack, supported by 300 25-pounders and XXX Corps medium artillery and the Valentine tanks of 8th and 50th RTR (23rd Armoured Brigade). The attack was to be made on a 4,000 yard wide front. The 9th Armoured Brigade was to break through the enemy gun line and advance 2,000 yards past it. The New Zealand infantry was to be kept in reserve for the pursuit. The 1st Armoured Division, with the 2nd and 8th Armoured Brigades and 7th Motor Brigade would lead the breakout into open country behind the Axis lines.
2 November
The artillery barrage before Supercharge was the most intense of the Desert War so far. The flanks of the infantry advance were marked by Bofors guns that fired tracer along the line every few minutes, and smoke bombs were fired to indicate that the barrage was about to advance.
The advance began at 0100 hours on 2 November. The two infantry brigades advanced to their objectives, with most resistance on the 151st Brigade front. The 9th Armoured Brigade attack was less successful – the brigade only had 94 working tanks at the start of the attack, and they advanced too fast for the artillery barrage. This attack ran into the German gun line, and many of the tanks were destroyed. The 1st Armoured Division was somewhat delayed, and arrived late, but by 0700 hours the 2nd Armoured Brigade had entered the battle. Rommel sent in a counterattack using 15 Panzer and 21 Panzer, attacking from the north and south of the breach in the lines, but the British radio interception service overheard these plans. 2nd Armoured Brigade took up a defensive position and 8th Armoured Brigade acted as a mobile reserve, and in the resulting tank battle the Germans lost around 70 tanks.
During the evening Rommel received more bad news. General Thoma informed him that the Afrika Korps would only have 35 tanks running on 3 November, and his artillery commander reported that ammo was running short. Although an Allied breakthrough had been stopped for the moment, Rommel realised that he needed to withdraw while he could. He sent a coded message to Berlin reported on the terrible state of his army, and stating that he would probably only be able to extricate fragments of his forces. This message was intercepted and decoded by Ultra, and the news helped bolster the morale of the Allied high command. Rommel then issued the first orders for a retreat, and the infantry began to move out of its positions late on 2 November.
Crossed messages now contributed to the scale of the Axis defeat. Hitler drafted a 'no retreat' order in response to Rommel's earlier report. This message didn't reach Rommel until 3 November. In the meantime Rommel sent off a copy of his orders for the retreat.
Late in the day the 51st Highland Division attacked southwest from the new salient. The 2nd Seaforth Highlands and 5th Royal Sussexs made good progress, encouraging General Lumsden to order a new attack by X Corps. This began early on 3 November, and this also made some gains, but didn’t quite break through the German lines,.
3 November
For most of 3 November the British advance was held up by the thin line of German anti-tank guns, supported by the few remaining tanks, while Rommel's retreat continued. However in the mid afternoon Hitler's 'no retreat' message arrived, and Rommel decided to obey at least part of the order. The Afrika Korps was allowed to retreat to a new position ten miles east of El Daba, on the coast, while the infantry was ordered to stand and fight
4 November
The Axis line was finally cracked on 4 November. The key attack was made by the 1/4th Essex and 4/6th Rajputana Rifles from the 5th Indian Brigade. This attack was supported by 350 guns, and broke a hole in the German lines. The 7th Argyll & Sutherland Highlanders made a followup attack and captured Tel el Aqqaqir, and then the 1st Armoured Division passed through the hole and began the longed for advance. They quickly ran into the rearguard of the German army, under von Thoma, but by noon this force had been defeated and von Thoma taken prisoner. Elsewhere the Italian armour held up the 7th Armoured Division, but at great cost. By the end of the day the Italian XX Corps had been destroyed, but they had delayed the British pursuit, and allowed the survivors of the German mobile divisions to escape west.
At 1530 hours Rommel finally ordered a general retreat to a new line near Fuka. Later that day Hitler relented, and permitted Rommel to do whatever was necessary. This order meant that the less mobile Italian infantry and German paratroopers were trapped in their positions, lacking motor transport.
On 5 November Rommel attempted to stop at a new Fuka line, but this line was broken on the same day and Rommel ordered a full scale retreat. On the Allied side Montgomery hoped to cut Rommel off at Mersa Matruh or Fuka. X Corps was ordered to move to Mersa Matruh and the 2nd New Zealand Division to Fuka, while XIII Corps formed mobile columns which were used to round up the largely Italian formations that had been left on the battlefield. Montgomery's main concern at this point was to make sure that there wouldn't be any repeat of earlier disasters in western Cyrenaica – this time the advance would be well planned and well supported, and Rommel wouldn't be give the chance for any more dramatic successes.
By last light on 6 November the leading troops of XIII Corps were heading for Charing Cross, to the south-west of Mersa Matruh, in an attempt to cut off the retreat. Heavy rain then interfered, bogged down the pursing forces and grounded the Desert Air Force. This gave Rommel time to reorganise some of his scattered units.
On 7 November Rommel was still hoping to stop at Mersa Matruh. His men's morale was lifted by the arrival of part of General Ramcke's parachute brigade, which returned to the main army after a march across the desert, having already been recorded as lost. However on the same day Hitler sent a warning that the Allied might be about to land between Tobruk and Benghazi. This was triggered by the entry into the Mediterranean of the Allied convoys carrying the troops for Operation Torch, the invasion of French North Africa.
Operation Torch began on 8 November, and on the same day the news reached Rommel. This helped convince him that there was no point attempting to make a stand at Halfaya Pass, or anywhere in Cyrenaica. Instead he would carry out a single move to El Agheila. The pace would be dictated by the speed with which he could evacuate his supply bases. The Allied pursuit would be slowed by the skilful use of mines and booby traps.
On 9 November the last German troops (90th Light Division) evacuated Sidi Barrani, while the main part of Rommel's army headed past Halfaya Pass. Halfaya Pass itself was evacuated before dawn on 11 November.
On 12 November Tobruk was evacuated. The leading German troops reached Mersa el Brega and El Agheila, but the rest of the army was still some way to the east. The British took Tobruk on 13 November, and the airfield at Martuba on 15 November. On 19 November Rommel evacuated Benghazi, and on 20 November the British entered the port.
On 24 November Rommel met with Kesselring, Cavallero and Bastico at Marble Arch, the triumphal arch on the boundary between Tripolitania and Cyrenaica, where he was ordered to hold the El Agheila line. He would have much preferred to make a stand further to the west, but even an attempt to convince Hitler in person failed. Rommel flew back to Africa on 2 December, and was thus present at the start of the next battle. The battle of El Agheila (12-18 December 1942) saw Montgomery outflank Rommel's defensive position, and force him to resume his retreat. On 25 December the British captured Sirte and on 29 December they reached the Beurat Line, Rommel's next defensive position. Montgomery decided that an attack on this position would need four divisions and take up to ten days, so he paused to built up his supply dumps. By the time Montgomery was ready, Rommel had resumed his retreat. The British were now advancing into Tripolitania for the first time. They were at Homs by 20 January, and at 5am on 23 January the Eighth Army entered Tripoli, having advanced 1,400 miles in the three months since the start of the battle.
The victory at El Alamein came four days before the start of Operation Torch, giving Churchill the great Commonwealth victory that he so desired (admittedly won with a lot of American equipment). Four German and eight Italian divisions were eliminated as fighting units, and most of the Italian and German infantry were permanently lost. Most of the Axis survivors were part of the Panzer divisions and the German mobile infantry. Within six days of the end of the battle the British had captured almost 30,000 prisoners - 7,802 Germans and 22,071 Italians.
Montgomery described El Alamein as 'Rommel's first decisive defeat in battle' – although he had been forced to retreat after Operation Crusader that had more to do with supply issues than with a clear battlefield defeat, and Rommel had been rewarded with promotion to Field Marshal for his skilful retreat. This time there was no comeback for Rommel or the Afrika Korps. Although Montgomery is often criticised for his 'slow' pursuit after the battle, his troops advanced 1,400 miles in three months, and were never forced to retreat. Rommel played a part in the defensive campaign in Tunisia, and was even able to win one last victory at the Kasserine Pass, but the outcome of the African campaign was never in doubt after El Alamein and Operation Torch. In Britain El Alamein was treated as a major triumph, and Churchill ordered the church bells to be rung in celebration, the first time they had been heard since the outbreak of war.
 Rommel in his own words, ed. Dr John Pimlott.
Starts with his inter-war account of his First World War experiences, then moves on to the Second World War, with some material on the 1940 campaign and the defence of France, but with the largest section covering his famous campaigns in the desert of North Africa. Includes private letters, official reports and published works, giving us a range of Rommel’s public and private views(Read Full Review)
Rommel in his own words, ed. Dr John Pimlott.
Starts with his inter-war account of his First World War experiences, then moves on to the Second World War, with some material on the 1940 campaign and the defence of France, but with the largest section covering his famous campaigns in the desert of North Africa. Includes private letters, official reports and published works, giving us a range of Rommel’s public and private views(Read Full Review)
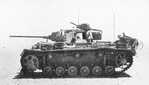 Panzer III Ausf L: Side View