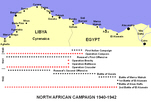
North African Campaign,
1940-1942
|
|
Operation Crusader (18 November-20 December 1941) was Rommel's first defeat in North Africa, and was a confused battle, won in part by a combination of Auchinleck's determination and Rommel's rash 'dash to the wire'.
Rommel first burst onto the North African scene in March 1941, when his First Offensive saw him push the British out of Cyrenaica and back to the Egyptian frontier. His only failure in this period came at Tobruk, where his initial attacks were repulsed. This marked the beginning of the eight month long siege of Tobruk.
Lifting the siege became something of an obsession for Churchill, and he applied pressure on General Wavell, the commander-in-chief in the Middle East, to make use of his increasingly strong army to attack Rommel. Over the summer Wavell tried twice (Operation Brevity, 15-16 May 1941 and Operation Battleaxe, 15-17 June 1941), but both attacks failed. Churchill finally lost faith with Wavell after Battleaxe, and at the end of June he was replaced by General Claude Auchinleck. Auchinleck came under just as much pressure to launch an offensive, but he insisted on waiting until mid-November, when a key railway and fuel line to the frontier would have been completed.
Allied Forces
The British attack would be carried out by the Eighth Army, commanded by General Sir Alan Cunningham. He had led the victorious Allied campaign in Italian East Africa, where he had coped well with difficult logistical problems. Operation Crusader suggested that he wasn't quite as well suited to commanding large scale armies.
Cunningham commanded a truly Commonwealth force, with Australian, Indian, New Zealand, South African and British troops.
The Eighth Army was split into two corps – XIII and XXX Corps.
XIII Corps, under General W. H.E. Godwin-Austen, was the main infantry force. It contained the New Zealand Division, the 4th Indian Division and the 1st Army Tank Brigade, equipped with around 130 Infantry Tanks.
XXX Corps, under General Lt General C.W.M. Norrie, was the armoured formation. It contained the famous 7th Armoured Division, 4th Armoured Brigade, the 1st South African Division (two brigades) and the 22 Guards Brigade, with around 500 tanks (a mix of cruiser tanks and M3 Stuart light tanks).
At the time of Operation Crusader the garrison of Tobruk was made up of 70th Division, the Polish Carpathian Brigade Group and the 32nd Army Tank Brigade, with 130 tanks, commanded by General R. Scobie.
There was also one independent brigade, the 29th Indian Infantry Brigade.
In all the Eighth Army had around 300 cruiser tanks, 170 infantry tanks and 300 M3 Stuart light tanks, as well as 600 artillery guns, 240 anti-aircraft guns and 900 mortars.
The British were operating quite a mix of tanks.
The 4th Armoured Brigade had 166 M3 Stuarts, which made its major combat debut during Crusader. The Stuart was known as the 'Honey' by its British tank crews because it was reliable and easy to operate, but it suffered heavy losses during Crusader, partly because of poor British tank tactics and partly because of its thin armour.
Most of the 7th Armoured Division and the 22nd Armoured Brigade used the Crusader cruiser tank. These were an improvement on earlier cruisers, but suffered from low reliability at this stage.
The 7th Hussars (part of 7th Armoured Brigade, 7th Armoured Division) were operating a mix of the old A10 Cruiser Tank Mk II and A13 Cruiser Tank Mk III.
In the 1st Army Tank Brigade 42nd RTR operated the Matilda II, while 8th RTR had a mix of Matildas and the new Valentine II and Valentine IV infantry tanks, which made their combat debut at Crusader.
In Tobruk the 4th RTR and D Squadron, 32nd Army Tank Brigade were using the Matilda II.
German Forces
Rommel commandeered a mixed Italian and German force, made up of his own Panzergruppe Afrika and the Italian XX Mobile Corps.
The most famous part of his army was the Afrika Korps, his original command. This contained two Panzer divisions – 15 Panzer and 21 Panzer (originally 5th Light Division when it came to Africa), 90th Light Division and the Italian Savona Division, and was commanded by General Cruewell. The two Panzer divisions were posted along the Via Balbia, between Tobruk and Bardia. 90th Light was on the eastern perimeter of Tobruk.
The second part of Panzergruppe Afrika was the Italian XXI Corps, which contained four infantry divisions (Pavia, Brescia, Trento and Bologna). One infantry division was manning the border fortifications, the other three were preparing for Rommel's planned assault on Tobruk.
The second major armoured formation was the Italian XX Mobile Corps, under General Gambara. This contained the Ariete Armoured division and Trieste motorised division.
Rommel had 438 tanks, split into 189 Italian medium tanks and 249 German tanks. The German tanks included 69 Panzer IIs, 136 Panzer IIIs (half of which were new models with the short 50mm gun and half older models with the original 37mm gun) and 31 Panzer IVs, at this point armed with a short 75mm howitzer.
Rommel wanted to take Tobruk before any further Allied offensive, as it posed a real threat to his left flank in any defensive battle. Access to the port would also have made his supply situation rather easier, and the main coast road, the Via Balbia, ran through the town. He had to fly to Rome to convince the Italians to allow the attack (he also met with his wife to celebrate his 50th birthday on 15 November). Eventually he was given permission for the attack, and the date was set for 23 November.
Allied Plan
Cunningham examined two alternative plans – a strike across the desert some way inland, heading for Jalo in western Cyrenaica, and then north to Benghazi, in order to outflank Rommel's entire army, or an attack towards Tobruk. The second alternative was chosen, as the Jalo attack would have left the 8th Army with a long vulnerable supply line across the desert, with Rommel's intact army to its north.
The detailed plan was for XIII Corps to contain the Axis border garrisons, who held Halfaya Pass, Fort Capuzzo and Sollum near the coast and Sidi Omar further inland, outflank this line to the south of Sidi Omar and then advance north on the Axis side of the frontier, isolating the garrisons. This force was then to turn west to join up with the Tobruk garrison.
XXX Corps was to try and destroy the German armour. It would cross the frontier to the south of the Axis defensive line, and advance north-west towards Tobruk. 4th Armoured Brigade would operate in the gap between the two corps, to protect XIII Corps against an tank attack. 7th Armoured Brigade, 22nd Armoured Brigade and the 1st South African Division would carry out the advance towards Tobruk. This would provoke an armoured battle, in which the British expected to be able to destroy Rommel's tanks. Once Rommel's armour had been defeated, he would be forced to retreat out of Cyrenaica.
The garrison of Tobruk was to wait until the Axis tank forces had been destroyed, and then attack the besieging forces and link up with the relief forces.
In the south the 29th Indian Infantry Brigade and 6th South African Armoured Car Regiment was to cross the desert to Jalo and act as if it was the advance guard of a larger attack on Rommel's supply lines.
Finally a commando raid was sent to try and kill Rommel by attacking Beda Littoria, which was believed to be the location of his headquarters. This raid, on the night of 17/18 November was a total disaster. On the night Rommel was in Athens, returning from his trip to Italy. He had already rejected Beda Littoria as being too far to the rear (it was 200 miles to the west of the front line). Lt Colonel G.C.T. Keyes, the commander of the attack, was killed during the fighting, and most of his force destroyed.
The Battle
The battle began well for the British. Heavy rain just before the operation grounded the Axis air reconnaissance forces, and by the end of the day the 7th Armoured Brigade had reached Gabr Seleh, half way to Tobruk, without running into any significant enemy forces. Rommel only returned to his headquarters early on 18 November, and at first he believed that the Allied forces that had been detected were only conducting a reconnaissance in force.
On the right the 3rd Royal Tank Regiment chased a force of armoured cars towards Sidi Azeiz (west of Bardia and behind the German frontier line). This force then returned to Gabr Seleh, but General Cruewell believed that it was the start of a major Allied attack and ordered 15 Panzer to move east to Sidi Azeiz engage the phantom force. 21 Panzer was ordered to move south-east to Sidi Omar, to cut off its line of retreat.
At the start of 19 November 22nd Armoured Brigade was moving towards Bir El Gubi, south of Tobruk, where it expected to find the Ariete division. 7th Armoured Brigade was heading to Sidi Rezegh and 4th Armoured Brigade was posted at Gabr Seleh. On the Axis side 15 Panzer and 21 Panzer sent some of the day moving east towards Sidi Azeiz and Sidi Omar, before Cruewell realised his mistake.
At about noon 22nd Armoured Brigade clashed with Ariete around Bir El Gubi, and came off slightly the worst of the two. The British lost around 40 tanks, the Italians only 34. The British attack failed, and the Italians remained in position at Bir El Gubi. In the centre 7th Armoured Brigade did much better, reaching Sidi Rezegh, ten miles from the Tobruk perimeter, and capturing the airfield at Sidi Rezegh intact. 4th Armoured Brigade, near Gabr Seleh, had a rather more difficult day. First the brigade was attacked by Stukas, and then at around 1600 hours a force of 80-90 tanks from XXI Panzer attacked from the east. By the time the Germans withdrew that evening, the 4th Armoured Brigade was down to 98 tanks, having lost 66 since the start of the battle. Back at the frontier XIII Corps had begun its move around the border fortifications, using part of the 7th Indian Brigade in place to mask the southern end of the line at Sidi Omar.
In order to exploit the success at Sidi Rezegh, reinforcements were ordered to join 7th Armoured Brigade. The 1st South Africa Division was ordered to sent one brigade there, while the rest of the division watched Ariete. 22nd Armoured was to move north towards Sidi Rezegh. Two battalions from the 7th Armoured Division support group, one regiment of anti-tank guns and one of field artillery were to move to Sidi Rezegh.
On 20 November Cunningham ordered the 22nd Armoured Brigade to move from the Allied left to the Allied right, to support the 4th Armoured Brigade at Gabr Seleh. At the same time the Tobruk garrison was ordered to try and break out on 21 November. As expected the German armour attacked 4th Armoured in some strength, and by the time the 22nd Armoured Brigade arrived the British had lost 26 tanks. Rommel was now convinced that he was facing a major offensive, and ordered Cruewell to move north-west from the Gabr Seleh area to attack the British positions around Sidi Rezegh.
Before dawn on 21 November 15 Panzer and 21 Panzer began the move north-west. The 4th and 22nd Armoured Brigades attempted to attack the rear of the German columns, but just ran into screens of 88mm guns and 50mm anti-tank guns and suffered heavy losses. The Germans then attacked 7th Armoured at Sidi Rezegh during the morning. In the meantime the garrison of Tobruk began its first sortie, and made a sizable dent in the siege lines. However the Panzer attack on 7th Armoured meant that the supporting operation from outside the lines didn’t take place as planned. Brigadier Davy, the British commander at Sidi Rezegh, split his force. The Support Group was used to try and continue the advance around Sidi Rezegh, while his armoured forces attempted to stop the Panzers. The attack towards Tobruk was defeated at El Duda, and the garrison stopped its sortie and prepared to defend the newly captured ground. The armoured battle raged for most of the day, and by the time it ended 7th Armoured Brigade only had 28 of its original 141 tanks left in running order. The Germans had also recaptured Sidi Rezegh airfield.
On the XIII Corps front things were still going well. The New Zealand Division advanced north, and by the end of the day it was in the area between Bardia, Sidi Azeiz and Fort Capuzzo, behind the left-rear of the Axis border fortifications, ready to move west towards Tobruk. At the other end of the line the 4th Indian Division prepared to attack Sidi Omar.
The morning of 22 November was comparatively quiet around Sidi Rezegh. This changed in the early afternoon, when the 5th South African Brigade attempted to capture part of the Sidi Rezegh ridge. This failed, and the Allies were then forced onto the defensive when 21 Panzer attacked from the north and north-west. Their attack hit 22nd Armoured Brigade and the remaining few tanks of 7th Armoured Brigade. 4th Armoured got to within five miles of this fight, but was unable to see which side was which in the dust and sand, and was unable to intervene. Both sides suffered heavy losses during the day, but the British were forced to retreat south-west towards 5th South African Brigade.
On the XIII Corps front part of Sidi Omar was captured, while the New Zealanders took Fort Capuzzo and blocked the road between Bardia and Tobruk.
15 Panzer didn't enter the battle until the night of 22/23 November. During 22 November it was following Rommel's orders to move around the southern flank of the British position ready to attack from the south west, but when 21 Panzer came under pressure, 15 Panzer moved west instead, and ran into the 4th Armoured Brigade in its overnight camp. The Germans broke into the camp, and captured a large number of tanks and other equipment. It would take an entire day for the brigade to come back into action.
23 November was 'Totensonntag' for the Germans – the Sunday of the Dead, when they remembered those lost during the First World War. Rommel used it to inflict another blow on XXX Corps. He ordered Cruewell to attack towards Bir El Gubi, and attempt to trap the British armour between his own formations and the Ariete division. Cruewell modified the plan. Part of 21 Panzer was left around the airfield at Sidi Rezegh, to provide a barrier to any Allied retreat. He then led his armour around the eastern flank of the XXX Corps position, with the intention of attacking from the south-east. During this move 15 Panzer ran into the 5th South African Brigade. Once again a confused fight broke out, but the Germans were reinforced by V Panzer Regiment (21 Panzer), and by the end of the day the 5th South Africa Brigade had lost two thirds of its men and all of its heavy equipment. By the end of the day the 7th Armoured Division was down to only 70 tanks, and it appeared to be in danger of being surrounded by Rommel.
Once again the XIII Corps front provided some good news, as the New Zealand Division captured Sollum barracks in the east and advanced onto the Sidi Rezegh ridge in the west, getting to within six miles of the airfield.
By now Cunningham was very concerned about the progress of the battle, and was seriously considering canceling the offensive. He asked Auchinleck to visit his HQ to decide what to do, and Auchinleck made the bold decision to continue with the attack. XIII Corp's infantry attack would now be the main thrust and the remaining tanks of XXX Corps would be used to protect that force against any armoured attack. This was a risky decision – the British had lost most of their cruiser tanks already, and although the Germans had also suffered heavily, their armoured formations were in better shape.
Luckily for Auchinleck, Rommel decided not to finish off XXX Corps on 24 November, but instead decided to launch his famous 'dash to the wire'. He believed that XXX Corps had already been defeated, and the time was right to complete the destruction of the 8th Army. He hoped to get around the southern flank of the border defences, cut the British supply lines, and defeat the New Zealand and Indian Divisions of XIII Corps.
The 'dash to the wire' began at around midday on 24 November. 15 Panzer and 21 Panzer were withdrawn from the main battle, and charged east along the Trigh el Abd, a track that led from Bir el Gubi to Bir Sheperzen on the frontier. Rommel led the attack in person, meaning that his army effectively lacked a commander at a key point in the battle. This advance caused a great deal of short term chaos on the Allied side, as the Germans passed through a series of British headquarters. They almost captured General Cunningham, whose Blenheim fighter bomber was shelled while taking off after a visit to XXX Corps HQ. They also passed through the tip of two massive Allied supply dumps just to the south of Gabr Saleh, half way to the frontier – these were each six square miles in size, and their capture might have allowed Rommel to continue with his raid.
By 1700 hours Rommel was at the frontier where he issued orders for the following day. 21 Panzer was to cross the frontier, head north-east to Halfaya Pass and Sollum. 15 Panzer was to advance north on the western side of the frontier, towards Sidi Azeiz. The Ariete and Trieste divisions were ordered to join the attack, although in the end only Ariete would move east.
That night Rommel was almost captured. He crossed the Frontier Wire, and headed towards Halfaya Pass in an unescorted car, which then broke down. By pure chance General Cruewell then drove past in his command vehicle, 'Mammoth', having also got lost east of the wire. Rommel and Cruewell then spent the night almost alone in British territory, and weren't able to find a way back across the wire until dawn on 25 November.
The dash to the wire began to run out of steam on 25 November. At the south end of the frontier defences V Panzer Regiment (21 Panzer) was ordered to attack Sidi Omar, now held by the 7th Indian Brigade. This attack was repulsed and the Germans lost 18 tanks. 15 Panzer ran short of supplies on the road north from Sidi Omar to Sidi Azeiz and made little progress. 21 Panzer, without its tanks, reached Halfaya, but was then unable to do anything. Ariete ran into part of the 1st South Africa Brigade just to the east of Bir el Gubi, and made very little progress. An attempt to attack the British railhead at Mis Heifa, further to the east, was abandoned after the column came under heavy attack by the Desert Air Force.
While Rommel was dashing around along the frontier, the New Zealanders continued to push west, taking the Luftwaffe airfield at Gambut and threatening Belhamed on the approaches to Tobruk. The absence of the German armour also meant that XXX Corps repair teams were able to get 70 damaged tanks back into action, altering the balance of strength.
On 26 November Auchinleck decided to replace General Cunningham as commander of the Eighth Army, in the belief that he had become too defensively minded. He was replaced by General Sir Neil Ritchie, until then Auchinleck's Deputy Chief of Staff, although Auchinleck took an increasingly hands on approach to the battle from this point.
On the same day the New Zealanders captured Belhamed and Sidi Rezegh, while the Torbuk garrison captured El Duda. That night (26-27 November) the two forces met up around El Duda, temporarily lifting the siege of Tobruk.
Further east 15 Panzer and 21 Panzer joined up around Bardia.
By 28 November Rommel realised that his dash to the wire had failed, and he ordered his armoured forces to move back west, advancing along the Trigh Capuzzo, a track that ran parallel to the main coast road. This triggered a clash with the survivors of 7th Armoured Brigade, then heading east towards the frontier to recover, while General von Ravenstein, commander of 21 Panzer, was captured by the 21st New Zealand Regiment.
Rommel's return triggered a period of intense combat in the area around El Duda, Sidi Rezegh and Belhamed. The New Zealanders managed to hold on for two days, but by 1 December were close to be overwhelmed. General Freyberg was forced to retreat, and the siege of Tobruk was re-established. However the garrison had been reinforced, and General Godwin-Austen's XIII Corps had moved into the perimeter, so Tobruk was by now as much an offensive base as a besieged fortress.
Ritchie and Rommel were both determined to go onto the offensive once again. Ritchie intended to advance west to El Adem, a key position to the south of Tobruk, but before this could be attempted an Axis strongpoint between Bir el Gubi and Tobruk needed to be eliminated. 11th Indian Brigade carried out a determined attack on this position on 3 December, but without success.
Rommel had no more luck on 3 December. He decided to sent two columns east to try and lift the pressure on his isolated frontier garrisons. These were each made up of an infantry battalion with artillery and anti-tank support (quite similar to the unsuccessful 'Jock' columns used by the British). One was to move along the Via Balbia, the other on the Trigh Capuzzo. Both of these columns were detected by Allied aircraft. The northern column was then ambushed and destroyed by the 5th New Zealand Brigade and the southern column by the 4th Indian Division.
On 4 December Rommel attempted to recapture El Duda, which had remained in British hands since the first relief of Tobruk. This attack failed, but Rommel wasn't ready to give up yet. His next plan was to attack the British forces at Bir el Gubi, which now posed a threat to his flank as he operated to the south-east of Tobruk. This attack was to involve 15 Panzer, 21 Panzer, Ariete and Trieste, and to begin on 5 December, but the Italians failed to arrive. A second attempt, on 6 December, also had to be abandoned after the Italians failed to appear. On the same day General Neumann-Silkow, commander of 15 Panzer, was mortally wounded, so both Panzer divisions had lost their commanders during the battle.
By now even Rommel could see that the battle was lost. His troops were running out of supplies, ammunition, tanks and even commanders, and so he decided that the time was right to retreat. On the night of 7/8 December the siege of Tobruk was lifted for the second and final time, and Rommel's men began a skilful retreat back to a new defensive position at Gazala.
Aftermath
Rommel's retreat left his remaining border garrisons isolated. Ritchie split his army, sending XXX Corps to deal with the border forts, while XIII Corps was given the task of pursuing Rommel.
Godwin-Austen planned to outflank Rommel's Gazala position. The Polish Brigade, the 4th Indian Division and the Support Group were to attack the Gazala line, while the 4th Armoured Brigade (now with 90 tanks) was to carry out the outflanking move. The attack was launched on 15 December, but soon ran out of steam. The outflanking movement also failed to live up to expectations, but Rommel was able to use it to convince his superiors that he needed to retreat out of Cyrenaica to reorganise his army. On the night of 16/17 December he pulled out of the Gazala positions and continued a skilful retreat back across Cyrenaica, ending up back at his original starting point around El Agheila by the end of the year. Too late the British realised that they had a chance to cut him off at Beda Fomm, but the only troops available for the cross- country trip weren't strong enough. On 19 December 15 Panzer received fifteen new tanks, and on 23 December they attacked the Coldstream Guards as they were approaching Beda Fomm. On 27 December the Afrika Korps proved that it still had teeth, attacking 22nd Armoured Brigade as it attempted to outflank the German line at Agedabia. This was repeated on 30 December, and in these two battles the British lost 60 tanks, the Germans only 14.
Back at the frontier Bardia was captured on 2 January, after an assault supported by medium bombers and fire from HMS Ajax and HMS Aphis. 8,000 prisoners were taken at Bardia. The garrison of Sollum surrendered on 12 January, and the final garrison, at Halfaya, on 17 January. By the middle of January the British had taken 33,000 prisoners, cleared Rommel out of Cyrenaica.
The British were unable to hold onto all of their gains. After a short pause to reorganise and resupply his battered forces Rommel went onto the offensive once again on 21 January 1942. His Second Offensive wasn’t quite as successful as the first, but he was still able to recapture Benghazi, Barce and Derna, and only stopped at the Gazala position, where the front line finally stabilised.
 Rommel in his own words, ed. Dr John Pimlott.
Starts with his inter-war account of his First World War experiences, then moves on to the Second World War, with some material on the 1940 campaign and the defence of France, but with the largest section covering his famous campaigns in the desert of North Africa. Includes private letters, official reports and published works, giving us a range of Rommel’s public and private views(Read Full Review)
Rommel in his own words, ed. Dr John Pimlott.
Starts with his inter-war account of his First World War experiences, then moves on to the Second World War, with some material on the 1940 campaign and the defence of France, but with the largest section covering his famous campaigns in the desert of North Africa. Includes private letters, official reports and published works, giving us a range of Rommel’s public and private views(Read Full Review)