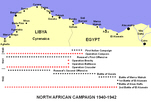
North African Campaign,
1940-1942
|
|
Allied Army
Axis Army
Rommel's Plan
The Battle
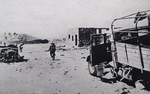
The battle of Gazala (26 May-14 June 1942) was Rommel's most impressive victory in North Africa, and saw him force the British to abandon the defences of the Gazala Line and retreat back towards the Egyptian frontier. In the aftermath of the battle he was also able to capture Tobruk, which had held out for eight months in 1941, but fell after the first serious attack in 1942.
Rommel had first established his reputation in the Western Desert in March-May 1941, when his First Offensive forced the British out of Cyrenaica (eastern Libya), and back across the Egyptian border. The only flaw in his victory was that Tobruk held out, leading to a prolonged siege (April-December 1941). During the summer of 1941 Rommel fought off two attempts to lift that siege (Operation Brevity and Operation Battleaxe), but he was unable to defeat the third attack, Operation Crusader (November-December 1941). He was forced to retreat back to his starting point of March 1941, on the western border of Cyrenaica, but just as in 1941 he almost immediately went onto the offensive. His Second Offensive caught the British off guard and overstretched, and he recaptured western Cyrenaica. This time the British were able to stop Rommel some way short of the Egyptian border (and of Tobruk), just to the west of Gazala. Four months of stalemate then followed, as both sides prepared for a new offensive.
The overall Allied commander in the Middle East was General Claude Auchinleck, who had replaced Wavell after the failure of Operation Battleaxe, and then pushed Rommel out of Cyrenaica during Operation Crusader. The 8th Army, which was responsible for the fighting in Libya, was commanded by General Ritchie.
The army was split into two corps. XXX Corps (Lt General C.W.M. Norrie), contained the 1st and 7th Armoured Divisions. Between them they had 167 M3 Grant medium tanks, 149 M3 Stuart light tanks and 257 Crusader cruiser tanks. The M3 Grant was a major addition to the Allied forces, finally giving them a tank armed with a 75mm gun, but the hull mounted position of the gun restricted its value somewhat. The divisions were split into three Armoured Brigade Groups, which were to include infantry and artillery elements. The corps also contained three motorised brigades and two infantry brigade groups (29th Indian Brigade Group and 1st Free French Brigade Group).
XIII Corps (Lt General W.H.E. Gott) contained most of the infantry. The corps contained 50th (Northumbrian) Division (Major General Ramsden), 1st South Africa Division (General D.H. Pienaar) and 2nd South Africa Division (General H.B. Klopper). In line with the British division of tanks into cruiser and infantry tanks, this corps contained the 1st and 32nd Army Tank Brigades, which had 166 Valentines and 110 Matilda IIs. The infantry divisions were each split into three Brigade Groups, which contained three infantry battalions, and in theory twenty four 25-pounder field guns and sixteen 6-pounder anti-tank guns).
In total the British had 100,000 men and 849 tanks in the front line, and another 145 Grants and Stuarts in reserve.
The Desert Air Force was still recovering from Operation Crusader, and only had 200 aircraft available to support the Gazala line.
The Allies were depending on the Gazala Line to repel any Axis attack. The basis of this line was a large minefield than ran south from the coast near Gazala for 43 miles. A series of defensive 'keeps' or 'boxes' had been built within the minefields, each intended to hold a brigade group and all of its supplies. A second line was under construction, running east frm Sidi Muftah (about half way down the main line) to El Adem, south of Tobruk. When Rommel attacked this line was incomplete. The idea was that any attack would be held up by the defensive boxes, allowing the tanks of XXX Corps to counterattack. At the right rear of the British position was the fortress of Tobruk, but the defences there had been run down, with many of the mines taken to build the main Gazala line.
Most of the boxes wouldn't play much of a role in the upcoming battle. The British assumed that Rommel would attack along the coastal road, and had concentrated their strength in that area. When he attacked around the southern flank of the line most of these boxes became largely obsolete, and the main fighting would take place on the southern half of the line. The brunt of this part of the fighting would thus fall on the 150th Brigade Group box and the Free French box at Bir Hakeim at the southern end of the line. Most of the British armour was scattered behind the southern half of the front, to deal with any outflanking move.
This position had a number of weaknesses. In the key southern part of the front the two boxes were too far apart to support each other, and large parts of the minefield between them wasn't covered by any artillery fire. The boxes were well supplied with food and water, but were short of 25-pounder ammunition, which was stockpiled at Tobruk. The idea of the mobile counterattack would force the British armour to leave any defensive positions and fight in the open desert, where it was not at its best. Finally the southern flank of the line was entirely open – there were no natural obstacles to prevent Rommel bypassing the line to the south.
Rommel's Panzerarmee Afrika was split into three. XX Italian Corps contained the Ariete armoured and Trieste motorised divisions.
Group Cruewell was a largely infantry force and contained the X Italian Corps (Pavia and Brescia divisions), XXI Italian Corps (Trento and Sabratha divisions), the HQ of the XV German Lorried Infantry Brigade and two light infantry regiments from the 90th Light Division (15th Infantry Rifle Brigade).
Finally the famous Afrika Korps (commanded by Lt. Gen Nehring) contained XV Panzer Division, XXXI Panzer Divison, the mobile elements of 90th Light Division and three Reconnaissance Battalions (Nos.3, 33 and 580).
Rommel had few tanks than the British, and for once he was also outclassed by the Allied tanks. His most effective tanks were 19 Panzer III 'specials', armed with the long L/60 50mm gun. He also had 232 of the older Panzer IIIs with the shorter L/42 50mm gun and forty Panzer IV, which at this date were armed with a short barrelled 75mm howitzer and were really infantry support tanks. Finally he had fifty Panzer IIs. This gave him 332 German tanks. He also had 228 Italian tanks, mainly M13/40 and M14/41 medium tanks, so in total he had 560 tanks in the front line.
In the air Rommel had the edge, with around 500 German and Italian aircraft available to support his attack.
In the spring of 1942 both sides were preparing to attack, although with different levels of enthusiasm. On the British side Churchill was always pushing his generals to go onto the offensive, often against their own instincts. In the spring of 1942 he believed that the Allies had enough of a numerical advantage over the Germans to launch an attack, and also wanted a British victory over the Germans before the Americans committed a significant number of troops to the war against Germany. There was also the probability of an Axis attack on Malta, and the only realistic way to help the defenders would be to occupy the airfields in western Cyrenaica. For once the Allied commanders, Auchinleck and Ritchie, were also fairly willing to take that risk, although not as quickly as Churchill would have liked. In the end Churchill had to threaten Auchinleck with dismissal before he would agree to an offensive in June.
On the Axis side Rommel wanted to launch a new offensive in Cyrenaica before the Allied advantage in tanks and manpower became too overwhelming, but the German and Italian High Commanders weren't so enthusiastic. Hitler was unwilling to divert any resources from the Eastern Front, while Rommel's relationship with the Italian High Command was poor. In the end Rommel had to visit Hitler in person in March in order to get permission to launch a new offensive. Permission was only finally granted on 1 May, and then only for an attack to break the Gazala Line and capture Tobruk. After that Rommel was to go onto the defensive. The overall offensive was given the codename Operation Theseus. Rommel's outflanking move was given the name Operation Venezia.
Rommel's plan was quite predictable, given his earlier attacks, but for some reason the British high commander didn't see it. He planned to use Cruewell's infantry to launch a feint against the main Gazala line. Once this was well underway he would lead the Afrika Korps on an outflanking attack which would pass to the south of Bir Hakeim. While the XX Italian Corps dealt with Bir Hakeim, the German armour would swing north and advance behind the British front line towards Acroma, half way between Tobruk and the main Gazala Line. This would provoke a tank battle in which the Allied armour would be destroyed. 90th Light Division would be sent east through El Adem heading for the coast east of Tobruk, to prevent reinforcements reaching the port from Egypt (as had happened before the siege of Tobruk in the previous year). Rommel would then crush the defences of Tobruk before the defenders could prepare for another siege. The bulk of the Allied infantry would be trapped in the Gazala position, unable to interfere further east. The main strike force was given enough fuel for 300 miles and enough supplies for 96 hours of operations. Fresh supplies were to come along the Trigh Capuzzo and Trigh el Abd, two tracks that Rommel believed passed through the Gazala line between the northern boxes and the isolated garrison of Bir Hakeim. This was the biggest weakness in Rommel's plan – he was unaware of the existence of the 150th Brigade Group Box, which blocked these tracks.
The battle began in the early afternoon of 26 May, with General Cruewell's attack on the northern part of the Gazala Line. This involved four Italian divisions and his German infantry brigade, and soon reached the Allied lines. Rommel's strike force formed up just to the south of Cruewell's attack, before late in the day it moved off to the south-east. The two Italian divisions (Trieste and Ariete) were on the left, the 90th Light Division on the right, and 15 Panzer and 21 Panzer in the centre. By the early morning of 27 May most of this force was in place to the south of Bir Hakeim, but the Trieste division got lost in the dark, veered off to the left and headed for the 150th Brigade Group box, as yet unknown to the Germans.
Rommel's main force wasn't advancing into empty space. The first clash came with the 3rd Indian Motorised Brigade, which was positioned to the south-east of Bir Hakeim. This was attacked by Ariete and 21 Panzer and scattered with the loss of 440 men. Ariete was then sent to attack the Bir Hakeim box. On the German right 90th Light ran into the 7th Motorised Brigade at Retma, fifteen miles further to the east. The British managed to escape to the east, heading for Bir el Gubi, but leaving the route to El Adem unguarded. The first British response ended badly. 4th Armoured Brigade, which was posted to the north of 7th Motorised, attempted to help the Indians, but ended up exposed to a flank attack by 15 Panzer. This time the fighting was more even, and the 75mm armed Grant came as a nasty surprise to the Germans, but the 4th Armoured Brigade ended up retreating to the north-east. Another column from 15 Panzer had some luck, finding the HQ of the 7th Armoured Division at Bir Beuid (where it had originally been protected by the two Armoured Brigades), and captured Major-General Messervy, the divisional commander, and most of his staff.
As the Germans moved north, they kept running into fresh British armoured formations. Next was 22nd Armoured Brigade (1st Armoured Division), but this formation ran into both German panzer divisions and was forced to retreat after losing 30 tanks. As the retreating 22nd Armoured moved back towards the Knightsbridge position (a British administrative centre on the Trigh Capuzzo track), the pursuing Germans were attacked from the east by the 2nd Armoured Brigade and from the west by the 1st Army Tank Brigade. The main thrust towards Knightsbridge was held up by this opposition. One column from 15 Panzer, operating on the German right, reached Bir Lefa, on the track running east from Knightsbridge, and 90th Light Division continued to push towards El Adem, but elsewhere the Ariete attack on Bir Hakeim failed, and the precious supply convoys were missing. By the end of the day Rommel may have lost up to one third of his tanks, and he was running short of fuel and water.
On 28 May Rommel continued to push north. 21 Panzer reached Commonwealth Keep, a smaller British position near the top of the escarpment that overlooked the coast road. Ariete, following the Germans north, ran into 2nd Armoured Brigade at Bir el Harmat, to the south of Knightsbridge, and had the worst of a hard fought battle. 90th Light's attack on El Adem was foiled by the 4th Armoured Brigade. By the end of the day Rommel was dangerously short of supplies, and apparently isolated on the wrong side of the Gazala line. This would have been a good time for a British counterattack, but Ritchie decided to wait and see.
The battle of Gazala showed Rommel at his best and at his worst. The overall plan was rash, and by accompanying the outflanking movement Rommel had cut himself off from his own Army HQ. His air support couldn't act, as they didn't know where their own forces were. Cruewell had no idea where his boss was, or what was happening in the Allied rear. However Rommel was also an inspirational leader. Late on 28 May he decided to concentrate his forces to the south-west of Knightsbridge, and he then left to try and find his supply convoys. During the night he found the vulnerable trucks, and personally led them north to bring vital supplies to the Afrika Korps.
29 May saw the start of a prolonged period of fighting in a shallow depression known as the 'Cauldron', between Knightsbridge and the 150th Brigade Group Box. During the day Rommel's four armoured divisions managed to concentrate in this area, despite some heavy fighting with 2nd and 22nd Armoured Brigades. An attempt by the Italian Sabratha Division to break through the Gazala Line was repulsed by 1st South African Division, so Rommel was still isolated. He also lost one of his most trusted subordinates. General Cruewell was captured when his aircraft flew over an unknown British position and shot down. By chance Kesselring was in Africa at the time, and he took temporary control of Cruewell's force.
Rommel now decided to change his plan. He would go onto the defensive on the eastern edge of the British minefields. His antitank guns would form a defensive line to deal with any British counterattack, while his engineers opened a line through the minefields. He would use that to resupply his panzers. The one problem with this plan was that Rommel had only now discovered the 150th Brigade Group Box, which sat exactly in his way.
By the morning of 30 May Rommel's engineers had made one narrow line through the minefields, and were thus in contact with the rest of his army. However this line ran just to the north of the 150th Brigade Box, and was under constant artillery fire. Further south Bir Hakeim still held out. Rommel decided to focus all of his offensive resources against the Box, while his guns fought off any British counterattack. This was the crisis of the battle. Rommel was running short of water once again, and admitted to one of his prisoners that if he didn't get any more then he might have to surrender. A major 8th Army counterattack at this stage might have been disastrous for Rommel, but Ritchie still failed to move.
This gave Rommel time to crush the 150th Brigade Box, defended by the 4th Battalion East Yorkshires, 4th and 5th Battalions the Green Howards, 72 Field Regiment Royal Artillery and 232 Field Company RE, commanded by Brigadier Haydon. The defenders were now isolated, with the nearest Allied troops seven miles to the north, and after several days of intense action they were already short of 25-pounder ammo. The attack on the box began on 30 May, and the defenders held out until late on 1 June. Brigadier Haydon was amongst the dead.
Rommel was now firmly established in the middle of the Allied line. To the north the main Gazala position still held out, and to the south General Koenig's Free French were still holding on at Bir Hakeim, but Rommel had an open supply line to the west, and the best chance of taking advantage of his gamble had gone. Ritchie finally launched his first counterattack on 1 June, but this was repulsed by Rommel's guns. The same happened to an attack on 2 June, although the same day saw General Westphal badly wounded.
Ritchie was finally ready for a large-scale attack on 5 June (Operation Aberdeen). This was badly mismanaged. XIII Corps was to attack from the north, while part of XXX Corps attacked from the east. The two attacks were uncoordinated. In the north the 32nd Army Tank Brigade made very little progress. In the east the 22nd Armoured Brigade ran into the heaviest part of Rommel's defences and suffered heavy losses. The failure was so severe that Rommel decided to launch his own counterattack later on the same day. This was much better handled – the British attackers were overrun, and the British lost around 6,000 men and 150 tanks.
Rommel's next move was to concentrate on the destruction of the Bir Hacheim box. He sent 15 Panzer and the 90th Light Division to join Trieste in the attack on the box. The Free French held out for another five days, but by 10 June it was clear they couldn’t hold out any longer. General Koenig was given permission to break out, and that night 2,700 of his original 3,600 men made their way to safety. The French had held up Rommel for fourteen days, a stand that deserved to have had better results, but sadly Ritchie had failed to take advantage.
Rommel was now able to go onto the offensive. On 11 June he launched a two-pronged assault. 21 Panzer attacked in the north, heading east along Sidra Ridge. 15 Panzer and 90th Light were attacked in the south, heading east towards El Adem. On the British side General Norrie attempted to organise a counterattack, but General Messervy (who had escaped from his brief captivity) went missing on his way to the crucial planning conference and the attack never happened. By the end of 12 June General Gott had to order the evacuation of Knightsbridge. Only seventy British tanks were still running, and there was a real risk that Rommel might be able to reach the coast west of Tobruk, cutting off the units still in the Gazala Line.
Early on 14 June Ritchie ordered the evacuation of the Gazala Line. The 1st South African Division was to move east on 14 June, followed a few hours later by 50th Division. Ritchie wanted to withdraw all the way to the Egyptian border, accepting a second siege of Tobruk. Auchinleck didn't want another siege, and instead ordered Ritchie to hold a new line that ran south from Acroma (west of Tobruk), south-east to El Adem and then south to Bir el Gubi.
The retreat began fairly successfully. The 1st South African Division was back around Tobruk by the morning of 15 June. 50th Division managed a dramatic move that Rommel would have been proud of. Aware that the Germans now dominated the area to their east, General Ramsden decided to attack west, break a hole in the Italian line, then swing south, and follow Rommel's earlier route to the south of Bir Hakeim. By 0400 on 14 June the breakthrough had been completed, and the division turned south. They safely made it around Bir Hakeim, and then headed east across the desert. Around 96% of the troops involved in the breakout managed to reach the Egyptian frontier safely.
The fighting now moved to the Tobruk area. Ritchie and Auchinleck disagreed about what to do about Tobruk, with Ritchie willing to accept a second siege, and Auchinleck insistent that the new defensive line should include Tobruk. The Germans soon took the decision out of their hands. On the night of 16/17 June General Norrie was forced to abandon El Adem, to the south of Tobruk. Late on 17 June the 4th Armoured Brigade had to withdraw from Sidi Rezegh, to the south-east of Tobruk. The port was now besieged for a second time, but this time it wouldn't hold out for any length of time. On 20 June Rommel launched a full scale assault on the south-eastern side of the defences, and by the end of the day he was in the port. Early on 21 June General Klopper, the Allied commander in Tobruk, was forced to surrender.
Rommel then turned east, and crossed into Egypt. He had one more success, forcing the Allies to abandon the Marsa Matruh position (26-28 June 1942). They retreated to the final defensive position before Alexandria, at El Alamein. This would mark the eastern limit of Rommel's advance. Rommel didn't give his men any time to rest, and launched his first attack on the new position on 1 July. This time the Allied defences were too strong. Over the next month the two sides launched a series of generally unsuccessful attacks, known as the First battle of El Alamein (1-27 July 1942). Although Auchinleck successfully stopped Rommel's advance in this fighting, Churchill had lost faith in him. By the time Rommel tried again a new team was in place – General Alexander as Commander-in-Chief in the Middle East, and Montgomery as commander of the Eighth Army. Rommel's final offensive, at Alam Halfa (31 August-7 September 1942) would end in defeat, and the front then stablised while Montgomery prepared for his own offensive, the famous Second Battle of El Alamein (23 October-4 November 1942).
The battle of Gazala was probably Rommel's most impressive victory. His First and Second Offensives had been conducted against weak Allied forces operating at the limits of their supply chain. The defeat of Operation Brevity and Operation Battleaxe had been defensive victories. In contrast the battle of Gazala was fought nearer to the British bases than the Axis bases, against a strong enemy with plentiful supplies and fighting from a strong defensive position. Rommel managed to overcome a bad start to the battle, and demonstrated an impressive degree of flexibility, totally changing his plans half way through the battle.