Build up to Battle
Rommel's First Attack
Auchinleck's First Offensive
Auchinleck's Second Attack
Auchinleck's Third Attack
Aftermath
The first battle of El Alamein (1-27 July 1942) was a series of engagements in the area south of El Alamein in which Rommel's run of victories in 1942 was finally brought to an end. A series of British counterattacks also achieved little, and the battle ended as a stalemate.
Between February and May 1942 the front line in North Africa had been the Gazala Line, a British defensive position that ran south from the sea at Gazala, and that was built around a series of defensive 'boxes', brigade sided strong points that were meant to be large enough to defend themselves for at least a week. The position was also meant to include an east-west line that ran back from the main line, to protect Tobruk, but this part of the line hadn't been completed.
On 26 May Rommel launched an attack on this line (battle of Gazala, 26 May-14 June 1942). This involved a frontal assault on the northern part of the line and an outflanking move around the southern end of the line. At first this gamble appeared to be failing, as Rommel's advance ran out of steam and he ended up apparently trapped on the wrong side of the Gazala Line, but the British failed to take advantage of a good chance to defeat him. The eventual British counterattack, on 5 June, was so badly handled that Rommel was able to launch his own counterattack later on the same day. He then turned south to eliminate the Bir Hacheim Box, at the southern end of the line, which was abandoned on the night of 10-11 June.
Rommel's final attack began on 11 June, and by 14 June General Ritchie, then commander of the Eighth Army, was forced to order a full scale retreat from the Gazala Line. The 1st South African Division escaped along the coast, and was at Tobruk by the following day. The 50th Division had a more difficult task, and had to break out west, through the Italian front line, turn south to get past Bir Hacheim and then east to head for the Egyptian frontier. An attempt to hold onto Tobruk failed. The supporting troops had to retreat on 16-17 June, and Tobruk fell to an Axis attack on 20-June 1942.
Rommel then turned east and invaded Egypt. Until 25 June the British had been intending to defend the Mersa Matruh position, but on that day General Auchinleck, the commander-in-chief in the Middle East, decided to remove General Ritchie and take over command of the army in person. Early on 26 June he decided not to defend Mersa Matruh, but instead retreat to the shorter El Alamein position if Rommel attacked. By this point XXX Corps, which had been badly battered at Gazala, was already in the Alamein position, attempting to recover. Mersa Matruh was defended by XIII Corps, which had escaped from Gazala in better condition, and X Corps.
Rommel attacked at Mersa Matruh late on 26 June. The British position was soon untenable, and a retreat towards the next defensive position, at Fuka, was planned. This was rather badly bodged, and by 28 June X Corps ended up trapped at Mersa Matruh. That night part of the Corps managed to break through the German lines, while XIII Corps retreated from the Fuka line.
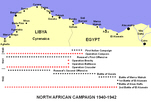
Auchinleck's new position stretched south from the small railway halt of El Alamein, close to the Mediterranean coast. Unlike most of the other positions fought over in North Africa it couldn’t be outflanked to the south. Thirty miles inland was the Qattara Depression, a low lying area that is below sea level, and that is bordered by a steep escarpment. The depression was impassable to large military formations, and especially to armour. Eventually the Eighth Army would be able to fortify the entire gap, but that wasn't the case in July 1942. El Alamein itself was surrounded by an incomplete line of fortifications (another of the 'boxes'), but south of that the desert was open. The area was generally very flat, and even some of the named ridges weren't major features (the Ruweisat Ridge, which featured heavily in the battle, was a low stony ridge, most notable as a viewpoint over the surrounding desert).
In the days immediately before Rommel's first attack on the El Alamein position Allied troops were fed into the position from east and west.
XXX Corps (General Norrie) was given the task of defending the northern part of the line. The 1st South Africa Division, coming from the Gazala battle, was posted around El Alamein. Its 3rd South African Brigade was given the task of defending the western side of the fortifications. The 1st South African Brigade was posted on the northern slopes of the Ruweisat Ridge, due south of El Alamein. The 2nd South African Brigade was five miles to the east/ north-east of the 1st Brigade. At the western end of the ridge was the 18th Indian Brigade, newly arrived from Iraq. Auchinleck expected Rommel to try and bypass the defended Alamein position, and these units were posted to provide defence in depth.
Armoured support came from the 22nd Armoured Brigade (1st Armoured Division), which was posted just to the south of Ruwesiat Ridge, and by the 4th Armoured Brigade (7th Armoured Division), which arrived just to the north of the 2nd South African Brigade on 1 July, just ahead of the Germans, after fighting a series of delaying actions further to the west.
XIII Corps (General Gott) was posted on the southern half of the line. Gott's front line ran south/ south-west from the western end of Ruweisat Ridge. The 6th New Zealand Brigade was posted at Bab el Qattara, slightly more than half way between El Alamein and the Qattara Depression, with the rest of the New Zealand Division further east at Deir el Munassib. Next was the 7th Motorised Brigade. The 5th Indian Brigade held the Naqb Abu Dweis box, on the edge of the depression. This position was unfinished, and had no water source. The 7th Armoured Division was posted further to the east, around Qaret el Himeimat, near the start of the 'Barrel Track', one possible route for an advance on Cairo.
Auchinleck's one advantage was that Rommel's men were almost as exhausted by the fighting of the last few weeks, and were now at the far end of their supply line. The Afrika Korps was down to 55 tanks and 500 infantry, the 90th Light Division had 1,500 infantry, and the three Italian corps had 30 tanks and 5,500 infantry. Between them the Germans and Italians had 500 guns, but only 29 of the precious 88mms.
Rommel's position probably wasn't helped by Mussolini, who flew into Cyrenaica on 29 June, ready to make a triumphant entry into Cairo.
Rommel was confident of victory, but he had misread the British deployment. He believed that the survivors of X Corps, battered at Mersa Matruh, was all that was standing around El Alamein, while the fresher XIII Corps was fifteen miles further south, blocking the road to Cairo.
Rommel decided to use the 90th Light Division to bypass El Alamein and cut the coast road somewhere to the east. The Italian XXI Corps would attack the El Alamein box from the west. X Corps was sent against a X Corps box that Rommel believed to be at Deir el Abyad, to the west of Ruweisat Ridge. The Afrika Korps was to be used for an attack south-east across the battlefield, starting at Tell el Aqqaqir, (north of Deir al Abyad, west of Tobruk) and heading south-east across Ruweisat Ridge towards Alam Nayil (east of the 6th New Zealand Brigade position), to attack XIII Corps from the rear. He didn't expect to face much opposition while crossing the Ruweisat Ridge area.
The 90th Light Division began its advance on time at 0300 hours on 1 July, but took the wrong route, and instead of passing to the south of the El Alamein position ran into the defensive works. The Germans were pinned down by heavy defensive fire, and were unable to make any progress.
The Afrika Korps set off nearly four hours late, at 0645 hours, tired and recovering from an air attack. The 'box' at Deir el Abyad turned out not to exist, and the Germans didn’t make contact with the British until 0900 hours, when they ran into the 18th Infantry Brigade at Deir el Shein, at the western end of Auckinleck's defensive in depth.
At about noon a sandstorm allowed the 90th Light to move on, but it was still too close to the defences, and was soon pinned down again, this time by artillery and mortar fire.
The same sandstorm allowed the Afrika Korps to attack the 18th Infantry Brigade position, and by 1300 hours the Germans had penetrated its perimeter. This limited success encouraged Rommel to issue ambitious orders for the pursuit – 90th Light and the Italian XXI Corps were to mop up around El Alamein, while Ariete, Trieste and Littorio divisions dashed east towards Alexandria.
The British response was also affected by the sandstorm. A force of armoured cars, sent ahead of a relief effort by the 22nd Armoured Brigade reported that everything was quiet, and so the brigade stayed put. At about 1700 the 22nd Armoured Brigade did attack west, and managed to force 15 Panzer to retreat, but one hour later 21 Panzer overcame the last resistance at Deir el Shein. This small battle cost them 18 of their 55 tanks, far too high a cost for the limited success.
On the British side an armoured force was slowly being put together, and by the end of the day the 1st Armoured Division had 38 M3 Grant medium tanks, 61 M3 Stuart light tanks, 12 Valentine infantry tanks and 8 Crusader cruiser tanks. This would give Auchinleck enough confidence to order a counterattack on the following day.
Both commanders ordered an offensive for 2 July. Rommel decided to sent the Afrika Korps east towards Alam el Onsol, to the south-east of El Alamein, to cut the coast road. 90th Light Division would advance on the Korps left flank. On the British side Auchinleck ordered part of the 10th Indian Division ('Robcol') to take over the 1st Armoured Division position, leaving the armour free to advance west along the southern side of Ruweisat Ridge. The advance would be supported by XIII Corps coming from the south.
Both attacks began on the afternoon of 2 July, and neither of them made much progress. 15 Panzer, on the German right, clashed with 1st Armoured Division, and neither side could advance. 21 Panzer made two attempts to advance east along the ridge, but on both occasions was stopped by 1st South African Brigade and Robcol.
That evening Auchinleck decided to call the newly arrived 9th Australian Division up from the Delta to join his army. He also had to deal with a request from the commander of the 1st South African Division to allow the 1st Brigade to withdraw east towards Alam el Onsol. This had already been refused by General Norrie (XXX Corps commander). Auchinleck backed up Norrie, but also gave him permission to replace the South Africans with Ackcol, part of the 50th Division. The relief didn’t got as planned – the South Africans left before Ackcol arrived, and a party from the 90th Light Division had to be forced out of the position.
By now Rommel realised that his force was running out of steam. He decided to make one last push on 3 July, and then stop. 90th Light and the Afrika Korps were to push to the coast, while Ariete and Triestewere to attack south to pin down XIII Corps.
Neither attack achieved much. The German advance was stopped by 1st Armoured Division, although Ackcol was forced to abandon its position. The Italians suffered a heavy defeat. Ariete was hit by the New Zealanders, and by noon had lost 350 men and 44 guns, and only have five tanks left. Rommel had to use his German reconnaissance battalions to bolster his right flank. Rommel launched the Afrika Korps on one last attempt at 1600 hours, but it was stopped nine miles east of Deir el Shein. By the end of the day the Germans had pushed a salient into the Allied lines, running along the northern side of Ruweisat Ridge, but they weren’t close to breaking through at the eastern end of the salient, and Auchinleck had strong forces to the north and south.
On 4 July Auchinleck planned a minor offensive, with XIII Corps to push north west of El Mreir (to the west of Ruweisat Ridge), while XXX Corps was to stop any further German advances, and push west if possible. On the German side Rommel decided to try and close the gap in his line left by Ariete by moving 21 Panzer from the Ruwesiat Ridge to a position east of El Mreir. XV Panzer and 90th Light were to extend their lines to fill the gap.
The German move was detected by 1st Armoured Division at around 1400hours. Auchinleck thought it might be the start of a German withdrawal from their salient, and ordered both corps to be ready for a pursuit. Although this wasn't the case, 1st Armoured Division came close to overrunning 15 Panzer Division, and although the Germans escaped, they were pushed by four miles. The salient had been turned into more of a curve. Elsewhere the XIII Corps attack quickly fizzled out.
This first phase of the battle fizzled out on 5 July. Rommel prepared to withdraw the German units from the front line and replace them with his Italian divisions. This would give the panzer divisions a chance to recover from the stresses of the last few weeks, but it would also give Auchinleck a series of opportunities for local victories. On the British side XIII Corps was ordered to attack. The New Zealand was to advance north from Bab el Qattara in the direction of Sidi Abd el Rahman, on the coast, while the 9th Indian Infantry Brigade advanced on their left, heading for a point ten miles east of El Daaba, and about five miles west of Sidi Abd el Rahman (presumably these were directions, and not actual objectives for the day). Neither attack made much progress. On the same day General Norrie was replaced as commander of XXX Corps (in order to give him a rest) by General Ramsden, commander of the 50th Division.
The initiative now passed to the British. Both sides prepared for new attacks, but it would be Auchinleck who moved first. Rommel was planning to chance his axis of attack. He would abandon the attacks around El Amamein and attack to the south of Ruweisat Ridge, heading for Alam Nayil and Deir el Munassib. Once the British line here was broken, he would be free to advance towards Cairo, leaving the Eighth Army isolated on the coast.
On the British side Auchinleck decided to attack the Italians on the coast. XXX Corps would carry out this attack, with the support of the newly arrived 9th Australian Division. XIII Corps would pull out of its southern positions and move them onto the Alam Nayil ridge, in order to concentrate his artillery more closely. He also hoped that this might convince Rommel to move south to try and take advantage of the apparently open road to Egypt, so that he would be unable to send his Germans to help the Italians on the coast.
The first stage in this plan came on the night of 7-8 July, when an Australian force raided the 15 Panzer position. The Afrika Korps commander believed this to be the start of a major attack, and summoned 21 Panzer to help. While this was distracting the Germans, the New Zealand division out of its old positions. On the following morning Rommel sacked the command of 15 Panzer.
On the night of 8-9 July the New Zealanders completed the move to Alam Nayil. The Germans didn’t realise they had gone, and on 9 July carried out a full scale assault on the empty Bab el Qattara box, led by the Littorio division and supported by 90th Light and the German artillery. Rommel didn't know that the New Zealanders had abandoned the box some time earlier, and believed that this attack was a major success. He prepared orders for a full scale attack on the southern front, to be carried out on the following day.
Auchinleck struck first. A heavy artillery bombardment began at 0330 (waking up Rommel), and the 9th Australian Division and 1st South African Division advanced against the Sabratha division. By 1000 the South Africans, with eight Matilda IIs had captured Tell el Makh Khad, a height point just west of El Alamein, and the Australians with 32 Valentine tanks, had taken the east part of Tell el Eisa, a few miles further to the north-west. The Sabratha division suffered very heavy losses, and was temporarily out of action. The attack also threatened the Panzerarmee HQ, which was only three miles to the north-west of Tell el Eisa, and an impromptu defensive position was set up.
Rommel reacted quickly. He cancelled the attack east, and moved north with his own HQ and a battle group from 15 Panzer. His counterattack began at noon, but was quickly stopped by artillery fire from the El Alamein position. Auchinleck's concentrated artillery fire was proving to be very effective.
On 11 July the Australians took the western end of Tell el Eisa, and then raided towards Deir el Abyad, ten miles to the south. This time they inflicted heavy losses on the Trieste division. Rommel now finally admitted to himself that he wouldn't be able to conduct any more major offensives with the army currently at his disposal.
That didn't mean he wasn’t willing to launch more counterattacks. On 13 July and 14 July XXI Panzer launched two attacks, both of which were repulsed with heavy losses – on 13 July they didn’t even get past the Axis front line before Allied artillery stopped the attack, which was aimed at the British lines south of El Alamein. The attack on 14 July was against the new Australian salient on the coast, and was no more successful.
Auchinleck was now under pressure to attack, although this time the pressure came from events on the Russian front rather than directly from Churchill. The German summer offensive of 1942 was now well under way, and they were getting dangerously close to the Caucasus, from where they could potentially strike into Persia and seize the vital oilfields. There was some concern that the Russians wouldn't defend the Caucasus, as an advance in that area would take the Germans further away from Moscow, and the British began to consider the possibility that they would need to form an army to reinforce Persia. The Middle East Defence Committee asked for advice, and on 12 July Churchill replied that the only way that they would be able to do that would be by 'defeating or destroying General Rommel and driving him to at least a safe distance'.
Auchinleck's next target was the western end of Ruweisat Ridge, which was now defended by the Italian Brescia and Pavia divisions. Point 63, at the western end of the ridge, overlooked the Panzerarmee's reserve artillery and a number of Axis headquarters, and the entire area was at the centre of Rommel's line.
On the Allied side the New Zealand Division (XIII Corps) was to the south of the ridge, facing north from the Alam Nayil Ridge (facing the Pavia division). 7th Light Armoured Division was further south, watching the German 90th Light Division. 1st Armoured Division was on the left flank of the New Zealanders, and the 22nd Armoured Brigade was provide support for the attack. The 4th New Zealand Brigade had the hardest task, advancing north-west to Point 63. The 5th New Zealand Brigade was to attack to the right. On their right the 5th Indian Division (XXX Corps) was to attack the central part of the ridge, and aim at Point 64, close to a track that crossed the ridge.
The infantry attacks began at 2300 hours on 14 July, and at first all went well. The New Zealanders had reached their objectives by daybreak, and the Indian Division by noon, taking 1,000 prisoners. Unfortunately the 22nd Armoured Brigade didn’t set off when it was meant too, and when it did finally get going didn’t cooperate with the New Zealanders. Rommel launched a counterattack, and by the late afternoon had recaptured Point 63. The New Zealanders took 1,600 prisoners, but lost 1,500 men and a great deal of their trust in the British armour.
Rommel attempted to retake the area around Point 64, but two counterattacks on 16 July were repulsed by British anti-tank and artillery fire. These attacks cost Rommel 24 tanks, six armoured cars, six 88mms and ten anti-tank guns.
On the same day the Australians attacked towards Miteiriya, on the southern side of their salient on the coast, and once again defeated part of the Sabratha division, before withdrawing to their original positions. They repeated the exercise on 17 July, and took a large number of Italian prisoners. Rommel was forced to commit his last German troops to the front line.
17 July also saw Kesselring and Cavallero, Rommel's superiors in the Mediterranean, visit his HQ. Rommel demanded reinforcements, supplies, tanks, 88mm guns, ammo and petrol. All they could offer in the short term were the Ramcke and Folgore parachute brigades, which had been preparing for the invasion of Malta (Operation Hercules). That attack now had to be cancelled, and the parachute infantry was rushed to the front. Kesselring realised that Rommel was now in a very dangerous position, at the extreme end of his supply lines, and facing a British army that had clearly recovered from the Gazala defeat. He insisted that Rommel prepare for one final attack on the British lines, to be carried out after reinforcements had arrived. This would result in the battle of Alam Halfa (31 August-7 September), but for the moment Rommel had to go onto the defensive. On 20 July, with the prospect of his triumphal march fading rapidly, a humiliated Mussolini flew back to Rome.
Auchinleck's third attack was timed to take advantage of the arrival of a new Armoured Brigade, equipped with the Valentine infantry. Once again he planned to attack along the Ruweisat Ridge, aiming for the centre of Rommel's line around Deir el Shein and El Mreir, at the western edge of the ridge. If this attack failed to break the Axis lines, then XXX Corps would attack south-west from its salient west of El Alamein and try and get into the enemy rear area. The first attack was to be carried out on 21-22 July, the second, if needed on 24 July.
The main attack was to be carried out by the New Zealand division, which would attack the western end of the ridge from the south, and the 5th Indian Brigade, which would advance west along the ridge from its positions around Point 64. The New Zealanders were to be supported by 2nd Armoured Brigade, coming from the eastern end of the ridge. 23rd Armoured Brigade was also available.
This attack would hit the Afrika Korps, which Rommel had been forced to deploy in the front line between El Mreir and the Ruweisat Ridge. Its two panzer divisions now only had 42 running tanks. The Italian XX Corps, to the south, had 50 tanks, but they were generally rather outdated. However Rommel had begun to cover his front with a dense minefield, mainly using mines taken from the British lines around Mersa Matruh.
The attack began on the evening of 21 July. The New Zealanders managed to fight their way to El Mreir, but this only meant that they were isolated on the Axis side of the minefields. The minesweepers had been unable to create a gap for 2nd Armoured Brigade, coming from the east, in time, and as a result the Germans were able to defeat the New Zealanders by 0515 hours on 22 July.
Unfortunatly General Gott didn't realise that the attack had failed, and so at 0800 he ordered 23rd Armoured Brigade to begin its advance, towards the second objective, further west in the El Mreir area. This was a costly disaster. The brigade began the attack with 104 tanks. 30 were lost in the minefield, and others as they advanced past it. Only 20 tanks managed to reach their objective, but only to run into the Afrika Korp's only battery of 88mm guns. The brigade was forced to retreat, having lost all but 11 of its tanks. The fate of the New Zealanders was still unclear, and so work on clearing gaps in the minefield continued. During the afternoon 2 Armoured Brigade attempted to pass through the gap, but ran into heavy enemy fire and had to retreat, having lost 21 tanks for no purpose. Rommel considered the day to have been a considerable success, but it had reduced the fighting power of the Afrika Korps.
This would have been the right time to launch the XXX Corps attack in the north, but General Morshead, commander of the 9th Australian Division, objected to his role, on the grounds that his men were exhausted. He claimed his right to consult with the Australian Government, and had to be won over by Auchinleck in person. A modified plan was adopted, in which one Australian brigade and the 69th Infantry Brigade would carry out the attack. Unfortunately this meant that it had to be postponed to 26/27 July. By this time the newly arrived Folgore division had been placed in the line, and Rommel was able to shift his men around. The attack began at 0300 hours on 26 July, but soon got bogged down, and any gains were taken back by counterattacks. The attack was cancelled at 1000 hours, ending the first battle of El Alamein.
Both sides were now exhausted, but the British were able to recover quicker than Rommel. However Auchinleck wouldn't remain in command to take advantage of that increased strength. Churchill was dismayed by his decision that the army wouldn't be ready to attack again until mid-September. Operation Torch, the Allied invasion of French North Africa, was expected to go ahead in October or November, and Churchill wanted the British to win one last victory before the Americans began to enter the war in great numbers. He also believed that a British success in Egypt would have an impact on the attitude of the Vichy French officials in Algeria and Morocco.
For once Churchill was able to intervene in the Middle East in person. He had decided to fly to Moscow to visit Stalin and try and explain why the Western Allies were invading North Africa and not France. He would visit the Middle East twice on this trip, on the way out and on the way back. General Brooke, the Chief of the Imperial General Staff, was sent ahead to examine the situation and report to Churchill.
In early August Brooke and Churchill met in Egypt. Churchill's first idea was that Auchinleck should return to Cairo to concentrate on his role as C-in-C in the Middle East, while General Gott was given command of the Eighth Army. Brooke disagreed, believing Gott to be too tired. Churchill suggested that Brooke take over the post, while Brooke and Auchinleck suggested appointing General Bernard Montgomery.
On 5 August Churchill visited the front, where he met with Gott, Auchinleck and the leaders of the Desert Air Force. Once again Auchinleck insisted that he couldn't attack until mid-September, and this convinced Churchill that the time was right for change. His first plan was to split the Middle East command into two. Auchinleck would remain in charge of the area east of the Suez Canal, while a new Commander-in-Chief in the Near East would take over west of the Canal. Brooke was offered the new post, but turned it down. Churchill settled on General Alexander for the Near East, with Gott in charge of the Eighth Army (Churchill would probably have been happy with Auchinleck in this post, but that would have been a clear demotion).
Churchill's plan was stopped by two unexpected developments. The first came on 7 August, when General Gott was killed when his aircraft was shot down. The second came on 8 August, when Auchinleck turned down the offer of the new Middle East command as it then stood. Over the next few days a variety of altenatives were considered, but eventually Auchinleck stuck to his guns. On 15 August he resigned as C-in-C Middle East and commander of the Eighth Army, and returned to the Indian Army (Alexander and Montgomery were already in Egypt by that date). He was replaced by Alexander as Commander-in-Chief in the Middle East, Montgomery as commander of the Eighth Army and General Maitland Wilson as commander-in-chief Persia and Iraq Command (a shrunken version of Churchill's original idea for a reduced Middle East Command).
Alexander and Montgomery took command two weeks before Rommel's final offensive in Egypt, the battle of Alam Halfa (31 August-7 September 1942). Montgomery inherited Auchinleck's defensive plans at Alam Halfa, although did make some modifications of his own, and Rommel's attack was very quickly repelled. It was then Montgomery's turn to prepare for an offensive, but unlike his predeciessors he was able to convince Churchill of the need to wait until the Eighth Army was fully prepared, and the Second battle of El Alamein didn’t begin until 23 October 1942, a full month after the date Auchinleck had been removed for insisting on.
 Desert Armour – Tank Warfare In North Africa, Gazala to Tunisia, 1942-43, Robert Forczyk.
A detailed examination of tank warfare in the final year of the campaign in North Africa, from the last major German victory at Gazala in the summer of 1942 to the final Axis surrender in North Africa in May 1943, one year later. Covers the armoured warfare of this dramatic period in great detail, looking at how the balance of power in Africa turned away from the Axis, despite the often greater experience of their tank commanders (Read Full Review)
Desert Armour – Tank Warfare In North Africa, Gazala to Tunisia, 1942-43, Robert Forczyk.
A detailed examination of tank warfare in the final year of the campaign in North Africa, from the last major German victory at Gazala in the summer of 1942 to the final Axis surrender in North Africa in May 1943, one year later. Covers the armoured warfare of this dramatic period in great detail, looking at how the balance of power in Africa turned away from the Axis, despite the often greater experience of their tank commanders (Read Full Review)