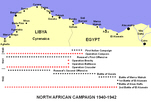
North African Campaign,
1940-1942
|
|
Rommel's Second Offensive (21 January-4 February 1942) was an unexpected counterattack that forced the British to retreat 350 miles, from the western border of Cyrenaica to the Gazala Line, and set the scene for Rommel's advance into Egypt later in the year.
Background
The fighting in North Africa followed a predictable pattern in 1940-42. The main British bases were in Egypt, the main Axis bases around Tripoli, separated by the Western Desert and eastern Libya (Cyrenaica). Whichever side was operating nearest to its bases had the advantage, starting with the British, who at the end of 1940 pushed the Italians all the way from Egypt to the western edge of Cyrenaica (Operation Compass). This convinced Hitler to send a small force under Rommel to North Africa to prop up Mussolini. Rommel realised that the British were at the limit of their supply line, and launched his First Offensive (24 March-30 May 1941). This was a stunning success, and the British were forced all the way back to the Egyptian border. Only Tobruk held out, and the siege of Tobruk and the British relief efforts dominated the rest of 1941. The first attempts to lift the siege, Operation Brevity and Operation Battleaxe, both ended in failure, and saw General Wavell replaced as Commander-in-Chief in the Middle East by General Auchinleck.
Auchinleck's first offensive, Operation Crusader (18 November-20 December 1941) was a complex and often confusing affair, but by its end Rommel was forced to lift the siege of Tobruk and begin a retreat back to his starting point, around El Agheila, on the border between Tripolitania and Cyrenaica. Auchinleck rather overestimated the scale of the damage to Rommel's army, and allowed his forces to become rather badly stretched out across Cyrenaica. In his defence Rommel had lost 80% of his armour, several of his senior officers and at least a third of his men, so on paper did indeed look to be out of action, at least for the moment. Auchinleck was also faced with a number of other problems. The outbreak of war in the Far East in December 1941 meant that supplies and reinforcements that had originally been earmarked for the Middle East were rushed east instead in a desperate attempt to stop the Japanese advance. At sea the Germans had sunk the aircraft carrier HMS Ark Royal and the battleship HMS Barham, while on 19 December a daring raid by Italian two-man torpedoes had crippled the battleships HMS Queen Elizabeth and HMS Valiant in Alexandria Harbour. The Royal Navy managed to hide the scale of the damage to these ships, but they would take some time to repair. More ships were lost around Malta, so by the start of 1942 the Royal Navy only had three cruisers and a number of destroyers and submarines east of Gibraltar. At the same time the air attacks on Malta were increasingly effective. This all meant that Axis supply convoys were able to reach Tripoli more easily early in 1942 than had been the case in 1941 (although the British still sank 40,000 tons of Axis shipping on that route in January 1942. Auchinleck's position in western Cyrenaica wasn't helped by the valiant defence of Halfaya Pass and other border positions – Sollum only surrendered on 12 January and Halfaya Pass on 17 January, so until them his supply convoys had to bypass these places, and the port at Benghazi wasn't useable.
As was often the case, the British had underestimated their opponents. As Rommel retreated west, he moved closer to his supply base at Tripoli. He also received reinforcements, starting with a convoy containing 54 tanks, 20 armoured cars, anti-aircraft guns, artillery, fuel and ammo, which landed in North African on 5 January 1942. Rommel soon had 120 tanks at his disposal.
Rommel Attacks
Rommel's forces were deployed along a 120 mile long position that ran south from Mersa Brega on the coast to the oasis at Marada. His Italian infantry held the line, with the XXI Corps in the north (three divisions) and X Corps in the south (two divisions). The German 90th Light Infantry Division was split between the two ends of the line. Rommel's armoured forces (the Afrika Korps and the Italian XX Corps) were placed behind the northern end of the line. However Rommel knew that this line was too long to be held against a determined assault, and so he decided to launch a spoiling attack, to try and win a quick victory before Auchinleck could build up his strength in western Cyrenaica.
Rommel's counterattack began early on 21 January. The 90th Light Division and the Italian XX Corps were sent along the Via Balbia, which ran all the way around the coast of Cyrenaica (normally at least a mile inland, sometimes further). On the Axis right the Afrika Korps was sent along the Waid Faregh, which ran parallel to the coast at this point. The British forces on the front line withdrew , and joined up with the stronger forces around Agedabia.
Rommel decided to continue his advance. His first target was Agedabia, but he then intended to move north-east to Antelat, then east to Saunnu, some way inland, from where he hoped to be able to cut the lines of retreat for the two British armoured divisions that he believed to be located east of Agedabia.
This attack was a limited success. The leading Axis troops (from the coastal column) captured Agedabia at 1100 hours on 22 January. Rommel then ordered the advance to continue to Antelat, which was reached at 1530 hours and Saunnu, which was taken at 1930 hours. Part of the Afrika Korps also arrived in time to be sent on to Antelat that day.
Heavy fighting broke out to the east of Agedabia on 23 January. The British were caught by surprise, and were unable to make use of their greater numbers. Rommel was unable to complete his planned encirclement, and by the end of the day most of the British troops had escaped to the north and north-east. On 24 January, when the Germans carried out a multi-pronged assault on the same area they captured a great deal of material, but hardly any troops.
On 25 January the coastal column was used to screen the left flank of the Afrika Korps as it advanced north from Saunnu to Msus, capturing more supplies on the way. Msus fell at 1100 hours, and the British continued to retreat to the north and north east. On the following day a shortage of fuel meant that the pursuit from Msus had to be cancelled.
Rommel then turned his attention north, towards Benghazi. He was not helped by the Italian high command, which didn't want to risk any further adventures. In an attempt to stop Rommel, Count Cavallero, the Chief of Staff of the Italian Commando Supremo, withdrew the two Italian infantry corps (X and XXI) from Rommel's control, and ordered them to stop in the Mersa Brega position.
Rommel wasn't sure how hard the British would fight to hold onto Benghazi. They had posted outposts at Ghemines, on the coast to the south, Soluq, a few miles to the east of Ghemines, and at Regima, east of Benghazi on one of the roads leading east.
Rommel split his army into three for the attack on Benghazi. The bulk of the Afrika Korps was sent east from Msus towards Bir Gerrari, to make it look as if the main assault was heading in that direction. The bulk of the 90th Light Division and XX Corps were sent up the Via Balbia, to approach Benghazi from the south. Rommel led the third column, a fast mobile assault column, north-west from Msus to try and cut the road east of Benghazi.
The assault column reached Er Regima, east of Benina, early on the morning of 28 January. During the day Rommel pushed west, but an attempt to capture Benghazi in the evening was repulsed. Rommel decided not to risk another attack until the coastal column had arrived. He used his assault force to block the roads east and north of Benghazi. That night a large part of the garrison managed to escape to the east, and on the following day Benghazi fell to Rommel's main force. 1,000 prisoners and 300 vehicles were captured in the port.
Rommel then turned east, to push the British back towards Gazala, on the Gulf of Bomba just to the west of Tobruk, where he expected them to make their next stand. A lack of fuel meant that the Afrika Korps had to stop at Bir Gerrari, leaving the pursuit to 90th Light and the XX Corps. Rommel split this force into two brigade groups, and sent one along the coast road and one along a parallel inland route.
The advance started on 31 January. The coastal group followed the Via Balbia road from Tobruk to Barce, but at D'Annuncio, eight miles further east, found the road too badly blocked to use and had to swap to the inland route. The inland column advanced north-east from Charruba (on a route further inland) to Marawa. The British made a stand at Marawa, but were forced to retreat on 1 February. Rommel's men then pushed east towards Derna on the coast, and Martuba, a short distance inland to the south.
On 2 February the coastal column captured Berta, but the advance towards Derna was stopped by more barriers on the read 12 miles to the west of the town. The inland column advanced further, and ended the day on a track that ran south from Derna towards Mechili, so was still some way to the west of Martuba.
On 3 February the British evacuated Derna along the narrow strip of coastal land not yet occupied by the Germans. That evening the British fought another rearguard action at Tmimi, but their main forces were now gathering around Gazala, taking advantage of a defensive position that Rommel had constructed in the previous year.
On 5 February Rommel ended his offensive. His most advanced forces were pulled back to Tmimi, and on the following day he concentrated the Afrika Korps, the 90th Light Division and XX Corps around Mechili. This became the new front line until the spring of 1942, when Rommel was finally ready to attack the Gazala Line (28 May-13 June 1942).
Rommel's Second Offensive was one of his most impressive achievements. In two weeks he had advanced 350 miles at the head of part of an army that had only just suffered a heavy defeat and been forced to retreat a longer distance. The victorious British had been knocked totally off balance and had lost most of the equipment that they had moved west past Tobruk.
Worse was to come for the British. Rommel's attack at Gazala was another triumph for him, and brought him to the Egyptian border. Tobruk fell to the first assault (20-21 June 1942) and the British were then forced out of their defensive positions at Mersa Matruh, in western Egypt. They were forced to fall back to El Alamein, where the final outcome of the Desert War would be decided.
 Rommel in his own words, ed. Dr John Pimlott.
Starts with his inter-war account of his First World War experiences, then moves on to the Second World War, with some material on the 1940 campaign and the defence of France, but with the largest section covering his famous campaigns in the desert of North Africa. Includes private letters, official reports and published works, giving us a range of Rommel’s public and private views(Read Full Review)
Rommel in his own words, ed. Dr John Pimlott.
Starts with his inter-war account of his First World War experiences, then moves on to the Second World War, with some material on the 1940 campaign and the defence of France, but with the largest section covering his famous campaigns in the desert of North Africa. Includes private letters, official reports and published works, giving us a range of Rommel’s public and private views(Read Full Review)