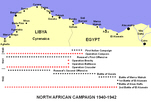
North African Campaign,
1940-1942
|
|
The Garrison
Land Battles
Air Attacks
Supplying Tobruk
Relief Efforts
The siege of Tobruk (10 April-16/17 December 1941) saw a beleaguered Allied garrison hold out for eight months against German and Italian attacks, and helped prevent Rommel taking full advantage of his victory in his first offensive, which had seen him conquer Cyrenaica only a few weeks after it had fallen to the British.
After the Italian entry into the Second World War their strong army in Libya had advanced just across the Egyptian border and then stopped. A British counterattack then developed into a major offensive (Operation Compass), and by early February the Italians had been driven back to Tripolitania. This worried Hitler, and he decided to sent two divisions to Africa to prop up the Italians. These two divisions formed the famous Afrika Corps, under the command of General Rommel.
During February 1941 the Germans began to arrive at Tripoli, while at the same time the British withdrew their most experienced troops from the Western Desert, some to rest and some to go to Greece. The Australian 6th Division was one of the units that was withdrawn, and it was replaced by the Australian 9th Division, under General Morshead. Two of this division's three brigades were sent west towards Benghazi, while the third was left at Tobruk to ease supply problems.
General Wavell, the British commander-in-chief in the Middle East, wasn't expecting any Axis offensive before May, so he was caught out when Rommel attacked in late March (Rommel's First Offensive, 24 March-30 May 1941). After early successes at El Agheila and Mersa Brega, Rommel launched a three-pronged invasion of Cyrenaica, and the British were soon retreating in some confusion. The two brigades of the Australian 9th Division retreated in the best shape, narrowly avoiding a German trap around Derna, around 100 miles to the west of Tobruk and retreated back towards the port.
Wavell realised that Rommel would be unable to risk an invasion of Egypt if the British could hold onto Tobruk. This would deny him the use of the port, and force him to reply on Benghazi, over 200 miles to the west of the Egyptian frontier. It would also force Rommel to split his forces, and thus weaken his position on the Egyptian border. The defenders would soon have four Australian brigades – the one left behind when the 9th Division moved west (20th Brigade), the two that had moved west (18th and 24th Australian Brigades) and were now retreating back to the port and a fourth that was being sent by sea (18th Brigade, 7th Australian Division). Wavell also flew into Tobruk in person on 8 April, made sure that General Morshead, commander of the division, was in a fit state to command the siege, and then returned to Egypt (not without some drama, as his aircraft was forced to land in no-man's land).
Morshead also began the siege with four regiments of 25-pounder field guns (1st, 104th (Essex Yeomanry) and 107th (South Nottingham Hussars) Regiments Royal Horse Artillery and 51st Field Regiment Royal Artillery), and a number of light and heavy anti-aircraft guns (two regiments of 3.7in guns, three regiments of 40mm Bofors guns, and some captured Italian 102mm guns), the Indian 18th Cavalry, Vickers machine guns of the 1st Battalion, Royal Northumberland Fusiliers, two regiments of anti-tank guns (3rd Regiment Royal Horse Artillery and 2/3rd Australian Anti-Tank Regiment). Morshead deployed his guns so that at least 40 could fire on any point of the perimeter without needing to move. The artillery was supplemented by captured Italian guns, known as 'Bush Artillery', and operated by anyone who was spare.
On 8 April Rommel captured General Gambier-Perry, the command of the British 2nd Armoured Division, at Mechili. This division had lost most of its tanks during the retreat, although 22 cruiser tanks (a mix of A9 Cruiser Mk I, A12 Cruiser Mk II and A13 Cruiser Mk III), four Matilda IIs and some light tanks did reach Tobruk. In total Morshead had around 30,000 men at the start of the siege. He had to defend a front line of around 30 miles.
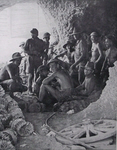
The outer 'red line', which included an anti-tank trench and barbed wire, was about eight-ten miles outside the port. The entire area within the perimeter was within range of German and Italian artillery, but some shelter was provided by a network of caves that had also been used by the Italians.
At first Morshead also had air support within the lines, with the Hurricanes of No.72 Squadron and reconnaissance aircraft from No.6 Squadron based inside the perimeter.
On 8 April General von Prittwitz, the command of 15 Panzer Division, reached the front (although without his unit, which hadn't yet arrived in Africa). Prittwitz was given command of a column based around the III Reconnaissance Battalion (5th Light Division) and was ordered to push the Australians out of Tobruk.
Von Prittwitz and his leading troops arrived outside Tobruk on 10 April, and he immediately attempted an attack, using III Reconnaissance Battalion and the artillery from the Italian Brescia regiment. This attack ran into the 1st Battalion, Royal Northumberland Fusiliers, and the guns of the 51st Field Regiment and quickly failed. Von Prittwitz himself was killed when his car was hit by an anti-tank shell.
Rommel still didn’t realise how strong the defences of Tobruk actually were, and on 11 April attempted another hurried attack. This time Rommel was in direct command, but the attack was no more successful. The aim was for a force of German infantry, supported by tanks from V Panzer Regiment (Olbrich), to attack up the road from El Adem, on the southern part of the perimeter, supported by artillery from the Italian Brescia division. The infantry attack was stopped by the 20th Australian Brigade. The tanks advanced until they ran into an anti-tank ditch where they came under heavy fire. After about half an hour Olbrich withdrew, having lost one Panzer III and two Italian M13s and an L3 tankette.
Rommel insisted on renewing the attack on 13 April. This time he began with an artillery bombardment which hit defensive posts R31 and R32. The German infantry managed to reach the perimeter and overnight managed to open up a gap in the defences (despite some hand to hand fighting in which Corporal John Edmondson won the VC). At 5am on 14 April Olbrich ordered the 2nd Battalion, V Panzer Regiment to attack through the breach. The Germans had breached the Red Line, but this only led them into a trap – Morshead had moved reinforcements to the area in response to the artillery bombardment and German troop movements. The Germans ran into two batteries of 25 pounders, then the 2/3rd Anti-Tank Regiment and 1 Royal Tank Regiment. The Germans were forced to retreat having lost seventeen tanks in only twenty minutes.
On 15 April a force of Italian infantry, supported by tanks from the Ariete division, attacked posts S13 and S17 but were repulsed. On 16 April Rommel organised another Italian attack, this time at Ras el Madauur. Once again the Italian tanks withdrew, and 97 Italians surrendered when the Bren carrier platoon from the 2/48th Battalion counterattacked. When a German armoured car opened fire the entire Italian battalion surrendered (a total of 26 officer and 777 men). Rommel was not impressed.
Morshead didn’t conduct a passive defence. On the night of 22 April he took nearly 450 prisoners in two raids, with the main one taking place in the Ras El Madauur Sector at the south-western corner of the perimeter. which appeared to be the focus of Rommel's interest. An Italian attack a few days later was repulsed, but this was only a preliminary to Rommel's next major attack, which began on 30 April.
Rommel's plan was to attack on the Ras el Madauur sector. His targets included Pt.209, the observation post for the 51st Field Regiment's guns. The attack was carried out by a mix of German and Italian troops, including the newly arrived German 104th Rifle Regiment and the Brescia division.
The initial attack began just after twilight on 30 April. The Germans broke through the line around posts S3 and S5, and by midnight have captured P.209. However posts S13, S7 and S8 were still holding out, and a supporting attack by the Brescia division was making slow progress.
By the morning of 1 May the Germans had established a breach in the line, and Rommel ordered his tanks to attack into the gap. They split into two formations. The first advanced towards Wadi Giaida and the 51st Field Regiment, while the second turned right to support the attack by the Brescia division.
The first group ran into the reserve company of 2/24th Battalion, supported the brigade anti-tank company. These guns inflicted the first losses on the Germans, but they then ran into a minefield, laid inside the defences. Although the Germans continued to fight on for another two hours, the attack had failed. The Panzers were now trapped on the edge of the minefield, and under increasingly heavy fire from 51st Field Regiment and 26 Brigade's anti-tank guns. Elsewhere most of the perimeter posts held out S5, S6 and S7 were taken, but S8, S9 and S10 were held.
During the afternoon Morshead launched a counterattack. This was rather costly and saw a number of Matlida IIs knocked out, one of the first signs that they were no longer almost invulnerable. Despite the loss of these tanks, the counterattack did convince the Germans to pull back from their most advanced position. A second counterattack, by 2/48th Battalion, was a costly failure, and Rommel ended the day in control of three miles of the defensive perimeter. However the fighting had been costly for the Germans – of the 81 Panzers that took part only 35 remained in running order, and casualties had been very heavy.
On 2 May a sandstorm prevented Rommel from resuming his offensive. This gave Morshead time to push reinforcements into the gap. The day was dominated by the infantry on both sides, with the Allies generally having the better of the day.
On the night of 2-3 May Morshead counterattacked on both sides of the salient, hoping to pinch it out. The attack was repulsed, but it shook the Germans, who weren't expecting such fierce resistance. Morshead was unable to eliminate the German salient, which remained in place for some time.
Rommel now settled down to a more formal siege. He built a line of defensive posts of his own around the perimeter, to try and stop any supplies getting in and to prevent Morshead attacking his vulnerable road links, which ran close to the town.
During the summer the main activity was patrolling, both out into Axis territory and between the perimeter posts to guard against any infiltration. The German artillery bombardment became more of a problem from mid-June, when Rommel gained some larger siege guns (many captured from the French). These gained the nicknames 'Bardia Bill' and 'Salient Sue', and caused the defenders a great deal of problems. Eventually skilful counter battery fire limited the number of shells the Germans could fire from any particular position.
One unexpected problem for the defenders was a political crisis in Australia. The government of Robert Menzies fell, and his successors demanded that the Australians should be withdrawn from Tobruk. After some controversy the British agreed to replace them with the Polish Carpathian Brigade and the British 70th Division. This required three naval operations - Treacle (21-30 August), Supercharge (17-27 September) and Cultivate (13-25 October). The 18th Australian Brigade was the first to go, in August. The British units remained at Tobruk, as did the Australian 2/13th Battalion, forced to stay behind after its transports came under heavy air attack, with one sunk and one damaged. Morshead left with his troop and was replaced by Major-General R.M. Scobie, commander of the 70th Division.
The defenders came under heavy air attack for much of the siege. The tactics used differed from day to day. On 17 April there was a raid by fifty Stukas. On 18 April individual bombers attacked all day. These attacks slowly wore down No.73 Squadron, and the last five machines withdrew on 25 April. Until June the Desert Air Force wasn't able to challenge Axis control of the night skies, but the situation began to improve later in the siege.
The Germans soon picked a list of key targets. These included the Wadi Audi Pumping Station, to the north-west of the town, and two distilleries to the south of the town, both of which provided drinking water. The town, the various HQs, and the artillery positions were also frequent targets.
Brigadier J.N. Slater, commanding the 4th Anti-Aircraft Brigade, did an excellent job. He decided to protect the harbour with a heavy but unpredictable barrage whenever it was attacked, and worked hard to protect his guns. He was so successful that the Germans stopped dive bomber attacks in daylight from May onwards. In July the attacks on the harbour lessened so much that daylight unloading could resume after a month in which it was too dangerous.
When the dive bombers returned in daylight in August they encountered one of Churchill's many pet projects, the 'Unrotating Projectile'. These were small bomb suspended from parachutes that were launched by rockets into the path of incoming aircraft. Tests in the UK had suggested that they were too dangerous to the population to be used at home and so they were tried out at Tobruk. Surprisingly this novel device appears to have been a success – they were used against an attack on the Maria Giovanna on 10 August, and forced the Germans to abandon their attack. One aircraft was probably brought down by the device and another picked up an unexploded UP.
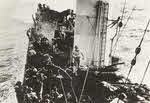
The main supply route into Tobruk was by sea. The Royal Navy used a wide range of ships on this dangerous route. This included HMS Fiona and HMS Chakla, two Indian passenger ships that were taken over by the Navy, the destroyers HMAS Stuart, Vampire, Vendetta, Voyager and Waterhen, the hospital ships Vita and Devonshire and a number of LCTs, then known as 'A-Lighters'.
The Germans focused a great deal of effort on cutting the naval supply lines into Tobruk, well aware that just about everything needed by the garrison had to come by sea. The Allied ships had to run the gauntlet of air attacks, E-boats and U-boats.
Many of these ships were lost – Fiona and Chakla were sunk in April, the Vita was lost to heavy air raids in Tobruk harbour, HMS Ladybird was lost on 12 May.
On 24 June HMS Auckland was sunk while escorting the petrol tanker Pass of Balhama. The tanker was towed to Tobruk, but this would prove to be her last mission.
HMS Waterhen was sunk on 29 June. From July onwards the port was only usable at night, which slowed down operations somewhat.
On 10 October one of the A-Lighters forced U-34 to dive.
On 11 October U-75 (Lt Eckleman) sank two A-Lighters as they were returning to Egypt from Tobruk.
These ships moved supplies and reinforcements into the port, and evacuated the wounded and surplus mouths. Over the course of the siege the Navy moved 34,000 men, 72 tanks, 92 guns and 34,000 tons of supplies into Tobruk.
The failure of the 30 April-1 May attack was reported to Berlin by General Paulus, who had been sent to Africa to bring Rommel under control. He also reported that the Africa Corps was in a difficult position, over-stretched and difficult to support. This message was intercepted by the British and decoded, and helped convince Churchill that the siege of Tobruk could be lifted by even quite a small attack. Wavell came under heavy pressure to try something. His preference was for a larger scale attack, using tanks and Hurricanes that were on their way through the Mediterranean, but in the meantime he authorised a smaller assault. This led to Operation Brevity, 15-16 May 1941, a short-lived offensive aimed at capturing Halfaya Pass. The pass was indeed taken, but an advance further on towards Sollum was soon abandoned. At the end of the operation the British held the pass, but on 26-27 May the Germans counterattacked and retook the pass.
Both sides received reinforcements before the next Allied offensive, Operation Battleaxe of mid June. Wavell received the 'Tiger cubs' – 82 Cruiser tanks, 135 Matildas and 21 light tanks, and used them to rebuilt the 7th Armoured Division.
Battleaxe (15-17 June) was no more successful than Brevity. The main problem on the British side was poor armoured tactics, which exposed their tanks to German anti-tank fire. Over the three days of the battle the British lost 27 Cruiser tanks, 45 of the new Crusaders and 64 Matilda IIs, a sizable proportion of the 'Tiger cubs' that had been sent through the Mediterranean at such high risk. On 22 June Wavell was informed that he was to be replaced by Auchinleck.
The siege was finally lifted by Operation Crusader (18 November-20 December 1941), Auchinleck's greatest success in North Africa. Even the build-up to this battle helped the defenders, as it convinced Rommel to cancel a planned attack on Tobruk that had been timetabled for after 20 November.
Crusader was a generally confused battle, but eventually the Germans and Italians were worn down, at least in part by a lack of supplies, but also by heavy losses. The attack was also supported by a breakout by the Tobruk garrison. Contact was made between a New Zealand force under General Freyberg coming from the east and the breakout forces at El Duda on 26 November. On 28 November General Godwin-Austen moved the HQ of 13 Corps into Tobruk, although his signal announcing the move was suitable vague ('Tobruk is as relieved as I am'). Rommel reacted violently, and after several days of fighting around Sidi Rezegh the New Zealanders were forced to retreat on 1 December. The siege was re-established, but only for a few days. On 7 December, with his forces under ever increasing pressure, Rommel was forced to withdraw, and that night the siege was finally lifted after 242 days.
Holding Tobruk was of great value to the Allies. Rommel was forced to leave some of his troops to blockade the port, weakening his defences on the Egyptian frontier. He was also denied its use as a port, meaning that supplies had to come from Benghazi, the next sizable port to the west. To make things worse the metalled 'Via Balbia', the only good road along the coast, ran through Tobruk, so for some of the way his road transport had to use nearby tracks. If Tobruk had fallen, Rommel's supply situation would have been much easier and his forces on the border rather stronger.