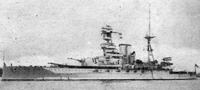
HMS Barham was a Queen Elizabeth class battleship that fought at the battle of Jutland during the First World War and in the Mediterranean during the Second World War. She joined the Fifth Battle Squadron as flagship in October 1915. At Jutland she was the flagship of Rear-Admiral H. Evans-Thomas. The 5th Battle Squadron was part of Admiral Beatty’s battlecruiser fleet. Despite their speed, the battleships of the 5th Battle Squadron were trailing behind the battlecruisers when the real fighting began. Soon after they caught up with Beatty, the German battle fleet was sighted, and the British squadron turned north. During the turn to the north, the Barham came under heavy German fire, which wrecked her radio gear. She was hit by six large shells, suffering 26 dead and 37 wounded during the battle.
She was the last of her class to undergo a first round of modifications, in 1930-33. In this round of modifications, her two funnels were merged into one, and she was given anti-torpedo bulges. The Second World War began before she could undergo the second round of modifications.
She was sent to the Mediterranean in September 1940. She took part in the unsuccessful attempt to occupy Dakar (west Africa) in September 1940. On 25 September she became engaged in a duel with the French battleship Richelieu. The French ship had been damaged in an earlier attack but was still able to fire. The Barham was hit once in the morning duel and four times during the afternoon. The bombardment was resumed briefly on 26 September, before the expedition was abandoned.
In November 1940 she took part in the wider naval operations that ended with the carrier attack on the Italian fleet at Taranto (11 November). Her role was to help carry 2,000 troops to Malta to reinforce the garrison.
On 28 March 1941 she took part in the battle of Matapan (along with her sisters Warspite and Valiant). All three battleships fired on the Italian cruiser Zara, reducing her to a burning wreck.
In April 1941, as Rommel advanced through the western desert, it was decided to attack the port of Tripoli. Admiral Cunningham was opposed to the idea of a naval bombardment, on the grounds that it would be too dangerous to take his ships so far into enemy territory. In response the Admiralty suggested that Barham should be used as a blockship. Cunningham decided to risk the bombardment instead, and at 5am on 21 April the three British battleships opened fire on Tripoli. The German response was slow, and the British ships escaped unscathed.
On 25 November 1941, Admiral Cunningham was at sea, supporting an operation by his light forces. U-311 slipped through the Barham’s cordon of destroyer escorts, and hit her with three torpedoes. Very quickly she listed over, capsized, and then exploded with the loss of 56 officers and 812 men. Her loss was caught on film, and is one of the most dramatic pieces of film recorded during the Second World War.
Displacement (loaded) |
31,500t (design) |
Top Speed |
23kts |
Range |
4,500 nautical miles at 10kts |
Armour – deck |
3in |
- belt |
13in-6in |
- bulkheads |
6in-4in |
- barbettes |
10in-4in |
- turret faces |
13in |
- conning tower |
11in |
Length |
645ft 9in |
Armaments |
Eight 15in Mk I guns |
Crew complement |
925-951 |
Launched |
31 October 1914 |
Completed |
October 1915 |
Captains |
Captain Craig |
Sunk by submarine |
25 November 1941 |