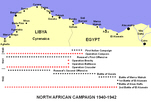
North African Campaign,
1940-1942
|
|
Operation Battleaxe (15-17 June 1941) was an unsuccessful British offensive in North Africa, carried out in an attempt to raise the siege of Tobruk.
The Desert War began with a short Italian advance into Egypt, but the first major move was Operation Compass, a British offensive that turned from a minor raid into a full scale triumph. The Italians were forced out of eastern Libya (Cyrenaica) and the British looked to be on the verge of eliminating their presence in Africa. Hitler responded by sending Rommel and the Afrika Korps to Libya, and in his First Offensive Rommel pushed the British back to the Egyptian frontier. Only Tobruk held out, and would endure a siege that lasted from April-December 1941. General Wavell, the British Commander-in-Chief in the Middle East, came under great pressure to lift the siege, but his first attempt, Operation Brevity (15-16 May 1941) was an almost instant failure.
Axis Forces
Operation Battleaxe took place on the Egyptian-Libyan border. Although the desert battlefields are normally portrayed as almost featureless blank canvases for armoured warfare, that wasn't the case here. The right flank was formed by the coastline, which ran west to Sollum (in Egypt), then turned north to run to Bardia (in Libya).
Just inland was a massive escarpment, only passable by tanks at a few locations. This split the battlefield into a narrow coastal strip below the escarpment and the open desert above it. The coast road ran through the coastal strip to Sollum, then climbed up the escarpment to the west of the village to reach Fort Capuzzo, the first Italian strongpoint inside Libya. From there the road ran north to Bardia. Just to the west of Fort Capuzzo was Hafid Ridge, also known as Point 208 to the British. Another hill, just to the south of Fort Capuzzo, was known as Point 206.
The famous Halfaya Pass ran up the escarpment, linking the coastal strip to the desert. It was located just to the south of Sollum.
Rommel had placed garrisons at Fort Capuzzo, Sollum, Musaid, Point 206 and Point 208, mainly made up of Italian infantry. He also had a mixed German and Italian force (500 Germans, 400 Italians, five 88mm guns and a battery of ex French 155mm guns at Halfaya Pass, commanded by the former pastor Captain Wilhelm Bach.
Rommel's armoured strength had increased since his First Offensive and the defeat of Operation Brevity. He still had his original armoured force, Panzer Regiment V of the 5th Light Division, but this was joined by 15 Panzer Division, which arrived in a series of convoys on 24 April, 2 May and 6 May. This division contained Panzer Regiment 8, which had 45 Panzer IIs, 71 Panzer IIIs, 20 Panzer IVs and ten command tanks. In total Rommel had around 200 German tanks at his disposal.
15 Panzer was posted to the east of Tobruk, to support the border defences. 5th Light Division was south of Tobruk, as was the Italian Ariete armoured division.
British Forces
Key to the British attack were the 'Tiger Cubs'. During the earlier crisis in North Africa, Churchill decided to take the risk of sending a convoy of tanks straight through the Mediterranean, instead of on the slower but safer route around the Cape of Good Hope. This 'Tiger' convoy arrived at Alexandria almost intact on 12 May, and delivered 238 tanks and 43 Hurricanes. These reinforcements didn't arrive in time for Operation Brevity, but General Wavell, the British commander-in-chief in the Middle East, came under severe pressure from Churchill to use them as quickly as possible. Wavell resisted as best as he could, aware that he really needed more time to get the new tanks ready to operate in the desert and their crews familiar with them.
During Operation Battleaxe the British army in Libya was designated as the Western Desert Force, commanded by Lt General Sir Noel Beresford-Peirse. This force was made up of the 4th Indian Infantry Division (Major-General Messervy), which contained the 11th Infantry Brigade; the 22nd Guards Infantry Brigade (motorised) and the 7th Armoured Division (Major-General Creagh). Although the 7th Armoured Division (the famous Desert Rats) already had an impressive reputation, many of its sub-units during Battleaxe were new to the division.
The division was split into two brigades, the 4th Armoured Brigade and the 7th Armoured Brigade. The 4th Armoured Brigade (4th RTR and 7th RTR) operated the Matilda II infantry tank, a heavy but slow vehicle that had earned the nickname 'Queen of the Desert' because of its thick armoured.
The 7th Armoured Brigade had two regiments. The 2nd Royal Tank Regiment had two mixed squadrons of A9 Cruiser Tank Mk I and A10 Cruiser Tank Mk IIs and a squadron of A13 Cruiser Tank Mk III. The 6th Royal Tank Regiment was given the new Crusader cruiser tanks that had arrived on the 'Tiger' convoy, and some older A13 Cruiser Tank Mk IIIs. Sadly the new Crusaders would prove to be very unreliable, and by the time most of their problems had been fixed all faith in them had been lost. They would be just about at their worst during Battleaxe, but would become rather more reliable by the time of El Alamein.
British Plan
Wavell is normally portrayed as being unwilling to attack, but this isn't entirely true. As early as 25 May he had signalled to Churchill that the 'Tiger now only needs to grow claws', and on 28 May he indicated that he was willing to attack. He ordered Beresford-Peirse to capture the border area, from Halfaya Pass up to Bardia on the coast and inland to Sidi Azeiz, before then defeating the German forces nearer to Tobruk.
Beresford-Peirse came up with a plan for a three pronged assault. Near to the coast the 11th Indian Brigade and one and a half squadrons of Infantry tanks from the 4th Armoured Brigade would attack Halfaya Pass.
To their left the 22nd Guards Brigade, the rest of the 4th Armoured Brigade and the artillery from the 4th Indian Division would carry out a shallow outflanking move to attack Fort Capuzzo, before turning east to take Sollum. The infantry from this force would then remain at Sollum and Fort Capuzzo while the tanks moved west to join the 7th Armoured Brigade.
7th Armoured Brigade would carry out a slightly wider outflanking move, cross the frontier to the west of Point 206 and head for Hafid Ridge. This force was expected to fight it out with the German tanks. The division's Support Group, was to protect the left flank of this advance, meaning that it wouldn't be present to actually support the armour.
The Battle
15th
The battle began early on 15 June. The coastal attack on Halfaya was the least successful of the three British attacks. Some of the Matilda tanks were immobilised by mines as they approached the pass, and the unsupported infantry attack failed. When the Matildas did get closer to the pass they came into range of the well concealed 88mm guns. These were easily able to penetrate the thick armour, and a total of 11 Matildas were lost in the attack. Her time as 'Queen of the Desert' was over.
On the first day the British armour advanced largely as planned. The 4th Armoured Brigade got into a fight with the defenders of Point 206. A first attack, without infantry support, ended in failure. A second attack, this time with infantry support, captured the position in the evening. In the meantime the rest of the brigade moved on. Fort Capuzzo was captured at about noon, and a counterattack was defeated. Their supporting infantry then began to dig in. A second counterattack, later in the day, was also repulsed.
On the left flank the cruiser tanks of 7th Armoured Brigade reached Hafid Ridge just after 0900 hours, but were then drawn into a protracted battle with the German gun positions on the ridge. The British cruisers lacked a good HE shell and so had to get very close to the German guns to knock them out. By the end of the day the British had a foothold on the ridge, but hit came at a high cost in lost tanks. The only direct clash with German armour was a long range duel with the leading elements of the 5th Light Division, which were approaching from Sidi Azeiz in the north.
Although the British had reached many of their objectives, the first day had been very costly – by the time the fighting died down in the evening they had just under 100 tanks still running.
The British plan for 16 June was for the 22nd Guards Brigade to defend Capuzzo and send a force east to occupy Sollum. The tanks of 4th Armoured Brigade would move west and complete the occupation of Hafid Ridge. The tanks of 7th Armoured Brigade would intercept a German tank force that had been detected approaching from the north.
Rommel's plan was for the 8th Panzer Regiment to attack around Fort Capuzzo, while the 5th Light Division was to outflank the British position to the west, bypassing the forces on Hafid Ridge and made for Sidi Omar, to the south-west of the British positions. The division would then turn east, heading for Halfaya Pass and the British rear. The British would be trapped between the two armoured divisions.
Rommel's attack disrupted the British efforts. The attack on Fort Capuzzo was defeated, and the Germans lost 50 tanks while attacking towards a line of British guns, but it did convince General Messervy not to allow the tanks of 4th Armoured Brigade to move west. By now Beresford-Peirse, who had remained back at Sidi Barrani, was losing control of his own force.
The most important fighting came on the left flank. Here the German 5th Light Division heading south towards Sidi Omar was harassed by the 7th Armoured Brigade and the Support Group. The German armour generally had the better of a series of battles, but the 7th Armoured Brigade handled its tanks well and took advantage of the terrain. By the end of the day the Germans advance was stopped around Sidi Omar, and both sides had lost a number of tanks.
The British plan for 17 June was to leave 22nd Guards Brigade at Capuzzo, while the two armoured brigades united to attack the Germans and Sidi Omar. On the Axis side Rommel planned to do almost the same – the 8th Panzer Regiment was to join with the 5th Light Division, and then head for Halfaya Pass.
The British plan very quickly unravelled. 7th Armoured Brigade was now down to 25 tanks, and had to move east across the Frontier to refuel. 4th Armoured Brigade's remaining 30 tanks were heading south from Capuzzo, but the two forces wouldn't meet up.
By 0430 hours on 17 June the 8th Panzer Regiment had disengaged at Capuzzo and was heading south. General Creagh, commander of the 7th Armoured Division, decided that he needed to consult with Beresford-Peirse, and radioed a request for him to fly to his HQ for a meeting. Rommel's intercept service heard this message, and this encouraged Rommel to order his two divisions to head straight for Halfaya. This advance began at about 0900 hours. General Messervy realised that he would soon be cut off and ordered his men to retreat from Fort Capuzzo. This all happened without any real input from Beresford-Peirse or Wavell. Wavell approved Messervy's orders, but wasn't happy with the lack of consultation.
For most of the day the Germans pressed east towards Halfaya Pass, resisted by the surviving Matildas of 4th Armoured Brigade. The tables were now turned, and the Matilda briefly regained her crown – the Panzer IIIs struggled to penetrate her armour, and the Germans had advanced ahead of their 88mm guns. As the tanks fought it out to the south of Halfaya Pass, the troops from Capuzzo made their escape. By the time the Germans reached the top of the pass at 1600 hours the British had escaped.
Aftermath
The British lost about half of their tanks during the battle – 220 were knocked out at some point during the battle, but only 87 were total write-offs. The rest were eventually recovered and repaired. Even so this was a heavy blow for Churchill, who had taken such a risk to get the tanks to Egypt in the first place. German losses were much lower, reported at only 25 tanks written off. Rommel's success also helped convince the Italians to send reinforcements to North Africa.
Churchill had already begun to lose confidence in Wavell, and had considered swapping him with General Sir Claude Auchinleck, the British commander-in-chief in India. In the aftermath of Battleaxe he decided to make that switch, and on 22 June both men were informed of the change. Auchinleck would have an equally stormy time in charge as Wavell. His first offensive, Operation Crusader, was a great success. The siege of Tobruk was raised and Rommel retreated out of Cyrenaica. This was a short-lived triumph, as early in 1941 Rommel launched his Second Offensive, which ended at the Gazala Line. After a pause Rommel went back onto the offensive in the spring of 1942 (Battle of Gazala), and forced Auchinleck to retreat back to Egypt. It was now his turn to be removed, and despite successfully holding the El Alamein position he was replaced by General Alexander as commander-in-chief in the Middle East, while Montgomery took command of the Eighth Army.