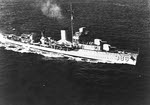
 USS Bagley (DD-386) underway, 1937-40
 |
|
USS Bagley (DD-386) was the name ship of the Bagley class of destroyers and fought at Pearl Harbor, Guadalcanal, the campaign on New Guinea and New Britain, the invasion of the Marianas, the battle of the Philippine Sea, the invasions of Peleliu and Angaur, the battle of Leyte Gulf, and the invasions of Luzon, Iwo Jima and Okinawa.
The Bagley was named after Worth Bagley, who served in the US Navy during the Spanish-American War, and was the only US naval officer to be killed during that conflict, after his torpedo boat went too close to Spanish shore guns and came under heavy fire for over an hour.
The Bagley was laid down at the Norfolk Navy Yard on 31 July 1935, launched on 3 September 1936 and commissioned on 12 June 1937.
The Bagley’s shakedown cruise took her to the Naval Torpedo Station at Newport, Rhode Island and then to Guantanamo Bay, through the Panama Canal to the Galapagos Islands, then back to Cuba before ending at Norfolk, Virginian on 4 October. After some post-shakedown repairs and more training she was ordered to move to the west coast.
The Bagley arrived at San Diego on 5 September 1938, where she joined Destroyer Division 7. She spent the rest of the year operating along the coast of southern California.
In January 1939 the Bagley returned to the Caribbean, and in February she took part in Fleet Problem XX, although only as a radio guardship in the port of Miami. She then moved north to take part in a planned fleet review at New York in late April. This was then cancelled and most of the fleet ordered back to the Pacific, but the Bagley moved to Norfolk instead for an overhaul that wasn’t finished until 5 July. She was back at San Diego on 28 July, and spent the next eight months operating along the coast of southern California.
On 2 April 1940 she departed for Hawaii to take part in Fleet Problem XXI, this time being used to carry out patrols off Honolulu and Pearl Harbor. At the end of the Problem the Bagley and most of the Pacific Fleet remained at Pearl Harbor, in an attempt to convince the Japanese not to risk war. She remained at Hawaii until the autumn when she returned to San Francisco for an overhaul, returning to Pearl Harbor on 12 December.
On 2 February 1941 she departed for Bremerton, Washington, for eleven days of repairs in the dry dock at Puget Sound. She then escorted the Enterprise (CV-6) to Pearl Harbor, arriving on 27 April.
Over the next few months the Bagley took part in operations from Pearl Harbor, often working with the Enterprise and Lexington (CV-2). On 3 December she was at sea with DesDiv 8 when here starboard side bilge keel came off. She had to slow down and return to Pearl Harbor for repairs. On 6 December she moved to berth 22 near the dry docks, and went ‘cold iron’, getting her electricity, steam and fresh water from the dock.
When the Japanese attacked Pearl Harbor the first Japanese aircraft spotted from the Bagley were dive bombers attacking Hickham Field, seen at about 0755, but they were believed to be American. However a few minutes later a Nakajima B5N2 was seen attacking the USS Oklahoma (BB-37), hitting with a torpedo. At this point the Bagley went to general quarters and opened fire with her .50in machine guns. At this stage the Japanese aircraft were flying past her port side as they attacked battleship row. In the Bagley’s combat report she claimed six victories (although none can be conclusively assigned to her, as so many ships were firing at the same aircraft). starting with the fourth torpedo plane to pass her, shot down by Chief Gunner’s Mate Harry L. Skinner. The eighth aircraft swerved to left and dropped its torpedo into a bank, before being claimed as her second victory. The third aircraft was claimed while heading for the cruisers Honolulu and St Louis. The fourth was shot down while flying over the dock, and its torpedo hit a lumber pile. The fifth was shot down while flying over the ship. The sixth and final aircraft was a dive bomber from the second Japanese wave, shot down by one of the ship’s main 5in guns along with fire from other ships.
At 0829 the Commander, Destroyers, ordered his ships to get underway. The Bagley’s crew had to work hard to get their ship going as it had been taking power from the dock, but she was able to get underway at 0940. She went around the north side of Ford Island, picking up Lt Commander F.R. Walker, commander of USS Patterson on the way. Walker was then passed over to his own ship once the Bagley was outside the channel.
The Bagley briefly joined the antisubmarine screen of Task Force 8, but her damaged bilge keel meant that she soon had to be transferred to the less demanding offshore patrol near Honolulu.
On 8 December the Bagley investigated a possible submarine contact, but only found a burning sampan. On 9 December she was ordered to return to Pearl Harbor, escorting the sampan Nisshin Maru into the harbour.
The Bagley moored alongside the Helm (DD-388) in the navy yard, and had the damaged section of the bilge keel removed. She was sent back out to sea on 13 December in response to a submarine scare, and dropped three depth charges on a suspected contact, although without success. She returned to harbour on 15 December.
On 16 December the Bagley sortied with TF-14 (Saratoga) to take part in the attempt to relieve Wake Island. However the Japanese got there first, and the island surrendered before the Americans could arrive. The Bagley and the rest of the task force returned to Pearl on 29 December.
On 30 December the Bagley put to sea with the Saratoga task group to patrol to the west of Oahu.
1942
On 11 January the Saratoga was hit by a torpedo from the submarine I-16 and had to return to Pearl Harbor for repairs. The Bagley escorted her to port, and then had a refit in which four 20mm AA guns were added.
On 31 January Bagley joined TF 11 (Lexington) to escort transports carrying reinforcements to Christmas Island, Canton Island and New Caledonia. The Task Force then joined the ANZAC cruiser force (HMAS Australia, HMNZS Achilles, HMNZS Leander and USS Chicago (CA-29) on 16 February. This force them moved north-west with the aim of carrying out a raid on the Japanese base at Rabaul, but on 20 February the fleet was spotted by Japanese reconnaissance aircraft. This was followed by two Japanese air raids. Although these were fought off without any losses, it was clear than any chance of surprise was gone, so the raid was cancelled and the fleet withdrew into the Coral Sea.
On 6 March the fleet was joined by the Yorktown and set off for another attempt to raid Rabaul. However 8 March news arrived that the Japanese had landed at Lae on the north coast of New Guinea. The Rabaul raid was abandoned, and the fleet moved into the Gulf of Papua, on the south coast of New Guinea west of Port Moresby. From there they sent 104 aircraft across the mountains to attack the Japanese, claiming a light cruiser, a transport and a minesweeper. The fleet then returned to Pearl Harbor, arriving on 26 March.
During April the Bagley underwent a period of upkeep and repairs and a spell in drydock.
On 30 April she departed for Palmyra Island, Christmas Island and the Society Island carrying mail and passengers. On 9 May she met the Hunter Ligget (AP-27) off Bora Bora and escorted her to Fiji, arriving on 15 May. She spent the next week patrolling outside Nukualofa Bay (Fiji), then departed for Brisbane, arriving on 30 May.
At Brisbane the Bagley joined the Southwest Pacific Force (TF 44). She was used to protect convoys approaching Australia, carried out two anti-submarine patrol sweeps with the Henley (DD-391) and took part in night battle practice. This ended on 17 July when she left Brisbane heading for Auckland, New Zealand, arriving on 20 July.
On 22 July the Bagley and Helm departed from Auckland to join TF 62, ready to take part in the invasion of Gaudalcanal. The fleet carried out a rehearsal at Koro Island, Fiji, on 28-31 July, then departed for Guadalcanal on 1 August.
The Bagley took part in the initial landings on Guadalacanal on 7 August 1942. The Bagley was part of the ‘Southern Group’, which contained HMAS Australia, HMAS Canberra, USS Chicago, USS Bagley and USS Patterson. On 7 August this group was protecting the transport ships to the south of Tulagi, from where they witnessed the Japanese air attacks on the ships off Gaudalcanal. The Bagley opened fire on a A6M2 Zero that came out of a cloud on a course parallel to her starboard side, and fired 26 rounds from her 5in guns without success.
On the night of 7-8 August the Southern Group patrolled to the south and east of Savo Island.
On 8 August the Bagley and Patterson carried out anti-submarine patrols around the transports off Tulagi. They also opened fire on a force of Japanese aircraft heading for Lunga Point, and this time the Bagley claimed one victory. After the attack was over the Bagley investigated several bombers that had been shot down into the water. The crew of one fired their pistols at the Bagley before committing suicide to avoid capture.
On the night of 8-9 August the ‘Southern Group’ was posted to the south-east of Savo Island. The group’s commander, Admiral Crutchley, took the Australia away to join a commander’s conference in Lunga Roads. He left Captain Bode of the Chicago in command of the group, but Bode assumed that Crutchley would soon be returning and didn’t issue any orders for the night. The four ships remaining in the group went to Readiness II, which for the three American ships meant that half of their weapons and all off the fire control and communications equipment was manned, and on the Canberra that all of the action stations were manned but some men were allowed to rest. The commanders of the Chicago, Canberra and Bagley all went to sleep. The four ships were arranged with the Canberra and Chicago in a line, and the Patterson to the front left and the Bagley to the front right.
On the Japanese side Admiral Mikawa was leading a force of seven cruisers and one destroyer towards Guadalcanal. This force slipped between two patrolling destroyers, USS Blue and USS Ralph Talbot, and came east around the southern side of Savo Island.
At about 0144 the Japanese float planes dropped flares that lit up the American warships, starting the battle of Savo Island. The Japanese fired torpedoes then opened fire. The Chicago was almost immediately hit by a torpedo. Both American destroyers turned to the left to try and fire their starboard torpedo tubes. The Bagley’s torpedoes weren’t ready in time, so continued to turn and fired her port torpedoes instead. Her torpedomen claimed to have scored a hit, but sadly it was probably on the Canberra. The two destroyers then continued on to the west into the gap between Savo Island and Guadalcanal, and didn’t see any more of the Japanese. In contrast the cruisers suffered heavy damage. The Canberra had to be sunk by American destroyers on the following day and the Chicago was badly damaged. In the meantime the Japanese moved on and attacked the Northern Group, inflicting mortal damage on the cruisers Vincennes, Astoria and Quincy. The Japanese then escaped back to the north having suffered very light damage.
The Bagley came alongside the Astoria’s starboard bow and by 0445 had picked up all the wounded from the forecastle. A flashing light from the stern indicated that there were survivors at that end too. The Bagley signaled that she had seen them, before rescuing survivors from the water (including some from the Vincennes). At daylight she came back alongside on the starboard quarter, this time to put a salvage party of 325 back onboard. During the day repeated efforts were made to save the ship, but the fires below deck were too fierce and at noon the order was given to abandon ship. The Bagley had rescued about 400 men, and the entire salvage crew was safely retrieved. The Bagley then withdrew to Noumea, arriving on 13 August.
On 19 August the Bagley joined TF 44, which then joined up with the Saratoga and Enterprise task forces south of the Solomon Islands. On 23 August American reconnaissance aircraft spotted a convoy of six transports and seven escorts heading for Guadalcanal, the start of a major Japanese attempt to reinforce their garrison on the island. This marked the start of the Battle of the Eastern Solomons, which saw the Americans sink the light carrier Ryujo, while Japanese carrier aircraft damaged the Enterprise. The Japanese convoy turned back.
After the battle the Bagley operated with the Saratoga until 29 August when she switched to the screen of the newly arrived Hornet (CV-8). Two days later the Saratoga was damaged by a torpedo from the submarine I-26 and forced to retreat for repairs.
The Bagley was ordered south instead, to join TF 44 and the Southwest Pacific Force. She arrived at Brisbane on 3 September, and spent most of the next six months protecting transports heading between Australia and New Guinea.
On 7 September the Bagley was part of Task Force 44 when it was sent to try and disrupt a Japanese attempt to rescue Japanese troops that had become trapped on Goodenough Island during the battle of Milne Bay. On 11 September the Bagley, Selfridge, Henley and Helm were detached from TF 44 to intercept two Japanese destroyers believed to be in Milne Bay. However no sign of them was found on the night of 11-12 September so the four destroyers rejoined the task force on 12 September. Despite the Allied effort the Japanese were able to rescue their troops.
On 21 September the Bagley was relieved by the Mugford (DD-389) and departed for Sydney, where her main battery director was repaired. This lasted until 7 October when she returned to Task Force 44’s base in the Palm Islands.
On 13 October she sailed with a task force that was covering a convoy carrying troops to Goodenough Island, which was occupied on 21 October.
In November she escorted a convoy carrying reinforcements to the fighting at Buna.
1943
On 5 February Bagley and Helm left Moreton Bay, Queensland, to escort a convoy to Noumea, arriving on 8 February.
On 15 March 1943 the Bagley became part of TF 74 in the newly formed 7th Fleet.
In mid May the Bagley escorted three troop transports from Townsville to Noumea, arriving on 22 May. From 22-29 May she sailed to Espiritu Santo and back, then underwent repairs at Noumea which lasted to 10 June and included a spell in the floating dry dock ARD-2.
On 10 June Bagley, Mugford and Helm left Noumea to escort a convoy to Brisbane, arriving on 14 June.
On 27 June the Bagley, Henley and SC-740 left Townsville to escort 2,600 troops and airfield equipment on six LSTs to Woodlark Island. The landings took place on the night of 30 June-1 July without opposition. The Bagley then escorted three more convoys of LSTs to Woodlark between 9 July and 7 August. She then escorted the Henry T Allen (AP-30) from Milne Bay to Cairnes and finally Brisbane.
The Bagley was back at Milne Bay on 19 August, and took part in patrols off Buna, Monrobe and Goodenough Island, to support the upcoming landings at Lae. This took place on 4 September, and on 6-11 September the Bagley escorted the empty invasion convoy back to Sydney.
In October she escorted three convoys from Townsville to Milne Bay.
On 8 November the Bagley moved to Buna, from where she escorted a convoy of three LSTs to Finschhafen to support the Australian 20th Brigade, arriving on 11 November. Over the next four weeks she escorted six more convoys from Buna, three to Finschhafen, one to Lae, one to Woodlark and one to Cape Cretin.
The next target was the western tip of New Britain, needed to give the Allies control of the Vitiaz and Dampier Straits and open up access to the western end of the north coast of New Guinea. On 14 December the Bagley was part of a force that left Buna heading for Arawe, where they landed the 112th Cavalry Regiment on 15 December. She was then used to escort the ships carrying the 7th echelon of the 1st Marine Division’s engineers, artillery and stores to Cape Gloucester. She was present during the pre-invasion shore bombardment early on 26 December then screened the LSTs as they landed troops. During the afternoon the task force was attacked by Japanese aircraft that sank the Brownson (DD-518) and damaged the Shaw (DD-373).
1944
At the start of 1944 the Bagley escorted the invasion force heading for Saidor on New Guinea, a leapfrog assault that bypassed a strong Japanese garrison further east at Sio. The Saidor force landed on 2 January 1944. The Bagley then escorted a convoy to Finschhafen and a convoy to Saidor, before departing for Sydney. She spent ten days there where her crew were able to enjoy a rare spell of shore leave. By the end of the month she was back at Milne Bay.
On 5 February she escorted a convoy to Saidor and on 6-7 February another to Cape Gloucester. On the evening of 6 February the convoy was attacked by a single Japanese aircraft, but the Bagley drove it off, firing 320 rounds of 22mm ammo. This ended her time in the south-west Pacific, and on 10 February she departed for the west coast.
She arrived at San Francisco on 27 February and on the following day entered the Mare Island Navy Yard for an overhaul that lasted for eight weeks. She was given two more 20mm AA guns and a twin 40mm gun tub, and improved fire control radar.
She departed for Hawaii on 5 May, where she joined the forces preparing for Operation Forage, the invasion of the Mariana Islands. On 3 June she reached Majuro Atoll in the Marshalls, where she joined the screen of the carrier Bunker Hill (CV-17), part of TG 58.2.
The fleet put to sea on 8 June heading for Saipan and Tinian. On 11 June the carrier’s aircraft attacked Japanese bases on those islands. On 12 June the Bagley screened the carriers, before joining the battleships of TG 58.7 to screen them during the pre-invasion shore bombardments. On 13 June she screened the fast battleships and on 14 June the older slower battleships as they bombarded both islands. During the evening of 14 June the Bagley also joined in, closing in to bombard Tinian town, firing 240 5in rounds. On 15 June she screened the initial landings on Saipan and on 17 June she returned to the bombardment group.
She was with the screen during the battle of the Philippine Sea (19-20 June 1944), when the Japanese conducted a massive but disastrous air attack on the American fleet. Most of the Japanese aircraft were destroyed by American fighters, but the Bagley did get to fire 24 5in shells at a Val and a Kate that passed 6,000 yards behind her and 147 20mm and 40mm shells at a Zero that came with 1,000 yards to her starboard.
On 25 June she returned to the Marianas, and spent the next two weeks on fire support duties, directed by fire control units on Saipan. She fired over 700 5in rounds, a mix of HE, white phosphorous and star shells into Japanese positions at the northern end of the island. On 6 July she took on more ammo from the Montpelier (CL-57) then fired 537 5in and over 1,000 20mm and 40mm rounds at Japanese strongpoints in caves and crevasses around the shore.
On 25 July she fired 200 5in shells at Tinian town. On 26 July two Japanese 5in shore guns fired at her, but missed. The Bagley fired four shots then called in an air strike.
This ended her involvement in the Marianas campaign. She returned to Eniwetok on 12 August and spent the next two weeks being repaired and restocked.
American attention was now turning to the Philippines. The Bagley’s first part in that battle was to form part of the screen of TG 38.4 (Franklin (CV-13), Enterprise, San Jacinto (CVL-30), two cruisers and eleven destroyers) as it attacked Japanese air bases in the Bonins, on Yap, the Palaus and Mindanao. However this started with a diversion raid on Iwo Jima (28 August-4 September). On 5 September the group sailed for the Palaus. On 7 September the Bagley took part in a shore bombardment of Yap, opening fire at 0931 and firing 200 5in rounds and gun emplacements. On the following day she screened the bombardment force.
The group then moved to the Palau Islands, where it supported the landings on Peleliu and Angaur. After a brief visit to the US base at Seeadler Harbor she departed with TG 38.4 to support mopping up operations in the Palaus on 24 September.
The full task force of four carrier groups then met up to carry out a massive raid on the Ryukyu Islands, Formosa and the Philippines. The Bagley screened the Enterprise during attacks on Okinawa and the Ryukyus on 10 October. On 11 October the target was Aparri in the Philippines.
On 12 October the task force turned its attention to Formosa, causing heavy damage to the remaining Japanese aircraft on the island. However the Japanese were still able to mount some limited night attacks on the fleet, and late in the day two damaged Betty bombers flew past. One was already on fire, came under heavy fire from the Bagley and crashed after one engine fell off but the other escaped. On the night of 13 October the Bagley claimed another victory during a Japanese night attack. On 14 October the fleet retreated east slowly, covering the damaged Canberra (CA-70), and also hoping that the Japanese might be lured into attacking her, thus exposing their aircraft to destruction. On 15 October the carriers attacked the airfields around Manila, and on 17 October airfields on Luzon.
It was now clear that the Americans were about to invade the Philippines, so the Japanese responded by sending what was left of their fleet to carry out a massive complex attack on the Americans (battle of Leyte Gulf). The Bagley was part of the screen for the carriers that sank the giant battleship Musashi (battle of the Sibuyan Sea, 24 October), but on the following day was also part of the carrier force that was lured north by the bait of exposed Japanese carriers coming from the north. Although these carriers were sunk off Samar, they carried very few aircraft and had always been a diversion for the main battleship attack further south. However that fleet failed to take full advantage of the American mistake and was eventually forced to retreat after failing to overwhelm a force of escort carriers. During the fighting off Samar the Bagley was close by when the light carrier Chiyoda and destroyer Hatsuzuki were sunk.
On 30 October the Bagley’s task group launched raids on Japanese airfields on Luzon. However five Japanese kamikaze aircraft made it through the combat air patrol. The Bagley and the rest of the screen managed to shoot down three, but two got through, hitting the carriers Franklin and Belleau Wood. Both carriers suffered heavy damage, with 148 men killed and 45 aircraft destroyed. The Bagley had been alongside the Franklin taking on fuel when the Japanese attacked, but was able to quickly cast off. After the battle the task group returned to Ulithi.
On 10 November the Bagley sailed with TU 77.4.1 (Hoggatt Bay (CVE-75) and Tulagi (CVE-72) to support the ground operations on Leyte. On 22 November she rescued the crew of a Lockheed PV-1 that had been shot down by friendly fire. The Bagley returned to Seeadler Harbor on 27 November and spent the next month training and being repaired.
On 27 December, the destroyer got underway for the Palaus, arriving there on the 30th.
1945
On 1 January 1945 the Bagley left the Palaus as one of 19 destroyers in TG 77.2 and 77.4, which also contained twelve escort carriers. Their target was Lingayen Gulf, the site of the American invasion of Luzon. The force came under heavy kamikaze attack during the voyage. On 4 January the Ommaney Bay (CVE-79) was hit and eventually sank. On 5 January four waves of kamikazes attacked. During the third wave the Columbia (CL-56), Manila Bay (CVE-61), HMAS Australia and the Stafford (DE-441) were all hit, although only the destroyer escort had to return to base.
From 6 January the Bagley screened the escort carriers, while their aircraft carried out ground attack missions to support the fighting at Lingayen. On 13 January the kamikazes returned. One hit the Salamaua (CVE-96) and another attacked the Bagley, but was shot down when about 1,000 yards from the carrier. After four more quite days the group returned to Ulithi, arriving on 23 January.
The Bagley’s next role was to escort the escort carriers of TG 52.2 as they supporting the invasion of Iwo Jima. The group arrived in their operating area west of the island on 16 February and the Bagley spent the next three weeks escorting the escort carriers or on air-sea rescue duties on the route used by B-29 bombers attacking Honshu. She left Iwo Jima on 12 March and was back at Ulithi on 15 March.
After six days she departed to take part in the invasion of Okinawa, this time as part of the screen for the escort carriers of TG 52.1. The group arrived off Okinawa on 25 March, and the Bagley was used to screen the Anzio (CVE-57) while her aircraft carried out group attack missions. She spent most of April on this duty, but it was largely uneventful. On 12 April one aircraft attempted to attack, and on 28 April a Yokosuka MXY-7 Ohka suicide aircraft passed overhead at high altitude.
On 30 April the Bagley and Lawrence C Taylor (DE-414) escorted the Rudyerd Bay (CVE-81) to Kerama Retto to replenish her supplies. At the same time the Bagley was loaded with 400 rockets, which she delivered to the Fanshaw Bay (CVE-70) on 2 May. For the first three weeks of May she was used to screen the escort carriers and to deliver mail. On 19 May she also rescued an airman whose aircraft had come down into the sea.
On 24 May her number one main generator blew, and she had to return to the Philippines for repairs, arriving on 27 May.
On 15 June she departed from Leyte for her last combat mission. She met up with the six escort carriers of TG 31.1 on 18 June, and she screened them during a week of air strikes against Okinawa.
However after a week her main battery director failed, and she once again had to return to Leyte for repairs. However this time the repairs were too complex to be dealt with there, so she had to retire to Guam, where the new director was installed.
On 15 July she left for Saipan, where she carried out training before a planned return to Okinawa. She left the Marianas on 6 August escorting a convoy of merchant ships heading for Okinawa, arriving on 12 August. She then departed with a return convoy, but three days in heard the news of the Japanese surrender.
After ten days of rest, the Bagley departed for Marcus Island carrying Rear Admiral Francis E. M. Whiting. On 31 August the Japanese Rear Admiral M Matsubara signed the surrender of the island and its garrison onboard the Bagley.
The Bagley then returned to Saipan, from where she was sent to Japan, arriving at Sasebo on 20 September. For the next five weeks she was used to mark minefields, support minesweepers and as a courier between Sasebo, Nagasaki and Wakayama. Some of her officers also helped inspect the few surviving Japanese warships to make sure the terms of the surrender were being obeyed.
The Bagley left Sasebo on 29 October heading for the United States and reached San Diego on 19 November. She returned to Pearl Harbor in late April 1946, possibly with the intention of her being used at the Bikini Atoll atomic tests, but instead she was inactivated at Pearl Harbor on 2 May, decommissioned on 13 June, towed back to San Diego and sole for scrap on 8 September 1947.
Bagley (DD-386) earned 12 battle stars for World War II service, for Pearl Harbor, the Pacific Raids of 1942, the invasion of Guadalcanal, the Bismarck Archipelago, Eastern New Guinea, Marianas, Tinian, Western Caroline Islands, Leyte, Luzon, Iwo Jima and Okinawa.
Displacement (standard) |
1,624.3t |
Displacement (loaded) |
2,245t |
Top Speed |
38kts design |
Engine |
2-shaft General Electric turbines |
Range |
6,500nm at 12kts design |
Armour - belt |
|
- deck |
|
Length |
341ft 3in |
Width |
35ft 6.5in |
Armaments |
Four 5in/38 guns |
Crew complement |
158 |
Laid down |
31 July 1935 |
Launched |
3 September 1936 |
Commissioned |
12 June 1937 |
Sold |
8 September 1947 |
 U.S. Destroyers: An Illustrated Design History, Norman Friedmann .
The standard history of the development of American destroyers, from the earliest torpedo boat destroyers to the post-war fleet, and covering the massive classes of destroyers built for both World Wars. Gives the reader a good understanding of the debates that surrounded each class of destroyer and led to their individual features.
U.S. Destroyers: An Illustrated Design History, Norman Friedmann .
The standard history of the development of American destroyers, from the earliest torpedo boat destroyers to the post-war fleet, and covering the massive classes of destroyers built for both World Wars. Gives the reader a good understanding of the debates that surrounded each class of destroyer and led to their individual features.
 USS Bagley (DD-386) off Mare Island Navy Yard 1944