|
|
USS Helm (DD-388) was a Bagley class destroyer that fought at Pearl Harbor, during the invasions of Guadalcanal and New Guinea, the invasion of the Marianas, the battle of Leyte Gulf, the invasion of Luzon, Iwo Jima and Okinawa.
The Helm was named after James Meredith Helm, who served in the US Navy during the Spanish-American War and who commanded the 4th Naval District during the First World War.
The Helm (DD-388) was launched at the Norfolk Navy Yard on 27 May 1937 when she was sponsored James Helm’s widor Mrs. J. M. Helm and commissioned on 16 October 1937. She was launched alongside her sister ship Blue (DD-387), but wasn’t quite as advanced as the Blue, not having had her guns installed yet.
After her shakedown cruiser the Helm operated in the Caribbean, then took part in the summer exercises of 1938. On 1 October 1938 she joined the new Atlantic Squadron. Early in 1939 she served with Carrier Division 2 during that year’s Fleet Problem, which was conducted in the Caribbean.
In May 1939 she was moved to the West Coast, where her new base was San Diego. She then took part in the general move of the Pacific Fleet to Pearl Harbor.
From September 1941 until February 1943 she was commanded by Chester Edward Carroll, who was awarded the Bronze Star Medal with Combat ‘V’ for her performance while in charge.
When the Japanese attacked Pearl Harbor the Helm was underway, heading along the West Loch channel. The first Japanese aircraft was spotted at 0759 and soon afterwards she was strafed by Japanese aircraft. However she couldn’t fire back, as the forward machine guns were coated with preservative grease which had to be cleaned off. The Helm backed out of the West Loch channel, and at 0805 was able to open fire with her aft machine guns, followed two minutes later by her 5in guns. At 0810 she shot down an aircraft which was seen to crash near Hickam Field. By now she was in the main channel, where at 0817 she reported spotting the conning tower of a submarine, but it submerged before she could open fire. Another submarine was spotted at 0820, but again escaped. This may have been the submarine commanded by Ensign Sakamaki, who reported being fired on by a destroyer at this time.
She then patrolled outside the harbour entrance. At 0915 a Japanese aircraft dropped two bombs on her, one missing by only 20 yards and the other by 50 yards. The shock damaged her main steering controls, which had only just been repaired after an electrical fault. Four compartments were flooded after seams below the waterline began to leak. Part of the director control for the AA guns failed. The gunnery director also suffered minor damage. She spent the rest of the morning patrolling, before she was ordered to join the Detroit at 12.15. On the following day she was forced to return to port after the damage to her gunnery director worsened in heavy seas until it was in danger of falling overboard.
In the aftermath of the attack and repairs to her damage the Helm joined the task force built around the newly arrived carrier Saratoga, and served as a plane guard and in her screen.
1942
On 15 January the Helm went into the drydock on the Yard’s marine railway for permanent repairs to the shell plating, structure, electrical lines and gun directors damaged by the near misses.
On 20 January the Helm left Pearl to rescue Department of the Interior works from Howland and Baker Islands, a US territory about half way between Hawaii and Australia. The islands had been bombed by Japanese aircraft from Kwajalein on 8 December and shelled by a submarine two days later. The Helm arrived on 31 January and picked up the six survivors. Later on the day she was attacked by a Japanese patrol bomber but drove it off. She returned to Pearl Harbor on 6 February.
This was followed by a round trip to San Diego and Mare Island, where she was photographed on 25-26 February 1942.
On 15 March she left Pearl Harbor to escort a base party heading to the New Hebrides, arriving at Efate on 19 March. She spent the next few weeks operating in that area while new U.S. bases were quickly constructed.
On 6 April she was photographed at Noumea, New Caledonia.
On 9 May she rescued 13 survivors from the SS John Adams, and on 16 May she rescued four from the oiler Neosho (although two later died), which had been sunk during the battle of the Coral Sea. She then moved to Brisbane, Australia, arriving on 19 May, where she joined Task Force 44, commanded by the British Rear Admiral Crutchley.
For the next two months the Helm preformed escort duties along the Australian coast.
In late July the Helm moved to Fiji to join the fleet being gathered for the invasion of Guadalcanal. On 7 August she took part in the invasion itself, screening the transports.
At the battle of Savo Island (8 August 1942) the Helm was part of the Northern Group (Vincennes (CA-44), Quincey (CA-39), Astoria (CA-34), Helm and Wilson (DD-408)). On the night of 7-8 August this group was patrolling between Savo and Florida Islands, with a second group of cruisers to the south and two picket destroyers to the north. However the Japanese force under Admiral Mikawa was able to get past the picket undetected and at 0138 they attacked the southern group, hitting HMAS Canberra and USS Chicago. They then moved on to attack the northern group, once again managing to catch them by surprise. The Japanese opened fire at 1.50 and within a few minutes all three American cruisers were on fire. When the Japanese opened fire they were south of the American force. The Helm was heading north-west, and was ahead and to the left of the leading cruiser Vincennes. At the start of the battle the Helm fired a single erratic salvo but was ignored by the Japanese cruisers. The Helm was then ordered to turn south to attack the Japanese, and briefly came under fire from the Kinugasa. The Japanese fired two salvoes at the Helm without success, and the Americans didn’t realise they had been fired on. The same happened a few moments later when the Aoba fired a salvo at her and again when the Kinugasa fired a third salvo. The Helm then disappeard into a rain squall and the Japanese reported sinking her. At about 0200 the Helm spotted a ship to the south-west, turned towards it and prepared to attack. However just in time it was realised that this was the Bagley.
The Helm then turned back to the north-east to try and find the Japanese. At about 0205 the Vincennes and Quincy came into sight, already looking damaged. The Helm turned north to try and pass between the two cruisers, but almost collided with the Wilson. At this point the Helm still hadn’t actually seen any of the Japanese, so although she knew her formation was under attack she didn’t know who by or from where. At 0210 she received an order for all destroyers to concentrate to the north of Savo Island, so turned north. This brought her close to the Ralph Talbot, one of the two picket destroyers, which was being illuminated by searchlights from the Tenryu. The Helm turned to the north-west to investigate. By 0225 she was able to identify the Ralph Talbot as friendly, but the firing then ended. The Helm could no longer hear or see any action, so continued on to the concentration point north of Savo Island.
The Helm spent the rest of the night in the concentration area. At daylight she and the Wilson headed back towards the area when the cruisers had been fighting. By this point the Vincennes had already sunk, and at about 0630 the Helm began to pick up survivors. This continued to 0915 when she was ordered to screen the Astoria, which was still afloat. By this point the Helm had picked up 171 men from Vincennes, 3 from Astoria and 1 from Quincy. The Helm spent the rest of the morning screening the Astoria while efforts were made to save her. She was then ordered to transfer all of the survivors she had rescued to the Hunter Liggett. The efforts to save the Astoria failed, and all three of the cruisers of the Northern Group were lost in a disasterous battle. The only positive was that Admiral Mikawa had decided to attack the cruisers instead of the vulnerable transport ships, a move that would have been much worse for the Americans fighting on Guadalcanal.
Over the next few weeks the Helm continued to operate around Guadalcanal, performing a mix of escort and patrol duties.
On 21 August the Blue (DD-387), Henley (DD-391) and Helm arrived at Guadalcanal, as the escort for the cargo ships Fomalhaut (AK-22) and Alhena (AKA-9).
From 29 August-1 September the Helm escorted YP-284, YP-239 and YP-346, three patrol vessels converted from tuna clippers, to Guadalcanal.
She then moved to Brisbane, where she joined the Southwest Pacific Force. On 7 September the Helm left Brisbane as part of British Admiral Victor Crutchley’s Southwest Pacific Force, which was attempting to catch the Japanese cruiser Tatsuta and destroyer Arashi, where were operating to the east of New Guinea. The fleet then attempted to stop two Japanese destroyers rescuing a Japanese force that had been trapped on Goodenough Island when their transport barges were sunk.
Her main role with the Southwest Pacific Force was to support the fighting on New Guinea, where Australian and American troops were fighting the Japanese at the eastern end of the long island.
On 9 October 1942 the Mugford (DD-389), Helm (DD-388) and Patterson (DD-392) took part in gunnery exercises inside the Great Barrier Reef, near the Palm Islands.
1943
Early in 1943 the Helm, Mugford (DD-389), Phoenix (CL-46) and Hobart formed TF 44 and took part in Operation Lilliput, escorting convoys from Milne Bay to Oro Bay on New Guinea to support the US 32nd Infantry Division and 7th Australian Division during the fighting around Buna, Gona and Sanananda.
On 26 June the Helm and Mugford formed TU 76.2.1, and then escorted a convoy of LSTs carrying troops to Woodlark Island, where they landed on 1 July. The Helm then spent the rest of the month escorting further convoys of LSTs to Woodlard Island, before moving to Milne Bay, New Guinea, on 7 August.
On 3 July 1943 the Helm and the Australian destroyer HMAS Arunta met the cruiser Phoenix in the China Strait as she returned from an overhaul in Philadelphia, and escorted her into Milne Bay.
On 6-7 December the Helm trained with the Australian-American TF 74 in the Coral Sea.
On 24 December the Helm left Milne Bay as part of Admiral Crutchley’s TF 74 to take part in the attack on Cape Gloucester on New Ireland. She took part in the pre-invasion bombardment on 26 December then carried out close support missions to support the fighting on shore.
1944
At the start of 1944 the Helm supported the landing at Saidor on 2 January, which saw the Americans bypass a strong Japanese position further to the east. She then continued her escory duties around Guadalcanal and Milne Bay into mid February.
On 19 February the Helm and Mugford left Tulagi to escort three merchant ships to Pearl Harbor, arriving on 24 February. The two destroyers then continued on to the US West Coast. The Helm escorted the Maryland and the two arrived at Mare Island Navy Yard on 4 March.
The Helm left San Francisco on 5 May, presumably after a brief refit and overhaul. She arrived at Pearl Harbor on 10 May where she took part in refresher training, then reached Kwajalein on 7 June to join Task Force 58 (Admiral Mitscher), which was about to take part in the invasion of the Marianas. She sailed with the task force as part of the screen for the fast carrier forces. From 11-13 June they guarded the western approachs of the islands to block any Japanese reinforcements. They then took part in a strike on the Bonin Islands, before returning in time to take part in the battle of the Philippine Sea, which saw a massive Japanese aerial assault on the US fleet defeated at great cost to the Japanese. They were never able to rebuild their naval aviator forces, which had a massive impact on the final major battle at sea at Leyte Gulf.
On 8 July the Helm rescued five Japanese airmen whos aircraft had been shot down while attacking the US fleet off Guam.
On 9 July Helm and Oakland (CL-95) were used to rescue pilots from the seas off Guam and to bombard targets on the Orote Peninsula.
The Helm spent the next two months operating with the fast carriers as they raided Japanese bases in the Bonin and Volcano Islands, the Palau Islands, Iwo Jima and supported the invasion of Guam. On 2 September she sank two Japanese ships off Iwo Jima, possibly two cargo ships or a cargo ship and a patrol vessel.
On 24 September the Helm and her carrier group sortied from Seeadler Harbor. After an attack on the Palaus the task force, now with seventeen aircraft carriers, carried out a strike on Okinawa (10 October), followed by three days of attacks on Formosa, which largely destroyed what was left of Japanese air power on the island. However the Japanese were still able to strike back, and on 13 October the Helm shot down on Japanese bomber and helped shoot down several others. The task force then returned to the Philippines and attacked air bases on the east coast of Luzon to prevent aircraft based there interfering during the invasion of Leyte.
The invasion of Leyte triggered the final major naval battle in the Pacific, the battle of Leyte Gulf. The Japanese split their fleet into three, with the carriers used as a diversionary force in the north in the hope that the Americans would dash north and leave their transports vulnerable. The central force, with the heaviest battleships, would then emerge from the San Bernardino Strait and destroy the transports. The plan almost worked, but still ended as a massive defeat for the Japanese.
The Helm was part of Task Group 38.4 during the battle of the Sibuyan Sea (24 October 1944), in which American carrier aircraft sank the giant battleship Musashi and temporarily forced the Japanese central force to turn back.
This helped convince Admiral Halsey that he was free to dash north on the following day to attack the Japanese carriers (battle of Cape Engano, 25 October 1944), and the Helm accompanied his carriers. The Americans sank four Japanese carriers but they were only a decoy as they carried almost no aircraft. Instead the main danger came in the centre, where the central force had turned back once again and emerged from the San Bernardino Strait. Once out they attacked the escort carriers of Taffy 3, but a skilful defence largely thwarted the Japanese who eventually withdrew, missing a chance to attack the vulnerable transport ships (battle of Samar). Admiral Halsey eventually turned south to try and intercept the Japanese, but without success. However despite this one blemish, the battle of Leyte Gulf had been a massive American victory, effectively ending Japanese naval power.
On 26 October the carriers returned to Leyte to support the ground fighting. They came under attack by Japanese land based aircraft, and also by submarines. However on 28 October the Helm and Gridley detected and sank the submarine I-46.
The biggest threat was now the kamikaze. On 30 October the Franklin and Belleau Wood were both damaged by suicide attacks, and the task group had to retreat to Ulithi. They returned to the Philippines again between 5-20 November, hitting shipping and shore targets.
The Helm was then detached from TG 38.4 and sent to Manus, to join the force being gathered for the invasion of Lingayen Gulf on Luzon. She set sail on 27 December with the invasion task force.
1945
Once again the main threat came from the kamikaze. On 4 January they sank the escort carrier Ommaney Bay, despite the best efforts of the Helm to shoot down the attacks.
On 5 January the Helm was slightly damaged by a kamikaze attack which just clipped her, knocking off her aft mast and a searchlight.
From 6-17 January the Helm was part of the screen for the carriers as they operated to the west of Lingayen Gulf and provided air support for the landings.
On 12 February the Helm sailed as part of the screen of a group of escort carriers heading for Iwo Jima. The force arrived off the island on 16 February and the Helm formed part of the anti-aircraft screen for the carriers during the pre-invasion landings. The landings took place on 19 February. On 21 February the carrier Bismarck Sea was sunk by kamikaze attack. The Helm rescued some of the survivors. She remained off Iwo Jima until 7 March when she departed for Leyte and repairs.
On 27 March she sailed once again, this time as part of the screen for the escort carriers taking part in the invasion of Okinawa. She screened them during the pre-invasion bombardment, and after the landings of 1 April. Once again the fleet came under heavy kamikaze attack, and the Helm helped to shoot down a significant number of aircraft. At the start of May she helped escort the carrier Block Island (CVE-106) to the combat zone. She returned to Leyte on 19 June after the island had been secured.
The Helm was next used as an escort and patrol ship based at Ulithi and Leyte. From 3-6 August she took part in the survivors from the Indianapolis (CA-35), which had been sunk on 30 July. Tragically it took three and a half days for the navy to realise that she had been sunk, so by the time the rescue effort began most of the survivors of the initial sinking had died. The Helm retrieved 28 bodies, although not all of them could be identified, having been in the sea for several days, where many had been partly eaten by sharks. Only 316 survivors were resuced, although around 900 men are believed to have survived the sinking.
The Helm was on her way from Okinawa to Ulithi when the Japanese surrendered on 15 August. She turned back to Okinawa, then went to Iwo Jima where she joined the air-sea rescue operation in the Bonins. She was relieved by the destroyer escort USS Tomich (DE-242) on 5 September 1945.
On 6 September the Helm and Lamson departed for Okinawa, arriving at Buckner Bay on 8 September. On 19 September, after the Japanese surrender, the Helm left for Japan, arriving at Sasebo on 23 September. She served as a shipping guide and patrol vessel off Japan until 26 September when she returned to Okinawa.
After a second visit to Japan the Helm departed for Pearl Harbor on 29 October. She returned to the US on 19 November, but then returned to Pearl Harbor where she was decommissioned on 26 June 1946. She was then selected as a target ship for Operation Crossroads, the atomic bomb tests at Bikini Atoll, but wasn’t one of the ships in the target area for either test. She was then sold for scrap in October 1947.
Helm received 11 battle stars for World War II service, for Pearl Harbor, the landings on Guadalcanal, the Bismarck Archipelago, Eastern New Guinea, the Marianas, Western Caroline Islands, sinking I-46, Leyte, Luzon, Iwo Jima and Okinawa.
Displacement (standard) |
1,624.3t |
Displacement (loaded) |
2,245t |
Top Speed |
38kts design |
Engine |
2-shaft General Electric turbines |
Range |
6,500nm at 12kts design |
Armour - belt |
|
- deck |
|
Length |
341ft 3in |
Width |
35ft 6.5in |
Armaments |
Four 5in/38 guns |
Crew complement |
158 |
Laid down |
|
Launched |
27 May 1937 |
Commissioned |
16 October 1937 |
Sold for scrap |
October 1947 |
 U.S. Destroyers: An Illustrated Design History, Norman Friedmann .
The standard history of the development of American destroyers, from the earliest torpedo boat destroyers to the post-war fleet, and covering the massive classes of destroyers built for both World Wars. Gives the reader a good understanding of the debates that surrounded each class of destroyer and led to their individual features.
U.S. Destroyers: An Illustrated Design History, Norman Friedmann .
The standard history of the development of American destroyers, from the earliest torpedo boat destroyers to the post-war fleet, and covering the massive classes of destroyers built for both World Wars. Gives the reader a good understanding of the debates that surrounded each class of destroyer and led to their individual features.
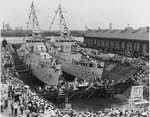 Christening of USS Blue (DD-387) and USS Helm (DD-388)
 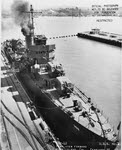 USS Helm (DD-388), Mare Island Navy Yard, 1942
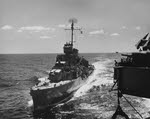 USS Helm (DD-388) alongside USS Makin Island (CVE-93) off Iwo Jima