New Guinea during
the Second World War
|
|
Background
Geography
Allied plan
Salamaua-Lae
Huon Peninsula and Finisterre Campaigns
Operation Postern - The Markham Valley/ Huon Peninsula Campaign of 4 September 1943-24 April 1944 saw a largely Australian force clear the Japanese from the Huon Gulf and the Huon Peninsula and ended with the fall of the major Japanese base at Madang, to the north-west of the Huon Peninsula. It was carried out as part of Operation Cartwheel, the overall plan to isolate the powerful Japanese base at Rabaul.
The Japanese had first arrived in the Huon Gulf in March 1942, when they captured Lae and Salamaua, helping to secure the sea route between New Guinea and New Britain. They also became key bases during the Japanese campaign in Papua New Guinea, which began with the capture of Buna and Gona on the north coast, and peaked with the Japanese advance over the Kokoda Trail. After the failure of this offensive the Australians fought their way back north over the trail, and then alongside the Americans expelled the Japanese from Buna and Gona at the end of 1942 and the start of 1943. Around 5,400 Japanese troops escaped from Buna and Gona and retired to Salamaua and Lae. After the end of this campaign the nearest Allied troops to Salamaua and Lae were based at Wau, in a valley parallel to the coast near Salamaua, where they had been observing the Japanese since they first arrived. General Adachi, the command of the Japanese Eighteenth Army, was determined to defend Salamaua and Lae, which were seen as a key part of the defences of Rabaul. In March the Japanese attempted to send eight transports from Rabaul to Lae, but all eight were sunk by Allied airpower (Battle of the Bismarck Sea, 2-4 March 1943). Only around 1,000 men reached Lae and Salamaua, and this marked the last Japanese attempt to ship large numbers of reinforcements into the Huon Gulf.
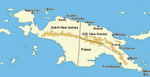
As always in New Guinea much of the fighting would be dominated by the geography of the local area. The coast runs north-west from the Gona/ Buna area into the Huon Gulf, where the Markham River flows into the sea. North of the river the Huon Peninsula juts out to the east for just over 50 miles, before turning north at Finschhafen. The coast then curves around to the north-west and runs in that direct for around 150 miles, reaching the splendidly named Astrolabe Bay. Bogadjim, at the head of the bay, was also the start of a trail south into the Ramu Valley, while just to the north was the important Japanese base of Madang.
About forty miles inland two river valleys ran parallel to the coast. The Markham River flows roughly south-east, flowing into the Huon Gulf near Lae. There is then a watershed before you reach the Ramu Valley. This river flows north-west, parallel to the coast, and eventually flows into the sea about half way between the Japanese bases at Madang and Wewak, west of Hansa Bay.
The area between the coast and the Markham and Ramu Valleys is filled with mountains. In the east the Cromwell Mountains fill the interior of the Huon Peninsula. In the centre of our area the Saruwaged Range fills the gap. In the west is the Finisterre Range, which eventually fades away into a flatter area some way to the west of Astrolab Bay. There were very few routes across the mountains, but the Japanese had built a trail from Bogadjim towards the Ramu Valley.
The Japanese had bases at Salamaua and Lae in the Huon Gulf, Finschhafen on the eastern tip of the peninsula, Sio on the northern coast and Madang to the nort of Astrolabe Bay. Madang was the HQ for the Eighteenth Army at the start of the campaign.
Early in 1943 the Allies produced a series of plans aimed as capturing, then later isolating, the Japanese base at Rabaul. The third of these was adopted as the Eklton III plan of 16 April 1943. Operation II of Eltkon III called for MacArthur's South-West Pacific Forces to capture Lae, followed by Salamaua and Finschhafen, and finally by Madang. Lae was to be attacked two months after the start of Cartwheel. Salamaua and Finschhafen were to be attacked six weeks later, and Madang two weeks after that. D-Day for Cartwheel was set for 30 June, so Lae was to be attacked at the end of August, Salamaua and Finschhafen in mid-November and Madang at the start of December. Although the overall framework of Cartwheel was followed, the exact order of events did change, as did the timing.
The first part of Operation Postern was the capture of Lae and Salamaua, at the head of the Huon Gulf. Work on this target began before Postern, with Australian troops from the 17th Brigade advancing from Wau and American troops landing at Nassau Bay on the night of 29-30 June (the same day as Operation I/ Operation Chronicle). The two forces combined and advanced north, taking Mubo village on 17 July, then capturing Mount Tambu, between Mubo and Salamaua, in mid August. General Adachi believed that if Salamaua fell then Lae would be lost, and so he sent 9,000 of his 11,000 men to Salamaua.
This meant that the Lae area was fairly weakly defended when Operation Postern got underway. On 4 September the Australian 9th Division landed on the coast east of Lae, and began to advance west. On 5 September US paratroops captured Nadzab, and on the following day the Australian 7th Division began to fly in and advanced east towards Lae.
This helped convince Adachi that Lae and Salamaua could no longer be held. He decided to withdraw his troops towards Finschhafen, at the tip of the Huon Peninsula. On 11 September American troops made an unopposed entry into Salamaua, and on 16 September troops from the Australian 7th Division captured Lae.
The fighting for Salamaua and Lae coast the Australians 500 dead and 1,300 wounded, the Americans 81 dead and 396 wounded and the Japanese 2,722 dead.
Huon Peninsula and Finisterre Campaigns
The second phase of the campaign saw the Allies advancing on two separate fronts. One force advanced up the Markham Valley then down the Ramu valley before turning north to reach the coast around Bogadjim (Finisterre Range Campaign). The second force followed the coast as it ran around the Huon Peninsula (Huon Peninsula campaign). This second campaign had the highest priority, and also faced the most determined Japanese opposition, at least to start with.
The western force moved first, reaching Kaiapit in the upper Markham by 20 September. Two days later the Australians landed north of Finschhafen, and began to push south towards the port, which fell on 2 October. Two days later the western force captured Dumpu in the Ramu valley.
On 16 October the Japanese launched a counterattack towards the Australian beachhead north of Finschhafen. They managed to break through to the coast, temporarily cutting the Australian position in half, but they then ran out of steam. On 19 October they were forced to abandon their positions on high ground near the beach, and soon afterwards they were forced back to their starting point. In the same month the western force got its first foothold on Shaggy Ridge, a dominating feature overlooking the Faria River, at the southern end of the best route across the mountains from the Ramu to the coast.
Late October saw the Australians go onto the offensive around Finschhafen. On 29 October they began an attack towards Sattelberg, a Japanese position to the west of the beachhead, from where the counterattack had been launched. The Japanese held on for almost a month, but Sattelberg was finally captured on 25 November. The Australians then turned north and captured Wareo (26 November-10 December 1943), the last Japanese inland position near Finschhafen. This removed the main threat to the Australian beachhead and allowed them to begin a drive around the northern coast of the peninsula.
The Japanese also launched a minor counterattack in the Ramu, beginning on 8 December (Battle of Dumpu). This saw them push the Australians back a short distance from their positions west of Dumpu. The biggest attack came on the night of 12-13 December, and forced the Australians to pull back a little further, but the attack had coast the Japanese so many men that they were unable to follow up, and instead they were forced back to their starting positions. This freed up the Australians to attack the Japanese positions on Shaggy Ridge. At the top of the ridge there were four individual summits, starting at 'the pimple' Despite the difficulties caused by the mountainous terrain the Pimple fell to the Australians on 27 December. The Japanese still held the fourth and highest of the summits, but were unable to push the Australians back.
The nature of the campaign changed on 2 January 1944 when US forces landed at Saidor, on the coast west of the advancing Australian forces on the Huon. The end of the operation was something of an anti-climax. After the Allied landings at Saidor the Japanese decided to evacuate their remaining troops from the area. The Japanese 20th and 51st Divisions moved inland and then carried out an impressive but costly march through the Finisterre Range, eventually reaching Madang in mid-February. Only half of the 20,000 men who set out reached Madang.
The key battle in the Finisterre range came at the end of January when the Australians carried out a three pronged assault on the Kankiryo saddle, at the top of the Faria Valley. The saddle was captured on 26 January 1944 and the last Japanese position on Crater Hill was taken on 1 February. The Japanese then began a fighting retreat back towards the coast, but on 13 April the advancing Australians reached Bogadjim on the north coast. By then patrols from the two wings of the Allied advance had met up in the mountains. By now the Japanese had decided to abandon Madang as well, and in mid-April General Adachi's men began to pull back west, heading for Wewak. On 24 April Australian troops made an unopposed entry into Madang.
The fall of Madang marked the effective end of Operation Postern. The aims of Operation II of Elkton III had been achieved, and the New Guinea side of the Vitiaz had been secured. The next part of the plan, Operation III, had already begun. This called for the invasion of the western end of New Britain, on the opposite side of the strait. The plan was implemented as Operation Dexterity. This began with a diversionary landing at Arawe on 15 December, before the main landings took place at Cape Gloucester on 26 December.
General Adachi's men had suffered heavy losses as they escaped from Sio and Madang, but their suffering was not yet over. As they prepared to defend the major base at Wewak, the allies were preparing to bypass them once again. In April 1944 the Allies carried out Operation Reckless, the invasions of Hollandia and Aitape. Adachi was now trapped between two Allied forces. He decided to try and break out to the west, and in late June attacked the American lines on the Driniumor River. After the failure of this attack he retreated back to Wewak. The Japanese were then left along until the spring of 1945 when the Australians began an costly offensive that eventually forced Adachi to retreat into the mountains. When he finally surrendered on 13 September 1945 only 13,500 of the 30,000 men who had originally been bypassed were still alive.