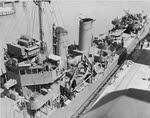
 USS Aylwin (DD-355) at Mare Island, 1942
 |
|
USS Aylwin (DD-355) was a Farragut class destroyer that fought at Pearl Harbor, the battles of the Coral Sea, Midway, Guadalcanal, the Aleutians, the Gilbert Islands, the Marshall Islands, Hollandia, the Marianas, the Philippines, Iwo Jima and Okinawa.
The Aylwin was named after John Cushing Aylwin, a US naval officer who served in the War of 1812 and died of wounds he suffered during the clash between the Constitution and HMS Java on 29 December 1812.
The Aylwin was laid down at the Philadelphia Navy Yard on 23 September 1933, launched on 10 July 1934 (when she was sponsored by Elizabeth Farley, the 11 year old daughter of Postmaster General James Farley), and commissioned on 1 March 1935. Her shakedown cruise took her to Portugal, Spain, France, Germany, Sweden, Belgium and Britain, and lasted for two months, ending on 22 July. After post-shakedown repairs and trials she joined the fleet at the start of October. She was allocated to the Pacific Fleet, and passed through the Panama Canal on 7 October.
Instead of heading to her new base, the Aylwin’s first task in the Pacific was to take up a post off Champerico, Guatemala, to act as marker during an experimental flight of the Consolidated XP3Y-1, the prototype of what became the PBY Catalina. The aircraft had flown non-stop from Norfolk, Virginia to Coco Solo in the Canal Zone, and was about to fly from Coco Solo to San Francisco. The Aylwin laid smoke to mark her position on 14 October, and the aircraft flew over at 12.45. It reached San Francisco on the following day, setting a seaplane distance record of 3,281.402 statue miles on the way. The Aylwin and her sister ship Hull then moved to their new home base at San Diego, arriving on 19 October.
The Aylwin joined in with the regular life of the fleet, taking part in visits to Alaska and the north in the summer, operating off California in the winter and taking part in several of the large scale Fleet Problems.
On 27 April 1936 she departed from San Diego to head for the Canal Zone and Fleet Problem XVII. This saw the Battle Fleet operate against the Scouting Force supported by submarines. The Aylwin was used to carry out simulated gun attacks on destroyers and torpedo attacks o the battle fleet. After the exercise was over she paid a visit to Peru, where she briefly became the flagship of Rear Admiral Sinclair Gannon, Commander, Destroyers, Scouting Force, as he returned to San Diego onboard. This was followed by a visit to Alaska, Washington State and Portland. In late August she took part in exercises with the Worden (DD-352) and Monaghan (DD-354), but these had to be interupted by a search for two missing ships, the tuna boat SS San Juaguin in the fully rigged ship Pacific Queen. Neither were found by the Navy, but both returned to port safely.
On 16 April 1937 the Aylwin departed for Hawaii to take in Fleet Problem XVIII. She formed part of the Hilo Detachment, and in late April carried out a ‘bombardment’ of Hilo before forming part of the screen for the Houston (CA-30) and Ranger (CV-4) as they covered a landing at Hilo. In May she formed part of the ‘White Force’, but after driving off two air attacks she got mixed up with ships that were already out of action, then ended up being knocked of the exercise by three fast mine layers from the ‘Black Force’.
In March 1938 Aylwin joined the ‘White’ fleet for Fleet Problem XIX. In the first phase of the exercises she supported a force of cruisers as they attacked the ‘Black’ fleet’s main body. In the middle phase she supported a mock landing on Lahaina. In the third phase she helped screen the battleships of the ‘White’ fleet. In June-August she cruised in the Pacific North-West. In October-November she was at Pearl Harbor for repairs and alterations before returning to San Diego.
At the start of 1939 the Aylwin took part in Fleet Problem XX, which mainly took place in the Caribbean. The Aylwin operated with the carriers Lexington (CV-2) and Enterprise (CV-6) during the exercises. After the exercises were over, the fleet moved to Puerto Rico, where it was inspected by President Roosevelt. A visit to the US East Coast was cut short and by mid-May the Aylwin was back at San Diego. She then entered the Mare Island Navy Yard for repairs and alterations.
In October 1939 the Aylwin was part of Admiral Adolphus Andrew’s Hawaiian Detachment, which moved its base from San Diego to Pearl Harbor, in an attempt to try and convince the Japanese not to make any moves against the US.
1940
In the spring of 1940 the Aylwin was used to guard the entrances to the port of Honolulu and Pearl Harbor during Fleet Problem XXI. In the aftermath of the problem the rest of the Pacific Fleet remained at Pearl Harbor, which became its new base. The Aylwin made one return visit to the west coast during the summer and early autumn of 1940, undergoing another spell of repairs and alterations at Mare Island in July-September.
1941
In February 1941 the Aylwin escorted the Enterprise as she retuned to the East Coast to collect a shipment of USAAF fighters. They were back at Pearl Harbor by 21 February.
On 19 March the Aylwin was taking part in night exercises off Hawaii when she collided with the Farragut. The Farragut hit the Aylwin at 90 degrees and almost severed her bow. A massive fire was triggered, which reached the wardroom and officer’s cabins, and wasn’t put out until 0140 on 20 March. Fire control parties from the Dale, Stack (DD-406), Philadelphia (CL-41), and Sterett (DD-407) all helped put out the fires. The Aylwin then had to be towed back to Pearl Harbor for extensive repairs.
When the Japanese attacked Pearl Harbor on 7 December the Aylwin was moored with the rest of her squadron, with half of her crew on leave or liberty, and only four officers, all ensigns, onboard. She had one small boiler lit, but that was only enough to power her auxiliary services. Howeer she was able to open fire with her main guns and her .50in machine guns before 0800, and by 0815 two boilers had been lit and she had steam. At 0820 the Commander, Destroyers, Battle Force, ordered his ships to get to sea. Commanded by Ensign Caplan, who had only been at sea for eight months, she was under way by 0858, just after suffering a near miss from a Japanese bomb. At some point a near miss forced her stern into a buoy, causing damage to one of her screws that caused significant vibration for the rest of the day. She managed to get out to sea, claiming to have shot down three Japanese aircraft on the way. Her captain, Lt. Commander Robert H. Rodgers, and some of her other officers, could only watch from a motor launch as she left the harbour, and had to go onboard the Chew (DD-106) instead. Half an hour after getting out to sea she was sent to investigate a reported submarine sighting, but found nothing.
On the afternoon of 8 December the Aylwin followed the Enterprise task force into Pearl Harbor, where she finally picked up Lt Commander Rodgers. From 9-11 December she patrolled outside the entrance to the harbour, and on 10 December she and the Farragut hunted for a possible submarine. On 11 December she returned to harbour for repairs on the damaged propeller.
On 14 December the Aylwin sortied from Pearl Harbor as part of the Lexington’s task force, which was sent towards Wotje Island in the Marshalls, to act as a diversion while the Saratoga’s task force attempted to rescue the garrison of Wake Island. The plans were soon changed and the entire force sent towards Wake, before being withdrawn just before the island fell. The task force returned to Pearl Harbor on 28 December.
On 31 December 1941 the Aylwin left Pearl Harbor to help escort a convoy carrying evacuees from Hawaii to the US West Coast.
1942
The Aylwin underwent a very brief period of repairs at Mare Island, in which she received a number of 20mm anti-aircraft guns.
On 12 January the Aylwin left Mare Island to escort the liners President Coolidge, President Monroe, and Mariposa the short distance across the bay to San Francisco.
On 17 January the Aylwin and Perkins (DD-377) left San Francisco to escort the support ships Neosho, Castor (AKS-1), Pyro (AE-1), and Crescent City (AP-40) to Hawaii, arriving on 25 January.
On 31 January the Aylwin sortied as part of TF 11 (built around the Lexington), acting as the plane guard for the carrier as the force headed towards New Guinea. On 13 February she accidentally fired a live torpedo towards the Hull during exercises, but she was able to warn the Hull in time for her to avoid the danger, then followed the torpedo to the end of its run.
On 16 February TF 11 met up with the ANZAC Squadron (built around the cruisers USS Chicago, HMNZS Leander, HMNZS Achilles, and HMAS Australia) for a command conference. TF 11 then moved north-west towards Bougainville, with the intention of launching a raid on the Japanese base on Rabaul. However on 20 February the force was discovered by Japanese reconnaissance aircraft and 17 Mitshubishi G4M bombers were sent to attack it. They were picked up on radar, and engaged by the fighters from VF3 from the Lexington in a battle in which Lt. Edward H. ‘Butch’ O’Hare was initially credited with five victories (he had actually shot down three and damaged three). O’Hare was awarded the Medal of Honor for his exploits, which were considered to have saved the Lexington from serious damage. However with the force discovered, the raid was cancelled and the fleet retreated. The Aylwin was soon detached to escort the fleet oiler Platte (AO-24) to Pago Pago, Samoa, then to Pearl Harbor, arriving on 8 March.
From 10-22 March the Aylwin escorted convoy 4072 from Honolulu to San Francisco. She then entered Mare Island Navy Yard for repairs, before from 31 March-12 April escorting convoy 2054 back to Hawaii.
On 15 April she left Pearl Harbor as part of TF 11, heading for the South Pacific. On 18 April the Lexington flew off a squadron of 14 Brewster F2A-3s to Palmyra Island. Orders were then received to join TF 17 (Yorktown) to try and stop a Japanese fleet that was heading around the eastern tip of New Guinea, heading to Port Moresby. The combined force was commanded by Rear Admiral Fletcher of TF 17. The Aylwin was assigned to be the Lexington’s plane guard.
On 7 May part of the Japanese force was detected, triggering the battle of the Coral Sea, the first naval battle in which the surface ships never came within sight of each other. On the first day of the battle the Americans sank the Japanese carrier Shoho, while the Japanese sank the oiler Neosho and destroyer Sims (DD-409), in the belief that they were a carrier and cruiser.
Very early on 8 May the Aylwin was sent to try and find any survivors from the Neosho and Sims, but she was back with the fleet by 1100 when Japanese aircraft attacked the US carrier force. She fired 150 rounds of 5in ammo and 950 rounds of 20mm ammo during this battle, but the Japanese fatally damaged the carrier Lexington and damaged the Yorktown. However the Japanese lost a large number of naval aviators, which forced the Zuikaku to return to Japan to replenish its air groups, while the Shokaku was damaged and needed repairs. As a result the two best Japanese carriers missed the battle of Midway.
The Aylwin remained with the US task force as it withdrew to Tonga, arriving on 15 May. She was then use to escort the Harriett (AP-11) as she carried the survivors from the Lexington back to the US west coast. The Aylwin remained with her as far as Pearl Harbor, arriving after six days.
On 28 May the Aylwin left Pearl Harbor as part of the screen of the Enterprise and Hornet, and performed that role during the battle of Midway.
After the battle the Aylwin joined TF 16 as it headed back to Hawaii, before on 11 June turning north to escort the oiler Kaskaskia (AO-27) towards the Aleutian Islands. On 16 June they met up with and refueled the destroyers Humphreys (DD-236) and Gilmer (DD-233). On 17 June they joined TF 8 (the heavy cruiser Louisville (CA-28), three light cruisers and six destroyers). The Aylwin operated with TF 8 until 10 July, when she left to escort the Kaskaskia back to Pearl Harbor, arriving on 17 July. The Aylwin then went into the Navy Yard for repairs.
On 2 August the Aylwin departed Pearl Harbor to escort the carrier Long Island (AVG-1), which was carrying the Douglas SBD-3s of Marine Squadron VMSB-232 and the Grumman F4Fs of VMF-232, the original squadrons allocated to the airfield on Guadalcanal. However when the Marines landed on Guadalcanal on 7 August the small convoy was still some way away. The Japanese counterattacked at the battle of Savo Island, and the US fleet carriers withdrew to avoid being caught by superior Japanese air power. As a result on 10 August the Aylwin and Long Island were ordered to stop at Suva in Fiji. They arrived on 13 August, and were then ordered to move on to Fila Harbour, Efate, where they arrived on 17 August. They were then joined by Helena (CL-50) and Dale (DD-353) for the final stage of the voyage, and on 20 August the Long Island was finally able to fly off her cargo from a position 200 miles to the south-east of Guadalcanal. The ships then returned to Efate.
On 30 August the Aylwin was ordered to escort the Long Island to Espiritu Santo to pick up the survivors from the Tucker (DD-374), which had struck a mine on 1 August.
On 11 September the Aylwin was part of the force that screened the transports landing troops on Canton Island. She was then ordered back to Hawaii as part of the escort of the damaged battleship North Carolina (BB-55), arriving on 30 September. October was spent in Hawaiian waters. At the start of November she escorted a convoy to Espiritu Santo. She was then used to protect the Bollard (AVD-10) against possible Japanese submarines in the Santa Cruz Islands. She then picked up sick Army coastwatchers from Vanua Levu, before returing to Espiritu Santo. From 19-22 November she acted as a plane guard for the Nassau (CVE-16). She was then used to escort the damaged South Dakota (BB-59) from Tonga. Finally she returned to the US west coast, reaching San Francisco on 10 December. She then entered the Mare Island Navy Yard for repairs.
1943
On 8 January 1943 the Aylwin, Bancroft (DD-598) and Dale departed from San Frnaciso heading for Alaska. She spent the next three months on escort duties in the Aleutians. She briefly returned south to support the carrier Nassau during flight training, then returned to the Aleutians to take part in the invasion of Attu on 11 May 1943.
On the night of 8-9 July she carried out a partly radar guided bombardment of Japanese anti-aircraft guns on Kiska, firing 84 rounds of 5in ammo in two passes. At the end of July the Japanese evacuated the island without the Americans noticing. On 2 August the Aylwin carried out a bombardment of the deserted Japanese camp. The Americans landed on the undefended island on 15 August. The Aylwin left the Aleutians on 31 August to return to San Francisco.
On 19 October she left San Francisco as part of the screen for the escort carriers Sangamon (CVE-26), Chenango (CVE-28), and Suwannee (CVE-27), arriving at Espirtu Santo on 5 November.
From mid-November into the first part of December the Aylwin took part in the invasion of the Gilbert Islands, screening the Sangamon and Suwannee. On 8 December she was detached to escort the Maryland (BB-46) to Pearl Harbor. She then joined a force that included the Maryland, Tennessee and Colorado for the voyage back to San Francisco, arriving on 21 December.
1944
The Aylwin underwent more repairs, this time at Union Engineering at Alameda, California. She then escorted a convoy of tank landing ships and minesweepers from San Diego to Hawaii.
The Aylwin then joined the forces attacking the Marshall Islands, reaching Kwajalein on 31 January. She served there until 8 February, when she left for Majuro, and again from 11-21 February. She then moved to Eniwetok. On the night of 21-22 February she formed part of a force (with Hall (DD-583), MacDonough, and Monaghan) that bombarded Parry Island before the Marines attacked. She fired 480 rounds of normal 5in ammo and 20 rounds of white phosphorus. She then formed part of the Southern Screen, and operated off Kwajalein, Eniwetok and Majuro until mid-March.
The Aylwin then joined TG 58.2 (Bunker Hill (CV-17), Hornet (CV-12), Monterey (CVL-26), and Cabot (CVL-23)) for a series of carrier raids on Japanese targets in the Carolines. The Aylwin helped drive off Japanese reconnaissance aircraft during the approach to the islands, and rescued the crew of a SB2C Helldiver from the Bunker Hill on 30 March. The raids lasted from 30 March-1 April.
The fleet’s next targets were on New Guinea, where it was to support the landings around Hollandia. The Aylwin formed part of TG 58.2 (Rear Admiral Alfred E. Montgomery), and helped support the landings at Aitape, Tanahmerah Bay and Humbolt Bay (21-24 April). The Aylwin returned to Maduro on 4 May for repairs alongside the tender Prairie (AD-15). In late May and early June she helped screen the carriers Bunker Hill and Cabot during training.
On 6 June she left Majuro with TF 58 to take part in the invasion of the Marianas. On 13 June she was part of the Northern Bombardment Unit (TU 58.7.2) which hit targets on the northern coast of Saipan, and formed part of the screen for the Alabama (BB-60) and South Dakota. Once the bombardment was over she joined the carriers, rescuing two aviators from the Bunker Hill. On 17 June she was ordered to help screen the transport ships, and thus missed the battle of the Philippine Sea. She briefly returned to Eniwetok for two weeks of upkeep, then retunred to the Marianas to screen the Wichita (CA-45) and St Louis (CL-49) during the bombardment of Guam (18-19 July). She was then used to bombard targets near Asan Beach on the northern shore of the island and to screen ships that were supporting the underwater demolition teams. On 25-26 July she screened a force of cruisers that bombarded Rota Island. She then departed for Eniwetok at the start of a trip east to Bremerton, Washington, for another overhaul.
The Aylwin departed for Pearl Harbor on 11 October, arriving on 18 October. The next few weeks were spent training, before on 11 November she departed for Ulithi with the Baltimore (CA-68), San Juan (CL-54), and three destroyers. She then joined the replenishment groups, operating between Ulithi and the Philippines.
On 10 December the Aylwin left Ulithi as the flagship of the replenishment group TG 30.8. The group met up with TF 38 on 13 December, completed refuelling on 14 December and left the area.
On 17 December the group met up with TF 38 in the Philippine Sea once again, just as Typhoon Cobra began to hit the fleet. Fueling had to be abandoned half way through, leaving some of the ships unbalanced. The Aylwin herself was short of fuel, but at 1700 her captain, Lt. Comdr William K. Rogers, ordered sea water to be taken on as ballast and for all ready ammo and moveable equipment to be moved below to try and make her less top heavy.
The worst of the storm hit on 18 December. At 0245 electrical power was lost, and with it steering control, so she had to be steered by hand. She soon began to roll badly, and this became worse as she slipped into the trough of the waves while attempting to remain in formation with the fleet. All attempts to maintain steering control failed, and she soon rolled over to 70 degrees to port. Rogers ordered her engines to be stopped, and when they were re-started they only made the rolling worse. She repeatedly rolled to 70 degrees, losing her whaleboot. At 12.45 Machinists Mate 1st Class Sarenski was swept overboard and at 12.55 her chief engineer, Lt. E. R. Rendahl, USNR. At 1330 the engine room ventilators failed and they had to be abandoned as the temperate reached 180 degrees. At 1930 a leak started to flood the engine room, but the pumps were just able stop the flooding. Luckily the Aylwin managed to survive the worst of the storm, unlike the destroyers Hull, Monaghan, and Spence, all lost with heavy loss of life.
After the strom was over the Aylwin returned to Ulithi, arriving on 22 December. Despite the fierceness of the storm she was only lightly damaged, and was repaired alongside the tender Markab (AD-21).
1945
On 12 January there was a suspicious explosion on the ammo ship Mazama (AE-12), just after an unknown object had been spotted in the water. The Aylwin carried out a patrol of the harbour searching for any Japanese submarine, but found nothing. The fires on the Mazama were soon put out and she remained in service until 1970.
Once the repairs were complete the Aylwin returned to her duties with the replenishment group. She formed part of the screen of TG 50.8 (Crowley (DE-303), Weaver (DE-741), Suamico (AO-49), Shasta (AE-6), and Wrangell (AE-12)) and escorted the group to Iwo Jima, arriving on 21 February.
On 23 February the Aylwin was transferred to the fire support group (TF 54). She replaced the Tuscaloosa (CA-37) in fire support sector I, and over the next two days fired 330 rounds of 5in ammo to support the Marines as they advanced north up the island. She left Iwo Jima on 25 February to return to Ulithi, arriving on 28 February.
During the early stages of the invasion of Okinawa, the Aylwin operated between Kerama Retto (an island group just to the west of the main Okinawa island) and Ulithi. On 5 June she survived a second typhoon, this time without quite the same level of drama. However other ships weren’t so luck, and the cruiser Pittsburgh (CA-72) lost her bows! The Aylwin carried out a search for the missing 100ft of bow structure, but without success (it was eventually found and towed to safety). The Aylwin reached Guam on 10 June for repairs that lasted until 6 July.
Once the repairs were complete she moved to Ulithi, when on 10 July she departed with convoy UOK-39, escorting it to Okinawa. She returned to Ulithi with another convoy, and was then posted in the picket screen off the anchorage. On 4 August she was ordered to search for survivors from the Indianapolis, which had been torpedoed on 30 July 1945. Tragically by the time she arrived most of the survivors of the original sinking had died, and she only found three bodies, two rubber rafts and a floater net. Early on 6 August she abandoned the search and returned to Ulithi.
On 13 August the Aylwin departed with a convoy, reaching Apra Harbor on 14 August. She was still there when the Japanese surrender was announced on 15 August.
On 18 August the Aylwin departed for Hawaii. Once there she picked up 54 men who were heading home, dropping them off at San Diego at the start of September. On 11 September she departed for the east coast. She was decommissioned at the New York navy Yard on 16 October 1945, struck off on 1 November 1945 and sold for scrap on 20 December 1946.
Aylwin (DD-355) received 13 battle stars for her World War II service, for Pearl Harbor, the Bougainville raid of 1942, the battles of the Coral Sea and Midway, the Aleutians, the Gilbert Islands, the Marshall Islands, the Palau and Truk raids of 1944, Hollandia, the Truk raid of 1944, the Marianas (Guam, Saipan and the Philippine Sea), the Formasa, China and Nansei Shoto raids to support the invasion of Luzon, Iwo Jima and Okinawa.
Displacement (standard) |
1,500t |
Displacement (loaded) |
2,064t |
Top Speed |
36.5kts |
Engine |
2-shaft Parsons turbines |
Range |
6,500nm at 12kts |
Armour - belt |
|
- deck |
|
Length |
341ft 3in |
Width |
34ft 3in |
Armaments |
Five 5in/38 DP guns |
Crew complement |
160 (much higher in wartime) |
Laid down |
23 September 1933 |
Launched |
10 July 1934 |
Commissioned |
1 March 1935 |
Sold for scrap |
20 December 1946 |
 U.S. Destroyers: An Illustrated Design History, Norman Friedmann .
The standard history of the development of American destroyers, from the earliest torpedo boat destroyers to the post-war fleet, and covering the massive classes of destroyers built for both World Wars. Gives the reader a good understanding of the debates that surrounded each class of destroyer and led to their individual features.
U.S. Destroyers: An Illustrated Design History, Norman Friedmann .
The standard history of the development of American destroyers, from the earliest torpedo boat destroyers to the post-war fleet, and covering the massive classes of destroyers built for both World Wars. Gives the reader a good understanding of the debates that surrounded each class of destroyer and led to their individual features.
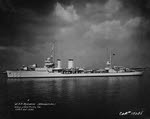 USS Aylwin (DD-355) at Philadelphia, 1935
 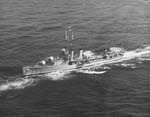 USS Aylwin (DD-355) from above