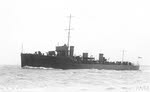
 HMS Ambuscade from the left
 |
|
HMS Ambuscade (1913) was an Acasta class destroyer that served with the 4th Destroyer Flotilla, initially with the Grand Fleet, fighting during the raid on the Yorkshire coast in 1914 and at Jutland, before moving to the Humber, then the south coast before ending the war with the northern patrol at Dundee.
The Ambuscade was laid down at Brown on 7 March 1912, launched on 25 January 1913 and commissioned in June 1913. When the Acasta class became the K Class the new name Keith was chosen for her, but it was never used.
On 16 May 1913 she achieved a speed of 30.636 knots at 25,595shp during full power trials in the Firth of Clyde.
In January 1914 she was part of the Fourth Destroyer Flotilla, and was commanded by Lt Gordon A. Coles.
In July 1914 she was one of twenty destroyers in the Fourth Destroyer Flotilla of the First Fleet, which contained the most modern battleships. The flotilla contained all twenty Acasta or K Class destroyers.
In August 1914 she was one of twenty K destroyers in the Fourth Flotilla of what was becoming the Grand Fleet. At the outbreak of war all but the Porpoise were at sea. Over the next two years five members of the class were sunk, while the surviving members of the class remained with the Flotilla into July 1916.
In late October the Achates, Ardent, Ambuscade and Fortune were attached to Admiral Moore’s Cruiser Force K, which was to support a seaplane attack on a Zeppelin base that was believed to be at Cuxhaven. Admiral Moore’s force was at seat by 22 October, but the raid was delayed until 25 October, and was a total failure, with none of the six seaplanes involved getting anywhere near to the target. Cruiser Force K protected the main attack force as it retired from the area.
Yorkshire Coast Raid, December 1914
When the Germans raided the Yorkshire Coast in December 1914 the Ambuscade was one of seven Acasta class destroyers that were with Admiral Warrender’s 2nd Battle Squadron when it was sent out to try and intercept them. During the night of 15-16 December the destroyers were posted ten miles to the port of the battle squadron, with orders to close in on them at daylight. The Ambuscade was part of the 1st Division of the Fourth Flotilla during this sortie.
At about 5.15 the Lynx, at the lead of the line of destroyers, spotted a destroyer to her port. The unknown destroyer failed to respond correctly to the challenge and the Lynx opened fire and turned to port to give chase with the Germans firing back as they attempted to escape to the north. The Ambuscade was next in line behind her, and soon came under attack herself. She was hit forward and holed, and by 5.50 had to withdraw from the fight with five feet of water in her mess deck. At just after 6.00 she broadcast a request for a ship to come to her assistance, and the Unity was sent, but she discovered that the way was blocked by a German cruiser. The Unity then helped escort the Lynx to safety, before returning to do the same for the Ambuscade, which she escorted into Leith.
The clash had been with the light cruiser Hamburg and several of the German destroyers, which were part of the screen for Admiral von Ingenohl and the High Seas Fleet, which were there to protect the forces actually carrying out the raid. News of the clash with British destroyers convinced von Ingenohl to withdraw, as part of his orders were not to risk losses
Before Jutland
In January 1915 she was part of the Fourth Destroyer Flotilla, under the direct control of the commander-in-chief of the Home Fleet.
On 1 February 1915 the armed yacht Vanduara clashed with U-21 north-west of Fishguard, during a cruise that had halted shipping in the Irish Sea. The Admiralty dispatched reinforcements to the area, including the cruiser Faulknor and the destroyers Achates, Owl, Hardy and Ambuscade from Scapa. They arrived at Milford Haven on 2 February, and were used to patrol the area between there and Liverpool for part of February.
On 11 March 1915 the armed merchant cruiser Bayano was torpedoed and sunk off Corsewell Point, having just left the Clyde, with the loss of all but 50 of her crew. In response Jellicoe sent the Faulknor and six destroyers from the 4th Flotilla (Achates, Ambuscade, Ardent, Fortune, Paragon and Porpoise) to patrol the area between Oversay and the North Channel into the Irish Sea. They reached Larne on 13 March and spent the next week patrolling the area between Belfast, the Clyde and the North Channel. However the submarine in question, U-27, had left the area heading north on 13 March and was back in German home waters by 16 March.
In January 1916 nineteen K class destroyers were in the Fourth Flotilla, based at Scapa. She had been equipped with a modified sweep.
On 22 April 1916 the Ambuscade was at sea with the Grand Fleet during an attempt to catch the High Seas Fleet. On the night of 22-23 April the Ambuscade, Ardent and Garland came together in a collision that badly damaged the Ardent.
Jutland
On the eve of Jutland the Ambuscade was part of the Fourth Destroyer Flotilla at Scapa Flow. The flotilla contained sixteen Acasta class destroyers and one Repeat M class destroyer. The flotilla put to sea with Admiral Jellico and the main body of the Grand Fleet by 10.30pm on 30 May.
As the Grand Fleet advanced into contact with the High Seas Fleet, part of the flotilla was with the British 3rd Battle Cruiser Squadron (Shark, Acasta, Ophelia and Christopher), forming an anti-submarine screen ahead of Admiral Hood’s capital ships. The 3rd Battle Cruiser Squadron was some way ahead of the main battleship force and was thus the first part of the Grand Fleet to get into action. The destroyers found themselves on the port flank of Hood’s battlecruisers, in a position to attack a force of German cruisers. However they soon became engaged in a battle with German destroyers which left the Shark crippled, but stopped the Germans attacking Hood’s battlecruisers.
The two main fleets finally came together at about 6.30pm on 31 May. By this point the battleships of the German High Seas Fleet were heading north, while the battleships of the Grand Fleet were forming a line running roughly east to west in front of them. For a few minutes the British were able to concentrate their fire on the leading ships of the German line, but the Germans then carried out their famous sixteen point turn, and within a few minutes were heading away south into the North Sea mist. However Admiral Scheer then mis-judged the British movements, and turned back east in the hope that he could pass behind the main British force. Just after 7pm the Germans found themselves steaming straight towards Jelicoe’s battleships, and by 7.15 the bulk of the Grand Fleet was finally able to open fire on the Germans. Once again Scheer was forced to reverse course. During this phase of the battle the destroyer flotillas struggled to keep up with the fast moving battleships and rather disappear from the narrative. After more confused manoeuvres the two fleets came into range of each other for a third time after 8pm, but the Germans turned away for a third time, and disappeared into the mists by 8.35.
Jellicoe was unwilling to risk a night battle, and at 9.17 ordered the fleet into its night cruising formation. The battleships formed up into lines in their divisions, with the destroyers following behind. The entire formation began to move south in an attempt to keep between the Germans and their home bases. By 10pm the destroyer flotillas were in line, with the 12th Flotilla at the eastern (left) end of the line, then the combined 9th and 10th Flotillas, 13th Flotilla, 4th Flotilla and finally the 11th Flotilla at the western (right) end of the line.
The 4th Flotilla was now split into three. Ophelia and Christopher were with Beatty’s battlecruisers off to the south-west. Owl, Hardy and Midge were with the armoured cruisers. That left ten destroyers and two flotilla leaders with the main part of the flotilla.
At about 10.10pm four German destroyers were sighted to the rear of the flotilla. They fired torpedoes, which missed, and the British fired a few rounds before the Germans disappeared once again.
The key moment of the night actions came at around 11.30, when the High Seas Fleet finally attempted to pass behind the Grand Fleet and ran into the British destroyers. The Germans would make contact with the 4th Destroyer Flotilla, which was towards the right of the British line. There was then a seven mile gap to the 13th Flotilla, with the 9th and 10th Flotilla close by, and the 12th Flotilla to their rear.
The 4th Flotilla first spotted ships approaching from their right at about 11.20, but couldn’t be sure who they were. The flotilla’s commander Captain Wintour waited until the Germans were within 1,000 yards before issuing the challenge of the day. The Germans immediately opened fire, killing Wintour and wrecking his flagship, Tipperary. However the German cruisers were forced to turn away, and the Elbing was rammed by the battleship Posen while they were attempting to pass through the German battle line. Soon after this the Spitfire actually rammed the German battleship Nassau, and stayed afloat. The German briefly turned to starboard before Scheer ordered it back onto its course.
The rest of the 4th Flotilla briefly turned east, once again coming into contact with the Germans, although the worst damage at this point was done by a collision between the Sparrowhawk, Broke and Contest. During the resulting melee one torpedo from the flotilla hit the Rostock, which later had to be scuttled by her own crew. The flotilla was now scattered, with the Fortune sunk and all but the Ardent knocked out of the battle. She attempted to find friendly ships, but instead ran into four German battleships and was sunk at around 12.19am on 1 June. Not only had the flotilla been unable to stop the Germans, the fighting had also failed to alert the Grand Fleet, where the action was mis-interpreted as a failed German attack on the British rearguard.
After Jutland
On 19 August 1916 the cruiser HMS Falmouth was torpedoed by U-66 while the Grand Fleet was at sea in response to a sortie by the High Seas Fleet. The Falmouth remained afloat and was able to proceed under her own power, but slowly. A series of destroyers were sent to escort her, with the Ambuscade, Porpoise, Victor and Unity arriving at 11pm. However unluckily her route took her past U-63, and despite the strong destroyer escort the Falmouth was hit again. The Falmouth still remained afloat for several hours, and tugs managed to get her within 25 miles of the Humber before she finally sank off Flamborough Head.
In August 1916 the Fourth Flotilla was relegated from the Grand Fleet, and now formed the Humber Force. It contained fifteen of the K class destroyers. From this point on the Ambuscade’s main role was to protect shipping around the British coast, a role that would often take her some way from her official base.
On 21 November 1916 the Porpoise, Ambuscade and Paragon were sent from the Humber to join the Dover Patrol, in response to a German raid into the channel on 26 October.
In December 1916 the 4th Flotilla moved to Portsmouth, but the Porpoise, Ambuscade and Paragon officially joined the 6th Flotilla at Dover, where they were joined by the Unity and the Victor.
In January 1917 she was undergoing a refit.
When the Germans raided into the Dover Straits on 25 February 1917 the Ambuscade, Porpoise, Paragon and Unity were anchored off Deal, but they didn’t take part in the action.
When the Germans raided again on 17 March the Ambuscade was still at Deal, but the other Acasta class destroyers were elsewhere. Once again she didn’t take part in the action.
By March 1917 the 4th Flotilla had moved from Portsmouth to Devonport. The five boats that had joined the 6th Flotilla made the same move by April, bringing the surviving members of the class back together.
On 8 April the Ambuscade spotted a submarine in the Channel Islands area, and six destroyers attempted to find it without success.
On 24 April 1917 the Ambuscade dropped three depth charges on a U-boat south of Portland (two deliberately and a third that fell off accidentally!). The submarine may already have been damaged by two bombs from S.P.8655 and was judged to have been sunk. At the time her victim was believed to have been UB-39, although more recent works suggest that U-boat hit a mine on 17 May. However this would have involved her being at sea for much longer than was normal for a UB type boat, so the Ambuscade’s claim may well still be valid.
In January 1918 she was one of forty destroyers in the Fourth Destroyer Flotilla at Plymouth, which was now made up of a mix of various types.
Early in 1918 she lost both of her torpedo tubes to make space for more depth charges. This included a depth charge rail with 20 charges, and throwers with three reloads.
In June 1918 she was one of fifty destroyers in the Fourth Destroyer Flotilla at Devonport, made up of a mix of types. She was still at Devonport in August.
By November 1918 she was one of three Acasta or K class destroyers in the Northern Patrol Force at Dundee, but the exact date of her move isn’t clear.
In November 1919 was in the hands of a care and maintenance party in the Devonport reserve. She was sold to be broken up in September 1921.
The Ambuscade was awarded a battle honour for Jutland.
War Service
August 1914-July 1916: 4th Destroyer Flotilla, Grand Fleet
August-November 1916: 4th Destroyer Flotilla, Humber Force
December 1917-March 1918: 6th Destroyer Flotilla, Dover
April-August 1918: 4th Destroyer Flotilla, Devonport
November-December 1918: Northern Patrol Force
Displacement (standard) |
1,072t |
Displacement (loaded) |
1,300t |
Top Speed |
29 knots |
Engine |
2-shaft Brown-Curtis turbines |
Range |
|
Length |
267ft 6in |
Width |
27ft |
Armaments |
Three 4in/ 45cal BL Mk VIII |
Crew complement |
73 |
Laid down |
7 March 1912 |
Launched |
25 January 1913 |
Completed |
June 1913 |
Sold for break up |
September 1921 |
 British Destroyers From Earliest Days to the Second World War, Norman Friedman. A very detailed look at the design of British destroyers from their earliest roots as torpedo boat destroyers, though the First World War and up to the start of the Second World War, supported by vast numbers of plans and well chosen photographs [read full review]