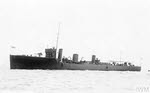
 HMS Shark from the left
 |
|
HMS Shark (1912) was an Acasta class destroyer that served with the 4th Destroyer Flotilla, fighting against the Yorkshire coast raid of 1914 and at Jutland where she was sunk with the loss of all but six of her crew.
The Shark was laid down at Swan Hunter on 27 October 1911, launched on 30 July 1912 and commissioned in April 1913. When the Acasta class became the K Class the new name Kestrel was chosen for her, but it was never used.
In July 1914 she was one of twenty destroyers in the Fourth Destroyer Flotilla of the First Fleet, which contained the most modern battleships. The flotilla contained all twenty Acasta or K Class destroyers.
In August 1914 she was one of twenty K destroyers in the Fourth Flotilla of what was becoming the Grand Fleet. At the outbreak of war all but the Porpoise were at sea. Over the next two years five members of the class were sunk, while the surviving members of the class remained with the Flotilla into July 1916.
In November 1914 all twenty K class destroyers were in the Fourth Flotilla, part of the Grand Fleet.
Yorkshire Coast Raid
When the Germans raided the Yorkshire Coast in December 1914 the Shark was one of seven Acasta class destroyers that were with Admiral Warrender’s 2nd Battle Squadron when it was sent out to try and intercept them. During the night of 15-16 December the destroyers were posted ten miles to the port of the battle squadron, with orders to close in on them at daylight. The Shark was part of the 2nd Division of the Fourth Flotilla during this sortie..
At about 5.15am the Lynx, at the head of the flotilla, spotted a destroyer that failed to answer the identification correctly. The Lynx opened fire and turned to port to give chase. The German retreated north, while the rest of the British destroyer flotilla followed the Lynx. The Hardy was in the middle of the column, and sighted more German destroyers off to port. A gun battle developed between these destroyers and the rear of the British column, but the Lynx then suffered a fault with her steering and turned further to port. The rest of the flotilla followed, and the second set of German destroyers disappeared to the east. The original target soon followed them.
The Lynx then turned to the south-west to close up with the battle squadron, but only three minutes later, at 5.58, a German cruiser was sighted about 600-700 yards to the port of Hardy and Shark. The cruiser switched on recognition lights, which identified her as German. A gun battle then developed between the cruiser and the Hardy and the Shark. The Hardy was soon taking heavy damage and was forced to steer to the starboard. The destroyers behind her followed, while the Lynx and Unity at the head of the column continued on their original course and were soon out of the battle.
The Hardy quickly turned back onto a parallel course with the cruiser, followed by the rest of the flotilla. However by 0600 she had been so badly damaged that her captain had to take her out of the line. Her steering gear was badly damaged, but luckily her captain had ordered an emergency system to be set up, and he was able to steer with his engines. However at this point the cruiser, which was only 500 yards away from her, turned on her searchlights and opened fire again. At this point the Hardy’s gunner fired a torpedo, which exploded very close to the cruiser. Everyone on the British side was convinced they’d scored a hit, but German records suggest they narrowly missed. Even so this was enough to convince the German cruiser to turn off her lights and retreat.
The Hardy was still under control, and was able to take up a position at the rear of the 2nd Division. This was now all that was left of the flotilla, with Lynx and Unity having lost contact, and Ambuscade having to retire damaged. The formation was now led by the Shark, followed by Acasta, Spitfire and Hardy.
The clash had been with the light cruiser Hamburg and several of the German destroyers, which were part of the screen for Admiral von Ingenohl and the High Seas Fleet, which were there to protect the forces actually carrying out the raid. News of the clash with British destroyers convinced von Ingenohl to withdraw, as part of his orders were not to risk losses
At about 6.50 the Shark sighted smoke to the south-east, and by 7.00 could make out five German destroyers. The flotilla gave chase, and were soon able to open fire. However a few minutes later they spotted a heavy cruiser, which they believed to be the Yorck class cruiser Roon. By now the Germans were retiring, so the Roon didn’t open fire open fire, and the four British destroyers were able to shadow her for some time. By 7.30 they had alerted Admiral Warrender, who moved east to try and catch the cruiser. Admiral Beatty with the battlecruisers also arrived on the scene, but didn’t join the chase until just before 8.20. By this point the situation for the destroyers had changed. Visibility had got worse, and at about 7.40 the destroyers had been forced to get closer to the Roon to keep her in sight. At this point the Germans sent three light cruisers to chase them off. The British destroyers turned north in an attempt to lure the Germans into a trap, but by about 8.35 the Germans had turned back to rejoin the fleet. The destroyers then found the British light cruisers and joined with them.
1915-1916
In January 1915 she was part of the Fourth Destroyer Flotilla, under the direct control of the commander-in-chief of the Home Fleet.
In June 1915 all twenty K class destroyers formed the Fourth Flotilla, along with two flotilla leaders.
In January 1916 nineteen K class destroyers were in the Fourth Flotilla, based at Scapa. She had been equipped with a modified sweep.
Jutland
The flotilla contained sixteen Acasta class destroyers and one Repeat M class destroyer at Jutland.
The flotilla put to sea with Admiral Jellicoe and the main body of the Grand Fleet by 10.30pm on 30 May.
As the Grand Fleet advanced into contact with the High Seas Fleet, part of the flotilla was with the British 3rd Battle Cruiser Squadron (Shark, Acasta, Ophelia and Christopher), forming an anti-submarine screen ahead of Admiral Hood’s capital ships. The 3rd Battle Cruiser Squadron was some way ahead of the main battleship force and was thus the first part of the Grand Fleet to get into action. The destroyers found themselves on the port flank of Hood’s battlecruisers, in a position to attack a force of German cruisers. However they soon became engaged in a battle with German destroyers which left the Shark crippled, but stopped the Germans attacking Hood’s battlecruisers. The Acasta came up and offered to take her under tow, but she was also damaged so was sent away. The German cruisers were then distracted by the arrival of the British cruiser Canterbury, but the Shark was then attacked by the 12th Half Flotilla and 9th Flotilla of destroyers,
By this time the Shark only had one 4in gun still in action, and she was eventually sunk by a torpedo. Commander Loftus W Jones and several of the crew managed to reach a raft, but nine, including the captain, died overnight, leaving only six survivors. A total of 86 of her crew were killed. Commander Loftus W. Jones was awarded a posthumous Victoria Cross for his actions during the battle. The official Naval Operations lists seven officers and 79 men killed and two men wounded.
The Shark was awarded a battle honour for Jutland.
War Service
August 1914-June 1916: 4th Destroyer Flotilla, Grand Fleet
June 1916: Sunk at Jutland
Commander
-1 June 1916: Loftus W. Jones (KIA).
Displacement (standard) |
1,072t |
Displacement (loaded) |
1,300t |
Top Speed |
29 knots |
Engine |
2-shaft Parsons turbines |
Range |
|
Length |
267ft 6in |
Width |
27ft |
Armaments |
Three 4in/ 45cal BL Mk VIII |
Crew complement |
73 |
Laid down |
27 October 1911 |
Launched |
30 July 1912 |
Completed |
April 1913 |
Sunk |
31 May 1916 |
 British Destroyers From Earliest Days to the Second World War, Norman Friedman. A very detailed look at the design of British destroyers from their earliest roots as torpedo boat destroyers, though the First World War and up to the start of the Second World War, supported by vast numbers of plans and well chosen photographs [read full review]