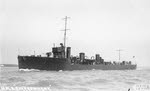
 HMS Sparrowhawk from the left
 |
|
HMS Sparrowhawk (1913) was an Acasta class destroyer that served with the 4th Destroyer Flotilla, fighting at Jutland where she sank after a collision with other British destroyers.
The Sparrowhawk was laid down at Swan Hunter on 17 October 1911, launched on 12 October 1912 and commissioned in May 1913. When the Acasta class became the K Class the new name Kingsmill was chosen for her, but it was never used.
In July 1914 she was one of twenty destroyers in the Fourth Destroyer Flotilla of the First Fleet, which contained the most modern battleships. The flotilla contained all twenty Acasta or K Class destroyers.
In August 1914 she was one of twenty K destroyers in the Fourth Flotilla of what was becoming the Grand Fleet. At the outbreak of war all but the Porpoise were at sea. Over the next two years five members of the class were sunk, while the surviving members of the class remained with the Flotilla into July 1916.
In November 1914 all twenty K class destroyers were in the Fourth Flotilla, part of the Grand Fleet. She had been equipped with a submarine sweep.
On 18 February 1915 the Sparrowhawk went ashore in the Orkneys, and was considerable damaged before she was able to get back afloat. On the same day the Goldfinch also ran aground and was lost.
In January 1916 nineteen K class destroyers were in the Fourth Flotilla, based at Scapa. She had been equipped with a modified sweep.
Jutland
The flotilla contained sixteen Acasta class destroyers and one Repeat M class destroyer at Jutland. The flotilla put to sea with Admiral Jellicoe and the main body of the Grand Fleet by 10.30pm on 30 May.
As the Grand Fleet advanced into contact with the High Seas Fleet, part of the flotilla was with the British 3rd Battle Cruiser Squadron (Shark, Acasta, Ophelia and Christopher), forming an anti-submarine screen ahead of Admiral Hood’s capital ships. The 3rd Battle Cruiser Squadron was some way ahead of the main battleship force and was thus the first part of the Grand Fleet to get into action. The destroyers found themselves on the port flank of Hood’s battlecruisers, in a position to attack a force of German cruisers. However they soon became engaged in a battle with German destroyers which left the Shark crippled, but stopped the Germans attacking Hood’s battlecruisers.
The two main fleets finally came together at about 6.30pm on 31 May. By this point the battleships of the German High Seas Fleet were heading north, while the battleships of the Grand Fleet were forming a line running roughly east to west in front of them. For a few minutes the British were able to concentrate their fire on the leading ships of the German line, but the Germans then carried out their famous sixteen point turn, and within a few minutes were heading away south into the North Sea mist. However Admiral Scheer then mis-judged the British movements, and turned back east in the hope that he could pass behind the main British force. Just after 7pm the Germans found themselves steaming straight towards Jelicoe’s battleships, and by 7.15 the bulk of the Grand Fleet was finally able to open fire on the Germans. Once again Scheer was forced to reverse course. During this phase of the battle the destroyer flotillas struggled to keep up with the fast moving battleships and rather disappear from the narrative. After more confused manoeuvres the two fleets came into range of each other for a third time after 8pm, but the Germans turned away for a third time, and disappeared into the mists by 8.35.
Jellicoe was unwilling to risk a night battle, and at 9.17 ordered the fleet into its night cruising formation. The battleships formed up into lines in their divisions, with the destroyers following behind. The entire formation began to move south in an attempt to keep between the Germans and their home bases. By 10pm the destroyer flotillas were in line, with the 12th Flotilla at the eastern (left) end of the line, then the combined 9th and 10th Flotillas, 13th Flotilla, 4th Flotilla and finally the 11th Flotilla at the western (right) end of the line.
The 4th Flotilla was now split into three. Ophelia and Christopher were with Beatty’s battlecruisers off to the south-west. Owl, Hardy and Midge were with the armoured cruisers. That left ten destroyers and two flotilla leaders with the main part of the flotilla.
At about 10.10pm four German destroyers were sighted to the rear of the flotilla. They fired torpedoes, which missed, and the British fired a few rounds before the Germans disappeared once again.
The key moment of the night actions came at around 11.30, when the High Seas Fleet finally attempted to pass behind the Grand Fleet and ran into the British destroyers. The Germans would make contact with the 4th Destroyer Flotilla, which was towards the right of the British line. There was then a seven mile gap to the 13th Flotilla, with the 9th and 10th Flotilla close by, and the 12th Flotilla to their rear.
The 4th Flotilla first spotted ships approaching from their right at about 11.20, but couldn’t be sure who they were. The flotilla’s commander Captain Wintour waited until the Germans were within 1,000 yards before issuing the challenge of the day. The Germans immediately opened fire, killing Wintour and wrecking his flagship, Tipperary. However the German cruisers were forced to turn away, and the Elbing was rammed by the battleship Posen while they were attempting to pass through the German battle line. Soon after this the Spitfire actually rammed the German battleship Nassau, and stayed afloat. The German briefly turned to starboard before Scheer ordered it back onto its course.
About an hour after this first clash, just after midnight on 1 June, the survivors of the 4th Flotilla ran into Scheer’s battleships for a second time. The Sparrowhawk prepared to fire her second torpedo, but before she could do so the Broke, ahead of her in the line, was hit, her steering jammed, and she rammed the Sparrowhawk close to the bridge at 28 knots. To make things worse, the Contest, further down the line, failed to take evasive action in time, and cut off the Sparrowhawk’s stern. This left her dead in the water, with no power, and dangerously illuminated by the flames from the Tipperary. There were several scares during the night. At about 0200 a German torpedo boat closed to within 100 yards, but didn’t open fire. Towards dawn a German cruiser was sighted, but this turned out to be the Elbing, which sank at around 3.40am. At around 06.10 a Carley float with fifteen survivors from the Tipperarywas briefly mistaken for a possible U-boat. Finally, at just after 7pm, three British destroyers arrived on the scene. The Marksman attempted to tow the Sparrowhawk, but her hawsers parted. The survivors were taken off, and the Sparrowhawk was sunk. Despite all of this drama, only six of her crew were killed during the battle. Another three officers and sixteen men were wounded.
Not only had the flotilla been unable to stop the Germans, the fighting had also failed to alert the Grand Fleet, where the action was mis-interpreted as a failed German attack on the British rearguard.
The Sparrowhawk was awarded a battle honour for Jutland.
War Service
August 1914-June 1916: 4th Destroyer Flotilla, Grand Fleet
June 1916: Sunk at Jutland
Commander
-1 June 1916: Lt Commander S. Hopkins
Displacement (standard) |
1,072t |
Displacement (loaded) |
1,300t |
Top Speed |
29 knots |
Engine |
2-shaft Parsons turbines |
Range |
|
Length |
267ft 6in |
Width |
27ft |
Armaments |
Three 4in/ 45cal BL Mk VIII |
Crew complement |
73 |
Laid down |
17 October 1911 |
Launched |
12 October 1912 |
Completed |
May 1913 |
Sunk |
1 June 1916 |
 British Destroyers From Earliest Days to the Second World War, Norman Friedman. A very detailed look at the design of British destroyers from their earliest roots as torpedo boat destroyers, though the First World War and up to the start of the Second World War, supported by vast numbers of plans and well chosen photographs [read full review]
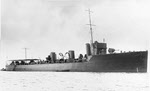 Acasta class HMS Sparrowhawk