|
|
|
|
Introduction
Across the Apennines - April 1796
Mantua
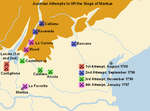
First Relief Attempt, July - August 1796
Second Relief Attempt - September 1796
Third Relief Attempt – November 1796
1797
Fourth Relief Attempt - January 1797
Into Austria
Napoleon Bonaparte's fame as a military commander can be dated back to his campaign in Italy in 1796-97, where as the young and relatively unknown commander of a ragged and poorly supported army he managed to defeat a series of much larger Austrian and allied armies, conquer most of northern Italy, and force the Austrians to the negotiating table. Napoleon was appointed to command the French Army of Italy in March 1796. His orders were to invade northern Italy and occupy Lombardy, a move that the French Directory believed would force the Austrians to move troops south from the Rhine front. Napoleon's task was essentially diversionary, for the main offensive for 1796 was expected to take place on the Rhine. Instead the campaign on the Rhine would soon bog down, while Napoleon's whirlwind of activity in northern Italy effectively ended the War of the First Coalition.
The army Napoleon inherited was in a terrible condition. By 1796 the French armies on the Rhine were seen as the most important, and the Army of Italy was badly paid, badly provisioned and often badly under strength. By the time Napoleon had somewhere between 37,000 and 47,000 men at his disposal, spread out from the pass of Tenda at their left almost to Genoa at their right. The army was split into three divisions, commanded by Pierre Augereau, Andre Masséna and Jean Sérurier, all more experienced than their young commander.
In theory the French were outnumbered, but the 60,000 Allied troops facing them across the Apennines were split into two armies – 25,000 Piedmontese troops south of Turin and 35,000 Austrian troops further east. The two Allied armies did not cooperate well, and would soon be forced apart. Napoleon would then face a series of Austrian armies sent across the Alps in an attempt to lift the siege of Mantua, and may have taken as many as 150,000 prisoners during the course of the campaign.
Across the Apennines – April 1796
At the start of his Italian campaign Napoleon's army was stretched out along the coast from Nice towards Genoa, with the Apennine Mountains between him and the Austrian and Piedmontese armies. The main Austrian army, under the command of General Beaulieu, was based around Alessandria, north of Genoa, while the Piedmontese army (Colli) was further west, defending the main passes across the Maritime Alps and the approaches to Turin.
Napoleon planned to split these two armies, and defeat then in turn. He sent a messenger to the senate of neutral Genoa, asking for permission to advance through their territory. As Napoleon expected permission was refused, and the Austrians were informed of the request. Napoleon also sent a small decoy force along the coast to Voltri.
The key to Napoleon's early successes can be found in the geography of the Ligurian Apennines. Two main passes cross the mountains – the Ormea pass in the west, which ran from Ormea up to Ceva in the Tanaro valley, and the Bochetta Pass, which left the coast at Genoa. Napoleon hoped to convince the Austrians he was heading for the Bochetta Pass. In fact he intended to cross the Apennines between the two main passes, taking advantage of a gap that ran from Savona at the coast west to Carcare, at the southern end of the Bormida valley. From there the French could move north along the valley to threaten the Austrians, or west to Millesimo and Ceva (along the route used by the modern A6 motorway) to threaten the Piedmontese.
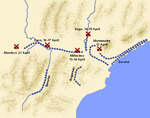
Beaulieu acted exactly as Napoleon had hoped. While Beaulieu led one Austrian army down the Bochetta Pass to attack Voltri, a second column, under General Argenteau, was sent along the Bormida valley, in the hope that Napoleon's right wing could be trapped between the two. Instead Argenteau ran into a strong defensive position in the mountains north of Savona, and on 12 April suffered a heavy defeat in the battle of Montenotte, Napoleon's first victory as a commander.
This left the Allies divided, with the Piedmontese to the west at Millesimo and the Austrians to the north at Dego. Napoleon sent troops to attack both of these positions. On 13-14 April Augereau forced the Piedmontese out of Millesimo. This overlapped with the battle of Dego (14-15 April). On the first day Masséna captured Dego, but he was then forced out by an Austrian counterattack. On the second day Napoleon launched a series of attacks, and eventually the Austrians were forced to retreat. In the aftermath of this defeat General Beaulieu decided to pull back towards his base at Alessandria to defend his communications with Austria.
This left Napoleon free to turn west and eliminate Piedmont from the war. On 16-17 April the Piedmontese managed to hold the French off at Ceva, but then pulled back to a stronger position at Mondovi, where on 21 April Napoleon won a conclusive victory. On 23 April General Colli, in command of the Piedmontese army, sued for peace and on 28 April Piedmont withdrew from the war. (Armistice of Cherasco).
Napoleon was now free to turn east and defeat Beaulieu. First he had to cross the Po. The main Austrian defences were around Pavia, and Beaulieu assumed that Napoleon would attempt to cross the river somewhere in this area. Napoleon encouraged this belief by including a provision in the armistice of Cherasco that gave him the right to cross the Po at Valenza, thirty miles to the west of Pavia.
While Beaulieu watched the river crossings around Valenza, Napoleon moved his army east along the southern bank of the Po and crossed over at Piacenza (7 May), thirty miles to the east of Pavia. When Beaulieu realised what was happening he rushed east, but in three days of fighting around Fombio (7-9 May) the Austrians were unable to prevent the French from blocking their best line of retreat to Cremona. Beaulieu's rapid movement and the relatively slow crossing of the Po did give the Austrians time to turn to the north west and escape across the River Adda at Lodi, leaving a rearguard behind to defend the long thin bridge across the river.
On 10 May Napoleon threw his infantry across that bridge (battle of Lodi), in order to prevent the Austrians using the line of the Adda to block his advance east towards Mantua. After a struggle that lasted an hour the French were victorious. Beaulieu retreated east to Cremona, watched by the French. Napoleon then turned back to the west. On 14 May the first French troops reached Milan, and on the following day Napoleon entered in triumph.
This triumph was short lived. With Piedmont out of the war General Kellermann's Army of the Alps was free to enter Italy, and the Directory decided to give him command of the war against Austria. Napoleon was to turn south to deal with the Papal States. Napoleon sent two letters back to Paris, in which he argued strongly against a divided command. Although neither letter actually contained a threat to resign, it was clear that that was what Napoleon had in mind, and the Directory relented.
After the defeat at Lodi, the Austrians retreated east to the Mincio, taking up a defensive position behind that river, running from Mantua to Lake Garda. On 30 May Napoleon broke through this line (battle of Borgetto). Beaulieu was forced to retreat up the Adige valley, leaving Napoleon free to begin his siege of Mantua. The first blockade of the city began on 4 June.
June also saw Napoleon's first campaign in the Papal States. The invasion was officially launched in revenge for the murder of Ugo Bassville, a French diplomat, in February 1793, but was motivated just as much by revolutionary hatred for the Papacy and the lure of plunder. This first campaign was over very quickly. On 19 June Napoleon reached Bologna, where he expelled the Papal authorities. Pope Pius VI then sued for peace. In the Peace of Bologna (23 June 1796) the Pope agreed to pay a large indemnity and to allow the French to occupy Bologna and Ferrara. This treaty was never ratified in Paris, and Napoleon would return to the Papal States in the following year. After dealing with the Pope the French turned west into Tuscany, passing through Florence and occupying the port of Livorno (Leghorn), before returning back to the Po plain.
First Relief Attempt, July - August 1796
By late July a fresh Austrian army, under the command of Field Marshal Dagobert Graf Würmser, was ready to attempt to lift the siege of Mantua. Würmser decided to advance in three columns. He took command of the central column, which advanced down the Adige valley. To the east General Szoboszio advanced towards Verona, while to the west General Quosdanovich advanced down the Chiese valley towards Brescia. At first all went well. Quosdanovich captured Brescia, threatening Napoleon's lines of communication with Milan. Würmser found the road to Mantua open, and entered the city on 2 August. It was this apparent success that doomed Würmser's campaign to failure.
While Würmser was marching on Mantua, Napoleon concentrated his army south of Lake Garda. On 31 July his advancing troops forced Quosdanovich out of Lonato (first battle of Lonato), and over the next two days Quosdanovich lost Brescia and was forced to move north east towards the lake. Realising that he needed to join up with Würmser, on 3 July Quosdanovich attacked the French position at Lonato (second battle of Lonato). The Austrians failed to break through, leaving Napoleon free to turn on Würmser's column.
Würmser realised his mistake and turned north from Mantua in an attempt to find Quosdanovich. On 4 July he found himself facing a large part of Napoleon's army at Castiglione, and took up a strong defensive position just to the east of the town. If Würmser had been able to hold this position, then his campaign would still have ended in success, for at this point the siege had been lifted, but Napoleon was able to bring superior numbers to the battlefield. At the start of the battle of Castiglione (5 August 1796) the French were outnumbered, and their attacks on the Austrian centre were essentially feints, designed to keep Würmser pinned in place while reinforcements arrived.
Eventually fresh troops arrived from Mantua (Sérurier's division under the temporary command of General Pascal-Antione Fiorella) and from Brescia (Despinois's division), and the Austrians were forced to retreat back to the Mincio. The battle of Castiglione was an early example of Napoleon's 'strategic battle', where widely separated columns converged at a key point on the battlefield to give the French numerical superiority where it counted, even against much larger armies. Although the battle did not go entirely as Napoleon had planned, Würmser was soon forced to retreat back to the Tirol, and the French were able to re-establish the siege.
Second Relief Attempt - September 1796
At the start of September Napoleon and Würmser both went onto the offensive. Napoleon had been ordered to cross the Alps and join up with the Army of the Rhine, then campaigning on the Danube. Napoleon's route would take him up the Adige valley towards Trento, and then across the Brenner Pass to Innsbruck.
At the same time Würmser had been ordered to make a second attempt to lift the siege of Mantua. This time he decided to advance down the Brenta valley and emerge onto the northern Italian plain to the north east of Vicenza (the upper Brenta valley comes within a few miles of the Adige just to the east of Trento, and the two valleys are connected by a short low level pass).
Once on the Italian plains Würmser would join with another Austrian army under General Mészáros, and the combined army would advance towards Mantua from the east. Field Marshal Davidovich would defend the area around Trento. Both expeditions began at about the same time, so while Würmser was moving east along the Brenta, Napoleon was moving north up the Adige valley. On 3 September the French forced their way past Davidovich's defences around Rovereto, and on 4 September broke through a second line at Calliano. Davidovich was forced to abandon Trento.
Only now did Napoleon learn of Würmser's movements. Napoleon's response demonstrated another of the keys to his military success – rapidity of movement. While a small force under General Vaubois was sent north to follow Davidovich, Napoleon's main army turned east to catch Würmser. Some sources suggest that Napoleon learnt of Würmser's movements before the battle of Rovereto, but a look at the map would suggest that this is incorrect. From any position south of Rovereto Napoleon had much better routes east to intercept Würmser, including retracing his steps down the Adige valley. Only the slow pace of Würmser's movement allowed Napoleon to catch and defeat him at Bassano.
Würmser was caught completely off guard, and dangerously out of position. His army was spread out, with one division still in the mountains at Primolano, a second at Bassano, at the edge of the plains, and a third at Vicenza. Napoleon's advance guard defeated Quosdanovich's division at Primolano (7 September 1796). On the following day, after another rapid march, Napoleon defeated Würmser at Bassano (8 September 1796) and split his army in two. Quosdanovich was forced to retreat east towards Treviso, while Würmser escaped towards Vicenza. Over the next few days Napoleon attempted to complete the destruction of Würmser's army, but eventually he and around 12,000 men arrived outside Mantua. A two day long battle followed (San Giorgio), but on 15 September Würmser was forced to seek refuge inside the city.
Third Relief Attempt – November 1796
The trapped Würmser was replaced as Austrian commander-in-chief in northern Italy by Field Marshal Joseph Alvinczy. He was given command of two armies – 27,000-30,000 men under General Quosdanovich at Friuli, at the north eastern corner of the north Italian plain and 17,000-20,000 men under Davidovich in the Tyrol. Alvinczy accompanied Quosdanovich's army.
Sickness and the accumulated losses of a long campaign meant that Napoleon now had around 28,000 men available for his field army. General Vaubois had 10,000 men at Lavis, just to the north of Trento in the upper Adige valley, facing Davidovich. Masséna had 9,500-10,000 men at Bassano, on the Brenta River, facing Quosdanovich. Augereau had 8,000 men at Verona, from where he could move to support either wing. Finally 8,000 men under General Kilmaine were blockading Mantua.
Alvinczy is normally criticised for splitting his forces and thus allowing Napoleon to defeat him in detail, but the Austrian plan came very close to success. Alvinczy realised that both of his field armies outnumbered their French opponents. With three divisions at his disposal Napoleon could only bring two of them to bear against a single Austrian army, and would still be outnumbered. It was unlikely that Napoleon would risk a second advance up the Adige valley to fall on Davidovich, so he would probably have to move east to attack Quosdanovich's larger army.
Alvinczy began his campaign on 1 November, when he crossed the Paive River. On 4 November Masséna pulled back from Bassano to Vicenza, and then to Montebello, where he met up with Augereau, giving him around 18,000 men to face at least 27,000 Austrians. Despite this Napoleon ordered Masséna to attack the Austrians on the Brenta River. On 6 November Masséna and Augereau launched attacks on the Austrians at Citadella and Bassano, but were repulsed by Generals Liptay and Provera. Masséna and Augereau then pulled back to San Martino, three miles east of Verona. Alvinczy reached Vicenza on 8 November and Montebello on 9 November.
Davidovich's advance down the Adige valley also met with success. On 2 November he repulsed a French attack at Lapis. After fighting on 6-7 November Vaubois was forced back from Caliano, and retreated to Rivoli. The two Austrian armies were now dangerously close to joining up. By 11 November Alvinczy had reached Caldiera, on the road between Vicenza and Verona, while his rearguard was at Villanova. Davidovich was only fifteen miles away, and if he had continued to press down the Adige valley would almost certainly have been able to join up with his commander. The Austrian plan failed because it took Davidovich ten days to advance from Rivoli onto the plains west of Verona, a delay that gave Napoleon a chance to concentrate on Alvinczy.
Even with this advantage Napoleon came close to failure. On 12 November Masséna and Augereau attacked the Austrians at Caldiera, and suffered a heavy defeat. Even Napoleon was discouraged by this, sending a very downbeat letter to the Directory in Paris, but he decided to risk one more attack. The Austrian position did have one weak spot. Alvinczy was advancing west towards the fortified and defended city of Verona, with the mountains to his right and the un-fordable Adige to his left. His only line of retreat was across a narrow band of dry ground at Villanova, at the northern tip of a triangle of swampy ground between the junction of the Adige and Alpone rivers.
Napoleon decided to attack across the Adige at Ronco, just above the junction with the Alpone. The battle that followed took its name from the village of Arcole, on the eastern bank of the Alpone, where some of the key fighting took place (battle of Arcola, 15-17 November 1796). Napoleon's first attack on 15 November failed, but it did alert Alvinczy to his danger, and gave him time to withdraw most of his troops from the trap. On the third day of the battle the French were finally successful, and the Austrians were forced to retreat east.
This victory came in the nick of time. On 17 November Davidovich finally forced the French back to Peschiera. If this advance had come any earlier Napoleon might have been trapped between two armies, but it did at least save Alvinczy from any serious pursuit. Napoleon was forced to turn west to help Vaubois. For a moment there was a chance that Davidovich would be trapped, but after fighting around Castelnuovo (21 November) he managed to escape north. Alvinczy took advantage of this to move west back to Caldiera, before retreating east against after the defeat of Davidovich.
Fourth Relief Attempt - January 1797
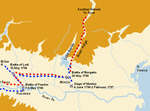
Two months passed before Alvinczy launched the fourth and final relief effort. This time he led the main Austrian army, 28,000 strong, down the Adige valley, while General Provera with 18,000 men advanced towards Verona and Legnago from the east. This time the two Austrian armies were meant to operate independently, and both should have been strong enough to defeat the French troops on their respective fronts. Napoleon had less than 30,000 men available for his field armies, split into three divisions. Augereau was based around Vicenza, where he would face Provera. Joubert with 10,000 men was at La Corona, just to the north of Rivoli, where he would face Alvinczy. Finally Masséna was in a central position at Verona.
The Austrian advance was underway by 10 January. Two days later one of Provera's columns was repulsed from Verona, but on 14 January his main column crossed the Adige, broke through Augereau's centre and made for Mantua. This success came to nothing, for on 13 January Napoleon realised that Alvinczy's was the main effort, and ordered all of his available troops to concentrate at Rivoli. Napoleon himself arrived just after midnight, Masséna arrived at about dawn and Rey arrived at around noon. Napoleon was thus able to feed reinforcements into the fighting whenever a crisis loomed.
He was also helped by the Austrian plan of attack, designed on the previous day to ensure the complete destruction of Joubert's isolated division. Alvinczy's six divisions attacked in three main columns – two divisions attacked along the Adige, three attacked the centre of the French line and the final division was sent on a wide outflanking movement. Napoleon was able to defeat each part of the Austrian army in turn, and Alvinczy was eventually forced to abandon the attack. By the end of the battle of Rivoli the Austrians had lost around 10,000 men, and another 5,000 were captured by Joubert over the next couple of days.
While Joubert moved north after Alvinczy Napoleon and Masséna rushed south to prevent Provera from reaching Mantua. On 16 January Provera was caught at between Masséna and the troops besieging Mantua, and was forced to surrender (battle of La Favorita). The defeat of the forth relief effort effectively doomed Mantua. Two weeks later, on 2 February, Würmser surrendered to Sérurier.
As Mantua was capitulating Napoleon was heading south on a second invasion of the Papal States. This time he advanced down the east coast as far as Ancona before the Pope sued for peace. On 19 February Napoleon and the Papal representatives agreed to the Treaty of Tolentino. The Pope ceded Bologna, Ferrara and Ancona to the French and recognised the seizure of Avignon and the surrounding area in 1791.
Napoleon's next task was the invasion of Austria. He now faced the same problem that had crippled every Austrian attempt to save Mantua – there were two routes across the Alps and Napoleon couldn't afford to leave either of them unguarded while he used the other. The first route led up the Adige valley into the Tyrol, across the Brenner Pass to Innsbruck then east along the northern side of the Alps to Vienna. The second crossed the Julian and Carnatic Alps, at the north eastern corner of Italy, and ran from Udine to Villach, then east to Klagenfurt before turning north east to run around the eastern end of the Alps up to Vienna. It was also possible to advance to the southern end of the Brenner Pass and then turn east to pass through the mountains to Klagenfurt.
The court at Vienna realised that it faced a serious crisis and appointed the Archduke Charles to command the army facing Napoleon. Charles had recently inflicted a serious defeat on the French armies operating across the Rhine, and was perhaps the most able of all Austrian generals of the period. He immediately realised that the best way to oppose Napoleon was to concentrate his army in the Tyrol. If Napoleon attempted to use the eastern route across the Alps then Charles could move south and cut him off. The French would have to turn north to fight the Austrians in the Tyrol. Charles's original position around Innsbruck also made it much easier for Austrian reinforcements to reach him.
Unfortunately for Charles the Austrian government didn't agree with his plan, and he was ordered to make his stand on the Piave River to cover the port of Trieste. He arrived on the Piave on 11 February 1797 and prepared to fight a defensive campaign. At this date he had 22,000 soldiers on the Piave, and 10,000 soldiers and as many militia in the Tyrol, and he had been promised close to 50,000 reinforcements, but very few would reach him in time to play any part in the battles to come.
Napoleon now had the largest army available to him at any point in the campaign. He had requested 30,000 reinforcements, and had received 20,000 of them, under Delmas and Bernadotte, and the fall of Mantua freed up thousands more. When the campaign began he was able to leave 18,000 men in the Tyrol (Joubert, Delmas and Baraguay d'Hilliers) and lead 34,000 men in four divisions himself (Sérurier, Masséna, Guyeux and Bernadotte). Napoleon's plan was for Joubert to push the Austrians in the Tyrol back across the Brenner Pass to Innsbruck, while he advanced across the Carnatic and Julian Alps. If Joubert was successful he could turn east and advance along the Drave Valley to join Napoleon at Villach or Klagenfurt.
At the start of March the Austrians had 3,000 men under General Lusignan just inside the mountains at Feltre on the Piave, guarding their lines of communication to the Tyrol and 22,000 men under the Archduke Charles along the Piave between the mountains and the sea. Napoleon sent Masséna to deal with Lusignan, while he led his main force to the Piave.
Masséna began his advance on 10 March. Lusignan retreated up the river from Belluno, but on 13 March was forced to stand and fight between Polpet, where the valley of the Piave turns north and enters the high mountains, and Longarone, five miles to the north. Masséna was then free to turn south, crossing the Tagliamento River near Spilimbergo (five miles south of the start of the mountains) on 16 March. Masséna then moved north along the Tagliamento to Gemona. He then advanced north east along the mountain passes to Pontebba, from where he threatened Charles's right and the crucial Tarvis pass.
On 13 March Napoleon's main force crossed the Piave and advanced towards the Tagliamento at Valvasone. On 16 March Bernadotte and Guyeux's divisions forced their way across the river (battle of the Tagliamento) in one of the few recognised set-piece battles of the campaign. The Austrians lost 500 men and were forced to retreat east.
After the defeat on the Tagliamento Charles split his army. Bajalich, with his division, 25 guns and a large supply convoy, was sent east to Cividale, at the edge of the mountains. From there he was to cross the mountains to Caporetto in the upper Isonzo valley and then follow an alternative route to Tarvis. Charles hoped that this division would arrive in time to keep the pass open, for if the French captured Tarvis then Charles's reinforcements would have had to follow a very long route around the eastern side of the mountains to reach him on the Isonzo. The rest of the army pulled back to Gradisca on the lower Isonzo. Charles hoped to defend that river, which was the last natural barrier before Trieste.
The French soon forced their way across the Isonzo, taking 3,000 prisoners in Gradisca. Napoleon attempted to push the Austrians into the mountainous upper reaches of the Isonzo valley, but Charles escaped this trap and withdrew east towards Adelsberg (now Postojna) then north east towards Laybach (Ljubljana), with Bernadotte in pursuit.
Napoleon now turned north. Guyeux was sent to chase Bayalitsch through Cividale and Caporetto while Napoleon and Sérurer advanced up the Isonzo towards Caporetto. At the same time Masséna was advancing towards the Tarvis pass. On 20 March he captured Chiusa, at the southern end of the Pontebba pass, and on 21 March he reached Pontebba.
Charles now realised that Bajalich's column was in serious danger, with Masséna ahead of him and Napoleon close behind. Tarvis was defended by a weak force under General Ocskay, made up of the survivors of Lusignan's division. Charles made a dash through the mountains, using a minor pass at Krainberg (near Arnoldstein, east of Tarvis) and reached Villach. There he gathered together around 6,000 men and advanced towards Tarvis.
The exact sequence of events around Tarvis is somewhat obscure, with different sources giving different details. The basic outline seems clear – Masséna captured the pass. Charles counterattacked and drove the French east back towards Pontebba. Masséna then gathered his entire division together and retook the pass. Bajalich then arrived on the scene, although his exact route is not given, and found himself trapped between Masséna and Napoleon. Bajalich and around 4,000 of his men were captured. The name generally given to this battle is Malborghetto (23 March 1797), but that village is some way west of the top of the pass, where the fighting against Charles is said to have taken place, and so may refer to the capture of Bajalich. At the end of this battle Charles withdrew to Klagenfurt.
Napoleon was now across the Alps, and in the valley of the Drave. He was still faced by a large Austrian army, and Charles was now beginning to receive reinforcements. Napoleon had taken this into account, and soon after crossing the Tagliamento had ordered Joubert to join him on the Drave.
Joubert's own campaign had been just as successful as Napoleons. He was facing two Austrian generals – Kerpen and Laudon – who repeatedly received reinforcements from the north, but he defeated them at St. Michael on 20 March and Neumark on 22 March. After this second defeat the Austrian forces split. Joubert chased Kerpen to Brixen, at the foot of the Brenner Pass, and defeated him twice more, at Klausen (Chiusa) and Mittenwald. Kerpen retreated across the Brenner to Innsbruck, leaving Joubert free to turn east to advance down the Drave.
On 31 March Napoleon advanced to Klagenfurt. His plan was to approach Vienna across the Semmering pass, taking the road that led to Leoben. On 31 March, while at Klagenfurt, he wrote a letter to the Archduke making tentative peace feelers. Napoleon was aware that he was in a vulnerable position. A revolt had broken out in Venice, which threatened his rear, and if the campaign went on too long then the Austrians could concentrate new armies against him. Napoleon needed a quick diplomatic victory.
For the moment all Charles could do was forward the letter to Vienna and attempt to stop Napoleon's advance. On 1 April the French pushed back the Austrian advance guard at St. Veit, their main force at Friesach, and forced them out of the gorges of Neumark. Another victory followed at Unzmarkt (3 April), and on 7 April the French entered Leoben.
Napoleon's advance had triggered a panic in Vienna. While the court prepared to evacuate the city, Generals Bellegrade and Meerfeld were sent to Leoben to ask for a ten day armistice. Napoleon agreed to five days, and pushed his advance guards forward to Semmering. Negotiations began on 13 April, and 18 April resulted in the Preliminaries of Leoben. The Emperor Francis II agreed to surrender Belgium to France and to acknowledge France's new frontier on the Rhine. Lombardy was also surrendered, and the new republics in northern Italy acknowledged (Cisalpine around Milan and Cispadine around Modena). In return Austria was to be given Venice's land provinces in northern Italy although at this stage Venice herself was to remain independent. Although the negotiations dragged on for most of the year, Leoben marked the effective end of the War of the First Coalition. Napoleon spent most of 1797 as the virtual ruler of northern Italy, negotiating on equal terms with the Austrian emperor. The peace was finally formalised as Treaty of Campo Fornio (17th October 1797).