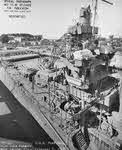
Photos courtesy of JSCSC Library, Crown Copyright
|
|
![]()
![]()
![]()
![]()
![]()
![]()
![]()
![]()
![]()
![]()
Photos courtesy of JSCSC Library, Crown Copyright
Despite the Japanese opting to commence war with the Allies (principally the United States, Great Britain, the Netherlands and Australia) in the Pacific in December 1941, there seemed to be a lack of strategic vision directing their war aims. The initial reasons were mainly economic, to secure Japan's access to the oil reserves of the Dutch East Indies. But there was little thought initially given as to what should happen if and when those objectives were realised or any proper assessment as to the forces that Japan would oppose if she went to war. With what amounted to a surprisingly economical force of some eleven divisions, 1,200 aircraft and most of the Imperial Navy, Japan very quickly realised her initial objectives.
In the three months after Pearl Harbor, she humbled the military forces of the United States, Great Britain, the Netherlands and Australia and gained control of the Dutch East Indies, as well as widening the defensive perimeter around the home islands, at a much smaller cost than had been anticipated. Japan had shown that her armed forces were a match for, if not better than, those of her opponents (a factor that would come back to haunt a number of the colonial powers after the Second World War, despite the eventual Allied victory).
The fortuitous start gave confidence to those in Japan's armed forces and the responsibility for planning the second stage was given to Rear Admiral Matome Ugaki (Chief of Staff of the Combined Fleet) by Admiral Yamamoto. It is in many ways symptomatic of the condition of the IGHQ (which was divided by deep rivalries between the General Staffs of the Army and the Navy) that the Imperial Navy took this task for their own. Such a condition never allowed the development of a joint coherent strategy that would govern the wartime operations of the two services. IGHQ therefore presided over two distinct and separate planning groups.
The Army (as the senior service) thought Japan's main interest lay in the war in China and defending Manchuria against the Soviet Union. Its support for the Navy's 'southern' strategy was conditional on to what degree it conflicted with its interests and therefore how many Army divisions it was willing to allocate. Compounding this indifference was the relative decline of the influence of the Naval General Staff over the planning of naval strategy that had passed in practice over to the planning staff of the Combined Fleet under Admiral Yamamoto. This was in part due to the personality of Yamamoto and his low opinion of the Chief of the Naval General Staff, as well as the position of Yamamoto after the success of the attack on Pearl Harbor. That is not to say that there was a lack of imaginative ideas in the Planning Division of the Naval General Staff and that they were not prepared to fight their corner to get their ideas across but that it would prove impossible to deflect Yamamoto from his chosen course of action once he had decided what he was going to do.
Ukagi initially came up with a plan to invade the Midway, Johnston and Palmyra Islands to act as forward bases for an invasion of Hawaii that would precipitate a decisive battle with the US Navy, and which was still at the heart of Japanese naval strategy. Ukagi's rationale was that Japan had to continue the offensive and not merely consolidate its initial gains, as doing so would hand the initiative over to the Allies who could then build their strength up once again and attack. Such a strategy would not only waste the proven effectiveness and technical efficiency of the Imperial Navy but the strategic advantage gained by the initial operations as well. These proposals were rejected by the Senior Fleet Operations Officer, Captain Kuroshima on the grounds that the United States was unlikely to risk the remainder of their fleet to save the islands in question. He offered an alternative plan to shift the strategic focus to the Indian Ocean and a seizure of Ceylon (now Sri Lanka). Ugaki accepted the criticisms of his own plan and while accepting the alternative put forward by Kuroshima, insisted it have a proviso that it be carried out within the context of a joint Axis offensive and timed to coincide with a German offensive in the Middle East and Southwest Asia.
What might have been a major strategic opportunity came to nothing, as the Germans offered no proposals for joint operations under the new Tripartite Axis agreement signed on 19 December 1941. Even so, the Combined Fleet continued to explore the possibility with wargames aboard the new battleship Yamato but the plan eventually foundered on Army reluctance to provide additional divisions for the assault on Ceylon. The Navy once again returned to Ukagi's option for a strike towards the Eastern Pacific and modified the plan to overcome Army opposition by dropping the ambitious Hawaii invasion and concentrating on the Aleutian and Midway Islands. The planning was given an extra impetus by the limited attacks by the United States on the Marshall Islands, Rabaul, Wake Island, eastern New Guinea and Marcus Island. It was important that the Japanese lure the remainder of the US Pacific Fleet to battle around Midway and that the Imperial Navy achieve a strategic victory as Yamamoto believed that Japan could then offer peace to the United States from a position of strength.
He was always conscious of the industrial and manpower resources of the United States and that unless victory could be achieved quickly, Japan would eventually be defeated after a long and costly war. Meanwhile, the Naval General Staff had been reviewing a number of options following the Army's veto of the Ceylon operation. Gradually there emerged the view that operations should be mounted to either occupy those areas of Australia that would most likely to be used as bases for an Allied counterattack, or at the very least, isolate them. As a major amphibious attack and occupation of parts of Australia would require a substantial Army force and likely to suffer another Army veto, the Navy decided to examine the more limited option of isolation and seize the island of Tulagi in the Solomon Islands and Port Moresby on the southeastern coast of New Guinea.
Yamamoto added Carrier Division 5 to the naval forces assigned to the operation and inadvertently increased the risks to the Midway operation, as both these carriers were assumed to take part in that operation as well. The Combined Fleet plan was finalised and presented to the Naval General Staff on 2nd April. There followed a great deal of heated debate, but Yamamoto once again played the resignation card as he fervently believed that it was vital to draw the American carriers out into battle and destroy them. If they didn't engage then at least the defensive perimeter had been pushed out to Midway and the western Aleutians. The plan was finally agreed by Rear Admiral Fukudome, the Naval General Staff and IGHQ - the Army happy to pass the plan, as it actually required little in terms of ground forces. While the Combined Fleet and the Naval General Staff debated the details, the Doolittle Raid took place, rapidly bringing discussions to a close. As April turned into May, preparations for the operation gathered pace.
Wargames were held on the Yamato between the 1st and 4th May to test the plans and explore the post-Midway operations, where it was apparent that what has been termed as 'victory disease' affected almost all levels of the senior staff. Such a mindset had its origins in the psychological view the Japanese had of themselves, their history, the samurai tradition and the belief in the divine righteousness of their cause. Such an attitude had warped the Japanese perceptions of the United States to the point where it was believed that there was really nothing to fear from this weak and decadent opponent, ignoring the immense military, industrial and moral potential of the great power. Therefore it was believed that the Japanese held the undisputed initiative in the up-and-coming operation and that the US carriers would only put to sea after the attack on Midway had begun.
That they might already be at sea and awaiting the Japanese was never really considered and when it happened to be brought up as a possibility to explore different aspects of the battle, it was dismissed and the results (the carriers Kaga and Akagi being sunk) were overturned. The Japanese began serious preparations for Operations MI and AL towards the end of April when the First Air Fleet returned from operations in the Indian Ocean. However, Nagumo had to accept the results of the Battle of the Coral Sea, which despite the victory trumpeted by the Japanese media had left the Shokaku badly damaged and in need of extensive repairs and the Zuikaku had lost a large percentage of her aircrew and had to wait for replacements.
The US Pacific Fleet on the other hand had lost two carriers, or so the Japanese thought, the USS Lexington and the USS Yorktown. Remarkably, the USS Yorktown would appear again and make a significant contribution to the Battle for Midway, after undergoing repairs. On 21 May, Yamamoto led the three elements of the Combined Fleet (his Main Body, Nagumo's four carriers and Kondo's Second Fleet) out to conduct manoeuvres, with the final wargames being played on the Yamato on the 24 May. The transports carrying the Army's assault force (led by Colonel Kiyonao Ichicki) rendezvoused with Rear Admiral Kurita's Support Force near Saipan on the same day. Those heading for the Aleutians made their way to the Ominato Naval Base on Honshu where they departed for their objectives on 28 May.
The largest assembly of naval power ever in the Pacific put to sea for Midway at 08.00 that day, still under the impression they would achieve surprise. The aim of Operations MI and AL was to secure a new forward defensive line running from the Aleutian Islands, through Midway Island, Wake Island, the Marshalls, the Gilberts and the southern Solomons to Port Moresby. Additionally, it would enable the Japanese to destroy the remaining surface units of the US Pacific Fleet as it was thought that Midway was held as a vital strategic point and that the US Pacific Fleet would be forced to sortie from Hawaii to contest control. The Combined Fleet had prepared a complex plan that was very dependant upon timing and involved two separate attacks, both revolving around N-Day, 7 June.
The first attack was to be a diversionary one, aimed at occupying the Aleutian Islands in the northern Pacific and was under the command of Vice Admiral Hosogaya with Northern Force Main Body, the Second Carrier Strike Force, the Attu and Kiska invasion forces and a submarine force as well as a screening force of battleships under Vice Admiral Takasu. The second attack would be on Midway itself, which would be initiated on 5 June by a carrier air strike from Nagumo's First Carrier Air Fleet to destroy US air power protecting the island. The carriers would then be free to ready themselves for the approach of the US Pacific Fleet and its aircraft carriers while the invasion force, supported by Rear Admiral Fujita's Seaplane Tender Group who would seize Kure Island, some sixty miles from Midway to act as a forward operating base and Vice Admiral Kurita's four heavy cruisers, occupied Midway. Then, once Yamamoto had received word that the US carriers had sortied, he would concentrate his disparate fleet elements (including his Main Body) and force a decisive engagement upon the remainder of the US Fleet.
Many were concerned about the tight timetable however, in that it required him to reconcile two separate (and opposing) objectives very close to one another, the defeat of Midway's air power and the destruction of the US carriers, limiting his ability to respond to an unexpected event. What made matters worse was the lack of accurate intelligence the Japanese had on the exact whereabouts of the US Pacific Fleet, the last sightings being on the 18 May near the Solomon Islands. Initial Japanese reconnaissance attempts were foiled when the two H8K 'Emily' flying boat flights between 31 May and 3 June were cancelled as the I-123 submarine reported that the US was patrolling near to their rendezvous point at the French Frigate Shoals. The submarine cordon didn't have any better luck as they were two days late getting into place (by that time Spruance had already passed by) and the Yorktown passed by unnoticed.
The Japanese however did have indications that all might not be well, as Ugaki found that some seventy-two out of 180 radio transmissions in the Hawaii area were marked urgent, making him suspect that the Americans had gotten wind of the operation. This information was denied Nagumo as those on Yamato staff believed that this traffic must have been picked up on the Akagi, despite the Akagi having some communications difficulties and so there was no need to break radio silence. An updated message sent by the Naval General Staff on 2 June speculating about the presence of US carriers east of Midway was not passed on either. Nagumo was thus denied information that could have radically altered the events that were about to unfold and he continued to head towards Midway surrounded by a fog bank.
Yamamato and Nagumo would not have been quite so confident of achieving such a certain victory if they had known that the Americans had in fact had received the first inkling of the Midway operation in April. While there were suspicions it would not be until after World War Two that the Japanese would discover that the Midway operation had indeed been compromised, the most important factor in which was the breaking of the then Japanese naval code, JN25. While not all of it was understood, enough phrases were understood for Commander Joseph Rochefort (commander of the Navy Combat Intelligence Office on Hawaii, nicknamed 'Hypo') to predict that Midway would be the subject of a major operation. He informed Fleet Admiral Chester Nimitz who, having learned to value Rochefort's judgement (he had predicted the Japanese attack on Port Moresby), decided to plan for a Japanese attack. Nimitz then held an inspection tour of Midway on 2 May and while he did not specifically warn Lt Commander Shannon and Commander Cyril Simmard (the two senior officers) he asked them what they would need to defend the island against a major amphibious attack.
Later on, Nimitz penned a letter to them in effect singling out Midway as the probable target of such an attack. Manpower and airpower were subsequently increased to a level Shannon thought necessary. Rochefort then used a ruse to secure confirmation that what the Americans had learnt about Japanese intentions was true. The Japanese used code letters for different locations and so to find out what code letters were assigned to Midway, Rochefort gained Nimitz's permission to send a message from Midway in plain English saying they were short of water due to a fault with their water filtration plant. As Midway lacked any natural water supply, this would ring true with the Japanese eavesdroppers. Two days later, the Americans received confirmation when the Japanese sent a message to their own fleet commanders indicating that 'AF is short of water'. Nimitz recalled Task Force 16 under Vice Admiral William Halsey that contained the carriers Enterprise and Hornet from the Solomon Islands to Pearl Harbor. He had intended to give command of the Midway operation to him but Halsey was suffering from a severe case of dermatitis but unreservedly recommended his replacement as Rear Admiral Raymond A Spruance, a man both Halsey and Nimitz held in high regard.
As the Hypo team had received one more message containing the Japanese order of battle for the Midway operation just before they changed the JN25 code, Nimitz was able to tell Spruance on the 27 May exactly what he was up against and from which direction the Japanese would be approaching Midway from. The following day, Nimitz met with Rear Admiral Frank Fletcher who had brought the badly damaged Yorktown back to Pearl Harbor. He told Fletcher that he would be sailing with the Yorktown to join up with Spruance in a few days, but that presupposed the Yorktown being sufficiently combat worthy - estimates of repair time varied between three months and a fortnight, neither of which would mean she would be available to face the Japanese. In a remarkable feat, some 1,400 dockyard workers descended upon the Yorktown and returned her to sea in forty-eight hours by working around the clock. Admittedly, many of her repairs were temporary, and few of the watertight doors worked and she had an ad hoc air group from three other carriers but with the cruisers Astoria and Portland, and the six destroyers of DesRon 2 she set off for Midway at a stately 27 knots. Nimitz had decided the Aleutian operation was a diversion but sent Rear Admiral Theobald with Task Force 8 (five cruisers and ten destroyers) to the islands to support the American forces there. Meanwhile, he was determined that Midway itself should act as a fourth, unsinkable aircraft carrier, and so while the total number of aircraft on the island was raised to 115, many of these planes were quickly approaching obsolescence and so the fighters main task would be to escort the bombers to their target and not defend the island.
The highest priority on Nimitz's mind was the absolute secrecy of the US carriers' presence off Midway and so there was little effort to coordinate the land based airpower with that from the carriers. The principal target for the US carriers were the four Japanese carriers under Nagumo, known to be approaching Midway from the northwest and that it was vital for the US Pacific Fleet to hit them with a devastating first strike as a drawn out battle of attrition was not a possibility that could be considered. If Spruance and Fletcher failed, and the Japanese managed to sink the US carriers, the entire Eastern Pacific and the western seaboard of the USA lay open to attack. Despite the advantage in intelligence, Nimitz knew that a great deal could still go wrong once battle was joined and so named the rendezvous point of the three US carriers some 325 miles northeast of Midway - 'Point Luck'.
Early in the morning of the 4 June, the fours carriers of the First Air Fleet, Akagi, Kaga, Hiryu and Soryu were scenes of intense activity as the fully fuelled and armed planes of the strike force were brought on deck. At 03.00 engines spluttered into life as mechanics began the warm up process and by 04.30 the first aircraft were taking off. The first wave would be made up of the younger replacement pilots as Nagumo wanted to keep his veteran pilots back to form a second strike force in the event of the American carriers making an appearance. This was symptomatic of his natural caution and not of any revised intelligence estimates. In fact, he generally believed that the plan was going well as he had been denied knowledge of the fact that Tanaka's invasion force had been prematurely sighted due to Yamamoto's insistence on radio silence and so had no reason to believe that they had lost the element of surprise and that the US carriers would only show up once they had taken out the airfield on Midway.
This would become a key factor in the whole Japanese approach to aerial reconnaissance, upon which the whole security of the task force depended. It would be made on the basis of a single-phase search, launched after the attack on Midway had begun. If all went according to plan any American force should be caught in one of the search patterns and dealt with by Nagumo's second strike. However, if things did not go according to plan then the American ships might only be spotted after the Japanese aircraft had begun to attack other targets, as had happened in the Indian Ocean. There was also a reluctance to employ combat aircraft such as the 'Val' or 'Kate' on reconnaissance missions when they could be armed with a torpedo or bomb and used offensively.
Launching was complete by 04.45 and the 108 aircraft of the first wave turned southeast towards Midway. Thereafter the Zeros of the Combat Air Patrol (CAP) were launched to provide protection over the fleet and the aircraft of the reconnaissance force were launched, with a delay of 30 minutes to one of the aircraft from the Tone - a delay that would prove fatal. On Midway Island, the early hours of 4 June were spent preparing for the onslaught to come. Eleven PBYs were sent up to try and locate Nagumo's carriers and some 16 B-17s were sent to plague Tanaka's invasion force once again. As the morning progressed, events began to move quickly.
The PBY of Flight 58, flown by Lt Howard P Ady spotted a Japanese recon plane at 0520. At 0530, the words 'Carrier bearing 320, distance 180' were received. A further flash was received from another PBY flying a pattern adjacent to Flight 58 that reported a large number of Japanese aircraft flying towards Midway. This was confirmation that Nagumo had committed his first air strike against Midway. While life became somewhat more risky for the PBYs, Lt Ady managed to send a signal that clinched it: 'Two carriers and battleships bearing 320 degrees, distance 180, course 135, speed 25'. Moments later, Midway received its first indications of the impending attack as radar operators detected the incoming Japanese strike force at a distance of ninety-three miles.
The aircraft were ordered to launch. The Wildcat and Buffalo fighters of VMF-221 took off and headed for the Japanese formation while the dive-bombers of VMSB-241 (16 aircraft) under Major Lofton Henderson, SB2U 'Vibrators' under Major Benjamin Norris, VT-6 (6 aircraft) and four B-26 medium bombers took off for the Japanese carriers, joined by the B17s that were already out to sea. The Marines attacked the Japanese formation after gaining something of a height advantage but the escorting Zeros, who were flying slightly behind and above the level and dive-bombers pounced and used their superior manoeuvrability to try and get behind the US fighters. A wild melee ensued with the Japanese shooting their through the Marines (thirteen Buffaloes and two Wildcats shot down) while the Marines accounted for three bombers and two Zeros. The Japanese force led by Lt Joicho Tomonaga, proceded to pummel Midway causing a large amount of damage to the airfield's facilities and to the oil tanks on Sand Island. Their reception however, was pretty hot and the anti-aircraft fire was later described as 'vicious'. Four aircraft were lost, and the airfield's runways remained intact, prompting Tomonaga to request a second strike.
Meanwhile, ten TBDs from the USS Yorktown had launched at 04.30 to look at the area to the north of the US task force in case the Japanese came from a slightly more northerly route. The strike on Midway and the later fix on the two Japanese carriers put the Japanese about 200 miles from Midway and made Spruance revise his original plans of closing to half that distance and then launching his strike. To do so would possibly loose the chance of striking at two carriers but to catch them he would have to launch very quickly, almost two hours before he had planned and the round trip to the carriers was beyond the range of the torpedo bombers. A course was plotted to bring them within range by about 07.00, assuming Nagumo stayed on the same course and speed to recover his aircraft. There was also the problem that only two carriers had been spotted and another two, possibly three, lay somewhere out there. Fletcher had no intention of launching all his aircraft and finding himself vulnerable to a strike from these carriers and so ordered Enterprise and Hornet to move south and strike the two carriers that had been sighted, while the Yorktown would act as a reserve and follow once it had recovered its scout planes. The Hornet started launching at 0700. The air group consisted of fifteen Devastators (VT-8 under Lt Cdr John C Waldron), thirty-five Dauntless dive-bombers (VB-8 and VS-8 armed with 1000lbs and 500lbs bombs respectively) and ten Wildcat fighters (led by Lt Cdr Samuel G Mitchell). Enterprise started launching at 07.06 and put up an air group of sixty-one aircraft made up of fourteen TBDs (VT-6 under Lt Cdr Eugene E Lindsay), thirty-seven Dauntless dive-bombers (VB-8 and VS-8 under Lieutenants Best and Gallaher) and ten Wildcats (from VF-6 under Lt James S Gray). Upon reflection, Fletcher decided that the two carriers already sighted were too good an opportunity and starting launching a small air group at 08.30 composed of seventeen Dauntlesses under Lt Cdr Maxwell F Leslie (VB-3) and twelve Devastators under Lt Cdr Lance E Massey (VT-3) with six Wildcats from VF-3. Meanwhile, the second wave of 108 bombers (72 D3A1s and 36 Kates) had been bought up onto the decks of the Japanese carriers under the command of Lt Commander Takashige Egusa of the Soryu. They would be escorted by 36 Zeros. As the hours past however, without any sighting of the Americans, many Japanese officers started to wonder whether they were out there at all. When Nagumo received Tomonaga's signal requesting a second strike on Midway (07.00), his sympathy for it was quickly hardened into decision as the first of the aircraft dispatched from the atoll attacked the First Air Fleet. These were the four B-26s under Capt James F Collins and the six TBFs of VT-8 under Lt Langdon K Fieberling. While a number managed to drop their torpedoes, deft manoeuvring from Akagi avoided these and five out of the six TBFs and two out of the four B-26s were shot down. At this point (07.15), Nagumo decided to commit to a second strike against Midway to finish the job, however while the second strike were rearming, a message came in from Tone's floatplane No. 4 (07.28), which read 'sight what appears to be 10 enemy surface ships, in position 10 degrees distance 240 miles from Midway. Course 150 speed over 20 knots.' This threw Nagumo and his staff into something of a quandary. While his original orders had indeed stipulated the destruction of Midway's airpower, he could not ignore the threat the US ships posed to his fleet. There was also the question of Tomonaga's strike group that would be returning soon and need rearming and refuelling. He decided to continue with the strike against Midway but those aircraft that still retained their torpedoes be kept for a possible strike against the US naval force (07.45). It was vital that the floatplane ascertain what the composition of the enemy force was. In the meantime, the First Air Fleet was attacked once again by the sixteen Dauntlesses of VMSB-241 under Major Lofton Henderson (07.48) who employed a low-angle glide technique due to the fact that most of the pilots were inexperienced in flying these aircraft. At the end of this attack, many of the US aircraft had been shot down and had once again failed to damage a Japanese carrier (despite a number of near misses on the Hiryu). This was followed by Lt Colonel Sweeney's B17s who dropped their bomb loads and departed. It was something of a relief that Tone 4 reported five destroyers and five cruisers (08.06), although Kusaka (Chief of Staff of the First Air Fleet) thought that a force such as that was unlikely to be at sea without a carrier being present. This opinion was vindicated by another message from the floatplane at 08.30, which stated 'the enemy is accompanied by what appears to be a carrier in a position to the rear of the others.' This was accompanied by the first sighting of Tomonaga's returning strike force, many of which were low on fuel or damaged. The second wave would have to be cleared quickly for the returning planes to be landed, rearmed and refuelled. While it was now evident that the enemy carrier presented the greatest threat, the dilemma for Nagumo lay in whether he should launch a strike immediately, with most of the bombers now armed with bombs and without the benefit of fighter cover (Itaya's fighters had been flying since first light helping to beat off the repeated US air attacks). Such a strike was thought to hold little prospect of success and so Nagumo ordered that the Midway strike force be landed first (requiring the decks to be cleared of the aircraft of the second strike, which could be rearmed with torpedoes), be rearmed and refuelled and the First Air Fleet turn east-north-east to engage the enemy force. In addition, extra scout planes were sent aloft (including some of the new D4Ys from Soryu) to try and get a better fix on the American force and any others that might be out there. Barely a few minutes later (09.18) the first aircraft of VT-8 were sighted by Chikuma. Spruance had wanted to wait and send all the aircraft of Task Force 16 as a single group but the discovery of floatplane No. 4 lurking on the horizon meant that he was forced to send them piecemeal as and when they were ready. Lt Commander Wade McClusky with his 33 SBDs (VB-6 and VS-6) were sent out first, followed by Hornet's SBDs and F4Fs (VT-8 and VF-6), and finally the two squadrons of TBDs (VT-3 and VT-6). In the gathering cloud cover, the Wildcats of VF-6 that were supposed to cover VT-6, lost contact with them and proceeded to fly top cover for Waldron's VT-8. Both squadrons of torpedo bombers would attack the Japanese carriers without cover. The strike force struck out towards Nagumo's estimated position without knowing that he had in fact changed course to close with the US naval group. The Hornet group (VF-8, VB-8 and VS-8) arrived at the estimated position only to find it empty and despite moving south (assuming that he had moved even closer to Midway) couldn't find the First Air Fleet and so some headed back to the US carriers while others landed on Midway. Many of the Wildcats however were forced to ditch in the sea as they ran out of fuel. Waldron followed his own hunch and after following the prescribed route only part of the way, changed course to a north westerly one. Waldron found the Japanese fleet and began his assault at 0920, followed over the course of the next hour or so by the remainder of the strike force. As the fifteen Devastators of VT-8 began their attack, Nagumo's fleet deployed to cover the carriers, and some fifty Zeros were aloft to provide CAP. Waldron's attack went in without the benefit of fighter cover, as he was unable to signal the Wildcats of VF-6 (Gray) to join them. As a result the aircraft were literally hacked from the sky by anti-aircraft fire and Zeros, the only survivor being Ensign George Gay who managed to cling to a piece of wreckage. Even as this was going on, the Japanese were preparing a strike of their own, but Nagumo needed a period of calm in order to launch it. He was not to receive it as the fourteen Devastators of VT-6 (Lindsay) began their attack almost immediately after Waldron, with seven surviving long enough to drop their torpedoes at the Hiryu, which just managed to avoid them by turning hard to port. Four planes made it back to the Enterprise.
At this point the Zeros had to land, refuel and rearm quickly and launch again to continue providing CAP. As they were doing this, lookouts spotted yet another American strike force that was inbound (10.15). Unlike the previous attacks, this was a coherent strike force of twelve Devastators (VT-3, Massey), six Wildcats (VF-3, Thatch) and seventeen dive-bombers (VB-3, Leslie). The intent was to launch a concerted attack, but heavy cloud separated the torpedo bombers off from the rest of the force and these began the attack before the dive-bombers were ready, and despite the efforts of the fighters only seven reached their final run-in position, five dropped their torpedoes at the Hiryu and the Kaga, and two made it back to the Enterprise. With the last of the torpedo bombers gone, Nagumo quickly ordered that the carriers turn into the wind and begin launching before another attack came in.
The sacrifice of the torpedo bombers had not been in vain however, as the defensive screen around the carriers had been disrupted through the heavy manoeuvring of the ships to avoid attack and, more importantly, the fighter cover had been pulled down to sea level. This left the skies over the Japanese fleet completely unprotected. Just as the Japanese began launching, lookouts spotted the incoming dive-bombers of McClusky and Leslie. The time was 10.20. Within five minutes, the entire balance of the war in the Pacific was altered as the dive-bombers descended on their targets only a light amount of anti-aircraft fire emerged. Kaga was hit first, with the fourth bomb in a string of four hitting squarely amongst the fully armed and fuelled aircraft ready to launch on the deck. The flight deck erupted and became an instant funeral pyre while burning fuel seeped below deck. Two more bombs hit her near the forward elevator with one bomb penetrating to the hangar level where aircraft of the second wave were being armed and fuelled. The explosion detonated fuel tanks and bombs that were waiting to be loaded and a fourth bomb destroyed a fuel bowser. The entire level became an inferno. The fire-fighting teams had little chance to control this and the ship was finally abandoned at 16.40 but did not sink until 19.25 taking around 800 of her crew with her and almost all her aircraft and aircrew.
The same fate befell Akagi, which had already started launching her fighters when three dive-bombers started their descent. The first bomb missed, but the second hit near the rear elevator and the third exploded among the packed aircraft, which again caused an inferno on the flight deck that quickly spread below decks and detonated the fuel and bombs being loaded aboard the second wave. Nagumo was forced to transfer his command to the Nagara and it was not until the next morning that the torpedoes of four destroyers administered the coup de grace and the Akagi sank below the waves taking over 300 of her crew with her.
Seconds after Akagi was hit, Soryu became the third victim of the dive-bombers and was hit by three bombs. The first hit between the second and third lifts, the second just in front of the forward lift and penetrated to the hangar level where it set off the fuel and weapons stores, resulting in an explosion so immense that it vaporised just about everything on the deck and generated a heat so fierce that even the metal began to melt. The third fell into the parked aircraft on the flight deck and caused yet another inferno. Twenty minutes later the ship was shaken by a huge explosion that persuaded Captain Yanagimoto to give the order to abandon ship. Finally, at 19.13 the ship was swept by a series of explosions that sent her and 718 of her crew to the bottom.
At around 10.58 the as yet undamaged Hiryu launched the first of two counter strikes, which consisted of eighteen dive-bombers and six Zero fighters. They were guided to their target by radio reports from Chikuma 5 that had kept up a discrete surveillance of Task Force 17. The dive-bombers were initially warned off by the twelve fighters of Yorktown's CAP and these were reinforced by fighters that were ready on deck and a number of aircraft from Task Force 16. The dive-bombers then attacked the carrier with five managing to get through and the ship was hit three times, the first hit the flight deck causing a large hole and fires that spread below deck, the second went down the smokestack and wrecked the engine room, radar, communications equipment and plotting room, while the third penetrated below decks but use of the carbonic acid gas system and flooding prevented the fuel tanks and magazines from exploding. Fletcher was forced to move command to the Astoria but the Yorktown managed to make some rapid repairs and she started to recover her fighters.
At this point, the second Japanese strike force of ten torpedo bombers and six Zero fighters arrived, led by Lt Tomonaga. The Yorktown's Wildcats managed to account for some of the attackers, as did anti-aircraft fire but five bombers launched their torpedoes and Tomonaga, knowing he could return to the Hiryu (there had not been enough time to repair a damaged fuel tank) crashed his plane onto the flight deck. Two of the torpedoes hit less than 60 feet apart and caused a series of explosions aboard the carrier, which promptly began to list and lost all power. Captain Buckmaster gave the order to abandon ship and over 2,200 of her crew were recovered. Yet the carrier refused to sink, and so by midday the next day a salvage crew was put aboard to see if repairs could be made and get her underway again. On 6 June, the Japanese submarine I-168 had located the Yorktown (after coming from the area of Midway), and after penetrating the destroyer screen fired a spread of four torpedoes. The destroyer Hamman, which was lashed to the Yorktown was cut in two by one and sank immediately. Several of her depth charges were set off by her rapid descent and many of her crew were killed. Another two torpedoes slammed into the Yorktown, which finished the carrier off. But it wasn't until sunrise on the 7 June that she finally succumbed and sank.
This in effect was the last action in the battle of Midway, but long before that, the American dive bombers once again found the a target - the one remaining Japanese carrier. Hiryu was in the middle of preparing a twilight strike to try and reclaim some pride from the disastrous events that morning. The Japanese thought that only one American carrier remained as the second strike group had not seen the damage done to the Yorktown from the first strike group and assumed they were attacking either the Enterprise or the Hornet and so sinking the last American carrier might snatch a slim victory from the proceedings. Despite avoiding the first three bombs, four others struck in quick succession with two amidships and two forward of the island. This caused much of the same destruction as was witnessed on the other three carriers and despite heroic fire-fighting attempts from the crew and four destroyers that pulled alongside the ship, the Hiryu was finally abandoned at 02.50. Admiral Yamaguchi and Captain Kaku stayed with it as the destroyer Makigumo launched torpedoes that hit the flaming hulk. Like the Yorktown however, the Hiryu did not want to die and it wasn't until 08.20 that she sank, taking some 416 of her crew with her. The news of the sinking hit Yamamoto and his staff badly, and while he considered trying to catch the American fleet in a night battle after being reinforced by forces from Operation AL, the Americans were moving away at too faster rate to do that and so with the greatest reluctance he ordered the cancellation of Operation MI and a general withdrawal to the west. The Japanese also lost the cruiser Mikuma to American dive-bombers after she and her sister ship Mogami had collided at around 01.18 on the 5 June.
Looking at these in sequence, while it is true that Nagumo's search plan was rather skimpy (seven planes covering 160 degrees as opposed to twenty-two planes covering 180 degrees), he did not expect the American carriers to be there and therefore the search effort was merely precautionary, whereas the Americans fully anticipated the Japanese to be there and were therefore committed to finding them as quickly as possible. The weather in the early morning was quite bad as well, as indicated by the Chickuma's No. 5 search plane almost flying right over one of the American task forces at 06.30 and not seeing a thing due to heavy low-level cloud. Next, the late launch of Tone's No. 4 search plane was actually the main contributing factor in it discovering the American task force in the first place as the pilot shortened his route to make up for the lost time (starting back on his return leg some sixty-five miles sooner than he should have done thus saving himself 130 miles), which resulted in it reaching the point at which it discovered the American task force an hour earlier than it should have. Finally, when Tone 4 detected elements of the American task force at 07.28 it initially reported ten surface vessels, and then elaborated (08.09) after a request by Nagumo that there were five destroyers and five cruisers - a carrier wasn't reported until 08.20. While there is some truth to the contention that had the search plane detected the carrier sooner then a communication to that effect might have prompted Nagumo to bring forward a strike on the carrier and given how close he was to launching an attack at 10.25, even a few minutes might have made all the difference. There is however no evidence to suggest that the Tone 4 crew were negligent or inefficient. While it is likely that they saw the American ships from quite close up (their estimate in the course - 150 degrees - was very precise) through a break in the clouds, it is likely that they indeed saw all that was to see at the time for it is very possible that Enterprise and Hornet and their immediate screen (the light cruiser Atlanta and four destroyers) had diverged from the remainder of Task Force 16, five destroyers and five cruisers, after they had begun launching at 07.05 and that they were hidden under heavy cloud cover which did not begin to break up until after 07.30. Indeed the crew of Tone 4 stayed with the task force for almost an hour and a half at considerable risk to themselves.
So what were the mistakes that cost the Japanese the battle? There were two high-level command mistakes - that of communications and rearming the torpedo bombers.
The information that Nagumo had when he sailed was that the Americans were still unaware of the Midway operation and that their carriers would probably still be located in Pearl Harbor. Unfortunately, no further information made its way into Nagumo's hands. He never found out that the Yamato had intercepted a transmission from an American submarine in the vicinity of the invasion force; neither did he learn that there had been a massive increase in the radio traffic from Hawaii marked urgent (also monitored by Yamato) or that Operation K (the long-range air reconnaissance of Pearl Harbor) had been cancelled or that Yamamoto suspected that an American naval response to the Midway operation was underway or that the Japanese Naval General Staff had come to the same conclusion and urgently sent a radio transmission to both Yamamoto and Nagumo. He did not pass this on (he had been inclined to but was talked out of it by his Chief of Staff) as he assumed that the Akagi had picked up the same transmissions as he had on the Yamato - but the Akagi had a relatively small infrastructure and did not possess the large radio antennas necessary to pick up low frequency transmissions, necessary for long-distance communications, and no arrangements had been made with the fast battleships in the First Air Fleet (that probably did have the capability) to pass transmissions of this kind over. Thus three days before the attack on Midway, almost everyone in the Japanese Naval High Command suspected that the Americans might have carriers at Midway except the one man who mattered - Nagumo. This lack of information however, does not excuse his blunder in deciding to rearm the torpedo bombers. While a second strike on Midway was reasonable under the circumstances (the first wave had failed to knock out the air power, installations and island defences), it could have been handled by the dive-bombers and Zeros. The rearming of the torpedo bombers made the Japanese fleet incapable of an effective strike against any American carrier force that might show up. In conclusion, while the United States should have, on balance, won the Battle of Midway due to the two bad mistakes committed by the Japanese, it should also be realised that a great deal of luck was also involved in that victory, most notably the cloud cover that obscured Task Force 17 from Chikuma 5 at 06.30 and the decoding of the Japanese naval code in April.
 Midway: Dauntless Victory, Fresh Perspectives on America's Seminal Naval Victory of World War II, Peter C. Smith. A very detailed and well researched account of the battle of Midway and of the historical debate that still surrounds it, supported by a mass of original documents and interviews with participants. An invaluable look at this crucial battle. [see more]
 The Pacific Campaign , Vat, Dan van der, Simon & Schuster, New York, 1991.