Solomon Islands:
Allied Invasions
|
|
Introduction
The Australian Campaign on Bougainville lasted from November 1944 until the Japanese surrender on the island in August 1945 and saw fighting renewed on the island as the Australians attempted to clear the last Japanese strongholds.
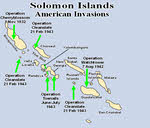
The Americans had first landed on Bougainville on 1 November 1943 (Operation Cherryblossom). They hoped to build a number of airfields around Empress Augusta Bay on the west coast and use them to attack the Japanese stronghold on Rabaul, which would be within fighter range of Bougainville. November and December 1943 saw American troops slowly expand their beachhead. Minor Japanese attacks were repulsed and the only major Japanese counterattack didn’t take place until March 1944.
The failure of this Japanese offensive didn't end the fighting on Bougainville. The Americans had no intention of attacking the strong Japanese positions at Buka in the north or Buin in the south, which were still held by the 17th Army. The Japanese had just under 40,000 troops available in October 1944, although not all were front-line troops and some were civilians who could be impressed if needed.
In the autumn of 1944 responsibility for Bougainville was handed over to the Australians. II Australian Corps (3rd Division and the 11th and 23rd Brigades) was to garrison the island. The changeover began in late September on the nearby islands. The 7th Australian Brigade moved into the Bougainville perimeter in mid-November, and on 22 November 1944 Lieutenant-General Savige officially took command. The change-over was completed by 12 December
General Savige had the task of eliminating the Japanese presence on Bougainville. He decided that his first objective would be the southern base at Buin, and in December 1944 he began to scout out the Japanese positions along the coast to the south-east of the bridgehead. A number of Japanese strong points were captured, and it was soon clear that the Japanese were moving fresh troops towards the fighting.
On 23 December General Savige issued a new set of instructions for his corps that called for a three-pronged offensive.
The central prong would see his troops were to capture the Pearl Ridge, about half way between the east and west coasts, and then patrol aggressively towards Numa Numa on the east coast. Any trails leading from the east coast were to be blocked.
To the north a new base was to be established in the Cape Moltke area, about a third of the way between Torokina and the Japanese northern bases at Buka and Bonis.
To the south the troops were to advance to the Puriata River, which cuts across the coastal area just beyond the southern end of Empress Augusta Bay. This would be the main thrust, as Savige expected the Japanese to defend that line in some strength.
Southern Offensive
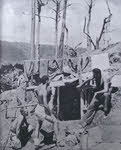
By 21 January the 3rd Division had advanced as far as Marawaka, towards the southern end of Empress Augusta Bay (the main beachhead was at the northern end of the bay). General Bridgeford, commander of the division, also had the 2/8th Commando at his disposal. Japanese resistance was scattered but still potentially deadly, and progress was slow but steady. Many of the Japanese troops on the island had been scattered around the jungle to maintain gardens that provided the isolated garrison with fresh food. This made it harder for the Japanese to concentrate a strong force, but did mean that the Australians were faced with constant skirmishes.
The Australians still made quicker progress than the Japanese had expected, and the constant setbacks triggered something close to a mutiny amongst the younger Japanese officers. In February General Hyakutake dismissed a number of these officers, but soon afterwards suffered what was probably a stroke. He was replaced as commander of the 17th Army by General Kanda, who was in turn replaced as commander of the 6th Division by General Akinaga. Kanda proved to be a capable leader, but Kanda was seen as being out of his depth in command of a full division.
As the Australians advanced it looked less likely that the Japanese would defend the Puriata. Savige now thought that they would stop at the Hari River, further along the coast and nearer to their key garden areas. On 4 March the first Australian infantry crossed the Puriata, and quickly established a firm footing on the south bank. Savige turned out to be somewhat mistaken and Japanese resistance stiffened south of the Puriata. In mid-March the advancing Australians had to fight a series of increasingly stiff battles to advance, and it became clear that the Japanese were planning a significant counterattack if the Australians advanced too far. General Bridgeford decided to halt at the Hongorai River, half way between the Puriata and the Hari, until sizable reinforcements reached him.
This proved to be a good decision. At the end of March the first signs of a Japanese offensive were detected, with sizable raids and booby traps being found. The main offensive began on 5 April with a strong attack on Slater's Knoll, a piece of high ground close to the main crossing over the Puriata River. The attacks began at 5am and ended at 6.20am, just before dawn. Some Japanese troops came within a few yards of the Australian positions but none broke through. On the following day 292 bodies were counted around Slater's Knoll and the Japanese offensive had been broken.
Another period of fighting against scattered Japanese outposts followed. This lasted for two weeks, and only then were the Australians ready to launch a fresh attack. This began on 17 April with a drive east from Slater's Knott. Some hard fighting took place, and the leading Australian troops had to fight off a number of Japanese counterattacks. During May and June the Australians continued to advance along the coast, crossing a series of rivers. In early May they crossed the Hongorai. The advance from that river began on 20 May. Japanese resistance west of the Hari River was broken by early June and by 9 June the Australians were only 28 miles from Buin. The slow advance continued through June and by the end of the month the Australians had reached the Mivo River.
The Australians planned to cross that river of 3 July, but heavy rain meant that the offensive was postponed for a week. The rain didn't stop, and the operation was postponed to 24 July. The rain slackened, but the floods still prevented operations much larger than patrols. The end of the war intervened before any further attacks were needed in the south.
Northern Offensive
The 11th Brigade was given the task of advancing north along the west coast, with the possible option of eventually advancing all around the coast to attack Numa Numa from the north. By March 1945 the Australians had reached Soraken, close to the foot of the Bonis Peninsula, and after a raid on the Japanese headquarters organised resistance on the Soraken Peninsular ended on 26 March.
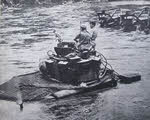
A fresh advance towards the Bonis peninsula began in mid-April. The village of Pora Pora, at the south-western edge of the peninsula, fell on 30 April and in May the Australians began to advance north. On 7 May they decided to stop near the base of the peninsula, while the high command tried to decide if the northern force should advance north towards Bonis, or down the east coast towards Numa Numa. When the northward thrusts were resumed the Australians ran into stiffer than expected resistance. They decided to try and force the Japanese to abandon their strong positions by landing an amphibious force behind them, at Porton Plantation.
The landing took place on 8 June, and was a dreadful failure. The Australians had landed in the middle of a strong Japanese defensive position, and were never able to break out from their landing point. On the evening of 9 June most of the landing force was withdrawn by sea, but a large group was trapped in a stranded barge and couldn't be rescued until 11 June. The Australians lost 23 dead or missing and 107 wounded during this failed attack.
After this setback the Australians decide to contain the Japanese troops to their north. Fighting did continue, but on a generally smaller scale than before. The Australians even pulled back a short distance to shorten their lines.
The End
In early August the Australians learnt of the first atomic bomb, and on 9 August news reached them of the second bomb. The end of the war was clearly close, and on 11 August all long range and fighting patrols were cancelled. Fighting was to stop on 15 August, although it took some days for this news to reach every isolated Japanese force.
The Australians had lost 516 dead and 1,572 wounded during their time on Bougainville. The campaign was controversial in Australia, partly because of criticisms of the way in which it was conduced and partly because some thought that it was unnecessary. This view appears to have been shared to certain extend amongst the troops themselves, who were aware that they were involved in a mopping up operation, but their morale remained high throughout the fighting.
The Japanese suffered much heavier losses during this period, later estimated as 8,500 dead in combat and 9,800 of illness. Only 23,571 men survived to surrender.
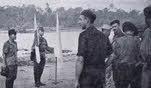
The first official Japanese representative to reach the Australians after the cease fire was a Major Otsu. He arrived at the Australian lines on the Mivo River on 18 August, and was taken to the base at Toko. He gave the Australians something of a nasty shock when he announced that there were still 23,000 Japanese troops on Bougainville - the Australians had believed that they were only facing 13,000 men.
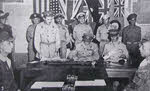
Negotiations with General Kanda, and with Vice-Admiral Baron Samejima, the local naval commander, made little progress until after the surrender of Rabaul. Only after their senior officers at Rabaul had surrendered were Kanda and Samejima willing to follow suit. The official Japanese surrender on Bougainville was signed soon after noon at 8 September in General Savige's headquarters at Torokina. Twenty two months after the initial American invasion the fighting on Bougainville was finally over.