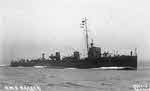
 HMS Badger from the right
 |
|
The Acheron class destroyers were built for the 1910-11 programme, and were similar to the previous Acorn class ships. Most served with the Grand Fleet until the autumn of 1916, before being replaced by more modern destroyers and moving to the South Coast and eventually the Mediterranean.
The destroyers for the 1910-11 programme were to be a mix of repeat ‘Acorn’ class ships and six ‘specials’, which would be produced to allow the specialist destroyer builders to try and construct the faster ships they could within the basic design of the type. At the start of the war most members of the class formed the 1st Destroyer Flotilla of the Grand Fleet, where they remained in some form until October 1916. From November 1916-March 1917 they were mainly split between the 3rd Battle Squadron and Devonport. From April 1917 they were mainly split between Portsmouth and Devonport. In September 1917 the first four moved to the Mediterranean, and by the end of the war fifteen of the surviving ships were in the Mediterranean. Only two were sunk, Attack and Phoenix, both while serving in the Mediterranean.
The Acorn class ships were oil powered versions of the previous Beagle class ships. The Beagle class ships had marked a return to the basic design of the River class, after a brief experiment with a mix of high speed Tribal class destroyers and Cricket class coastal destroyers. They ended up carrying one 4in and three 12-pounder guns, with two 21in torpedo tubes. The choice of coal power for the Beagle class meant that the machinery took up a large proportion of the hull, reducing the space available for the weapon. As a result the aft torpedo tube was right at the stern, where it was often difficult to use, and the aft 12-pounder had to be carried on a platform between the torpedo tubes.
The Acorn class saw a return to oil power, which allowed a reduction in the number of boilers, from five to four, and meant that the machinery took up less internal and deck space. This allowed for a more practical arrangement of the rear weapons, with one 4in gun aft and the two torpedo tubes between the gun and the rear funnel. They had three funnels, with the middle one serving two boilers.
In February 1910 Admiral Jellicoe, the Controller of the Navy, decided to split the twenty destroyers of the 1910-11 programme into two types. Fourteen would be modified Acorn class ships, produced to a standard Admiralty design. The other six would be ‘specials’, with the same basic layout and displacement but the highest speed that their builders could achieve.
In May 1910 the basic specifications for the Admiralty ships were drawn up. They were to be triple screw boats with the same layout of turbines as the Acorn class, but with three boilers instead of four. The uptakes from the front two boilers were combined into a single funnel, which was thus further back from the bridge than the front funnel of the Acorns. However in service the gap wasn’t enough, smoke got into the bridge, and the funnel had to be raised. Displacement rose by 6 tons, length was unchanged and width rose by 4in. Most of the Admiralty boats used three shaft turbines, but the three John Brown ships (Hind, Hornet and Hydra) used two-shaft Brown-Curtis turbines. They were armed in the same way as the Acorn class, with one 4in gun forward, one 4in gun after and two 12-pounders amidships, with two 21in torpedo tubes on the centreline.
Yarrow, White, Thornycroft, Parsons and John Brown were all invited to tender for the specials. Most used Parsons turbines, but John Brown offered an improved version of the Curtis turbine, the Brown-Curtis model. They had to have the displacement, armament, bow, steering system and structural strength as the Admiralty ships. Parsons, Yarrow and Thornycroft were each awarded contracts to produce two specials.
The Parsons specials (Badger and Beaver) were built by Denny. They were 6in shorter and 1in narrower than the Admiralty boats. They probably produced the same 13,500hp as the Admiralty boats, but used semi-geared turbines. The guaranteed speed was 30 knots.
The Yarrow specials (Attack and Archer) were 6in shorter and 1.75in wider than the Admiralty boats. They probably produced 16,000shp. The guaranteed speed was 28 knots
The Thornycroft specials (Acheron and Ariel) were 3ft 9in longer and 8in wider than the Admiralty boats. They produced 15,500shp. The guaranteed speed was 29 knots
During 1910 the Navy learnt that Germany was building 32 knot destroyers. Money that had been allocated to build three Admiralty Acheron class ships for New Zealand was instead used to fund three more specials. Yarrow and Thornycroft were both asked to tender for the contracts. After some negotiations Yarrow was given a contract to produce three 33 knot destroyers. The resulting Firedrake sub-group produced 20,000shp from three boilers. They were ten feet longer, but almost the same width and displacement as the Admiralty types, but much faster. The Firedrake herself reached 33.17 knots at a displacement of 774 tons with 19,174shp on her trials.
Service Record
As they entered service the Acheron class destroyers were assigned to the 1st Destroyer Flotilla, part of the First Fleet.
At the outbreak of the First World War most of the class were still with the 1st Destroyer Flotilla, which was assigned to Commodore Tyrwhitt’s Harwich Force. This was meant to be a ‘swing force’, which could reinforce either the Grand Fleet at Scapa Flow or the Channel Fleet at Dover, but instead became an independent striking force that took part in many of the clashes in the southern North Sea. Most of the Flotilla took part in the battle of Heligoland Bight (28 August 1914).
The composition of the Harwich Force changed often, and the ships in the First Destroyer Flotilla were soon often detached from it, carrying out escort missions or submarine hunts all along the south coast.
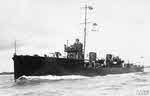 HMS Firedrake from the left
 On 15 February 1915 it was decided to move the 1st Destroyer Flotilla from Harwich to Rosyth, where it was to come under the command of the Vice-Admiral commanding the 3rd Battle Squadron. This would allow eight Grand Fleet destroyers currently based at Rosyth to return to Scapa, which would in turn allow seven older River or ‘E’ class destroyers to move from Scapa Flow to the south coast to be used to escort transport ships across the Channel. The first batch of destroyers from the flotilla (Acheron, Ariel, Attack, Badger, Beaver, Jackal, Lapwing and Sandfly, led by the cruiser Fearless) reached Rosyth on 18 February. The flotilla appears to have remained divided for some time, as the remaining ships were still part of the Harwich Force in August 1916.
At the time of the Lowestoft Raid on April 1916 the flotilla was at Rosyth.
The class stayed together with the 1st Flotilla until May 1916.
In June 1916 eight members of the class were detached to join the 3rd Battle Squadron (Druid, Forester, Ferret, Defender, Hind, Hornet, Sandfly and Beaver), while the other ships remained with the 1st Flotilla. The 3rd Battle Squadron had been based at Rosyth, but in April 1916 it was moved south to Sheerness to help guard against any further German raids on the east coast. It came under the control of the Nore Command on the Thames,
Nine members of the class (Acheron, Ariel, Attack, Hydra, Badger, Goshawk, Defender, Lizard and Lapwing) fought with the First Flotilla at Jutland, operating with the Battle Cruiser Fleet – these were the ships that had remained with the Harwich Force. However they didn’t have the most active of battles – during the early stage of the fight, in which Beatty’s battlecruisers played the main role on the British side, the flotilla was posted on the unengaged side of the fleet. They remained with the battlecruisers during the night action, and so missed the destroyer actions that took place to the north of the Grand Fleet.
The first ship to move away from these two units was the Tigress, which joined the 2nd Destroyer Flotilla at Devonport in July 1916.
The next big change came in November 1916. The ships that had remained with the Harwich Force were now split up, with Goshawk, Hydra, Lizard, Archer, Attack, Acheron and Ariel joining Tigress with the 2nd Flotilla at Devonport, Phoenix and Lapwing moving to the 6th Destroyer Flotilla at Dover and Jackal and Badger to the Escort Flotilla at Portsmouth. At the same time the eight ships with the 3rd Battle Squadron became a new 1st Destroyer Flotilla.
The next change came in April 1917. This saw the 1st Flotilla change from being attached to the 3rd Battle Squadron to being based at Portsmouth, and the two ships from Dover join the 2nd Flotilla at Devonport. They were joined by Jackal and Badger from the Portsmouth Escort Flotilla in June 1917.
At some point over the summer of 1917 the Defender became the first of three members of the class to be converted into mine layers, and by July she had moved from Portsmouth to join the 7th Destroyer Flotilla, based on the East Coast.
In August 1917 Druid, Forester and Beaver moved from Portsmouth to join the 4th Destroyer Flotilla at Devonport.
In September 1917 there was another big change. The remaining ships from the 1st Flotilla followed Druid and Forester to the 4th Destroyer Flotilla, where they were joined by Tigress, Goshawk, Attack and Ariel from the 2nd Flotilla. Lizard, Lapwing, Jackel and Badger moved to the Northern Division of the Coast of Ireland Station and Hydra, Archer, Acheron and Phoenixbecame the first to leave home waters, moving to join the 5th Destroyer Flotilla in the Mediterranean.
Between September 1917 and March 1918 most of the ships in the class were split between the 4th Flotilla at Devonport and the 5th Flotilla in the Mediterranean. By November 1917 all but Badger had left Ireland to move to the Mediterranean. Tigress and Hornet moved there from Devonport in December 1917 and February 1918 respectively. Ariel and Sandfly joined the Defender as mine layers on the East Coast. In March 1918 they were detached from the large 7th Flotilla to become the Slow Division of the 20th Destroyer Flotilla.
The last big change came in April 1917 when most of the remaining ships at Devonport moved to the Mediterranean. The Defender was last to move, arriving by July. By this point fifteen members of the class were with the 5th Flotilla, three were mine layers on the East Coast, two were with the submarine flotillas and one was attached to the Grand Fleet. Only two members of the class were lost – Attack and Phoenix– both lost in the Mediterranean.
In August 1916 the Navy adopted a policy for anti-aircraft guns. The I class ships were to be given 3-pounder Vickers HA Guns.
Quite a few of the group took part in the bombardment of Durazzo on 2 October 1918. Acheron, Goshawk, Jackel and Tigress were part of the bombardment group. Lapwing and Badger were part of the covering force
The Firedrake specials followed a different pattern. HMS Oak was attached to the flag ship of the Grand Fleet for the entire war. HMS Firedrake and HMS Lurcher spent the entire war serving with the submarine flotillas at Harwich, first the Eighth Submarine Flotilla and then the Ninth Flotilla.
Ships in Class
Admiralty Design
HMS Defender – 1st Flotilla, 1914-1916; 3rd Battle Squadron, 1916; 1st Flotilla Portsmouth, 1917; 4th Flotilla Devonport, 1917-1918; Mediterranean, 1918.
HMS Druid - 1st Flotilla, 1914-1916; 3rd Battle Squadron, 1916; 1st Flotilla Portsmouth, 1917; 4th Flotilla Devonport, 1917-1918; Mediterranean, 1918
HMS Ferret - 1st Flotilla, 1914-1916; 3rd Battle Squadron, 1916; 1st Flotilla Portsmouth, 1917; Mine Layer East Coast, 1917-1918
HMS Forester - 1st Flotilla, 1914-1916; 3rd Battle Squadron, 1916; 1st Flotilla Portsmouth, 1917; 4th Flotilla Devonport, 1917-1918; Mediterranean, 1918
HMS Goshawk – 1st Flotilla, 1914-1916; 2nd Flotilla Devonport, 1916-1917; 4th Flotilla, Devonport 1917-1918; Mediterranean, 1918
HMS Hind - 1st Flotilla, 1914-1916; 3rd Battle Squadron, 1916; 1st Flotilla Portsmouth, 1917; 4th Flotilla Devonport, 1917-1918; Mediterranean, 1918
HMS Hornet - 1st Flotilla, 1914-1916; 3rd Battle Squadron, 1916; 1st Flotilla Portsmouth, 1917; 4th Flotilla Devonport, 1917-1918; Mediterranean, 1917-1918
HMS Hydra - 1st Flotilla, 1914-1916; 2nd Flotilla Devonport, 1916-1917; Mediterranean, 1917-1918
HMS Jackal - 1st Flotilla, 1914-1916; Escort Flotilla, Portsmouth, 1916-1917; 2nd Flotilla Devonport, 1917; Coast of Ireland 1917; Mediterranean, 1917-1918
HMS Lapwing – 1st Flotilla, 1914-1916; 6th Flotilla, Dover, 1916-1917; 2nd Flotilla, Devonport, 1917; Coast of Ireland 1917; Mediterranean, 1917-1918
HMS Lizard - 1st Flotilla, 1914-1916; 2nd Flotilla Devonport, 1916-1917; Coast of Ireland 1917; ; Mediterranean, 1917-1918
HMS Phoenix – 1st Flotilla, 1914-1916; 6th Flotilla Dover, 1916-1917; 2nd Flotilla Devonport, 1917; Mediterranean, 1917 till sunk by Austrian submarine U.XXVII 14 May 1918.
HMS Sandfly – 1st Flotilla, 1914-1916; 3rd Battle Squadron, 1916; 1st Flotilla Portsmouth, 1917; 4th Flotilla Devonport, 1917-1918; Mine Layer East Coast, 1917-1918
HMS Tigress - 1st Flotilla, 1914-1916; 2nd Flotilla Devonport, 1916-1917; 4th Flotilla, Devonport 1917-1918; Mediterranean, 1917-1918
Yarrow Specials
HMS Archer - 1st Flotilla, 1914-1916; 2nd Flotilla Devonport, 1916-1918; Mediterranean 1917-1919
HMS Attack - 1st Flotilla, 1914-1916; 2nd Flotilla Devonport, 1916-1917; 4th Flotilla, Devonport 1917; Mediterranean, 1917-1918.
Thornycroft Specials
HMS Acheron - 1st Flotilla, 1914-1916; 2nd Flotilla Devonport, 1916-1917; Mediterranean 1917-1919
HMS Ariel - 1st Flotilla, 1914-1916; 2nd Flotilla Devonport, 1916-1917; 4th Flotilla, Devonport 1917; 7th Flotilla Mine Layer 1917-1918; 20th Flotilla Minelayer 1918
Parsons Specials
HMS Badger- 1st Flotilla, 1914-1916; Escort Flotilla, Portsmouth, 1916-1917; 2nd Flotilla, Devonport, 1917; Coast of Ireland 1917-1918; Mediterranean 1918
HMS Beaver – 1st Flotilla, 1914-1916; 3rd Battle Squadron, 1916-1917; 1st Flotilla Portsmouth, 1917; 4th Flotilla Devonport, 1917-1918; Mediterranean 1918
Firedrake Group
HMS Firedrake – Sixth Destroyer Flotilla, Dover, 1914; Submarine Flotilla, Harwich, late 1914-1918
HMS Lurcher– Sixth Destroyer Flotilla, Dover, 1914; Submarine Flotilla, Harwich, late 1914-1918
HMS Oak – Grand Fleet, 1914-1918
Displacement (standard) |
778t |
Displacement (loaded) |
990t |
Top Speed |
27 knots (Admiralty) |
Engine |
Admiralty Type: Yarrow ‘specials’: Thornycroft ‘specials’: Ferret; Forester 3 White-Forester boilers |
Range |
|
Length |
246ft oa |
Width |
25ft 8in |
Armaments |
Two 4in BL Mk VIII guns |
Crew complement |
70 |
Ships in Class |
Admiralty Design Yarrow Specials Thornycroft Specials Parsons Specials Firedrake Group Australian Type |
 British Destroyers From Earliest Days to the Second World War, Norman Friedman. A very detailed look at the design of British destroyers from their earliest roots as torpedo boat destroyers, though the First World War and up to the start of the Second World War, supported by vast numbers of plans and well chosen photographs [read full review]
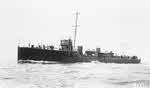 HMS Ferret from the left
  HMS Ariel from the right
 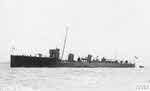 HMS Oak from the left