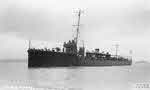
 HMS Hydra from the left
 |
|
HMS Hydra (1912) was an Acheron class destroyer that served with the Harwich Force in 1914, fighting at Dogger Bank, at Rosyth in 1915-16, fighting at Jutland, at Devonport from late 1916-1917 and in the Mediterranean from September 1917 onwards.
The Hydra was laid down at Brown on 7 February 1911, launched on 19 February 1912 and commissioned in June 1912.
On the night of Monday 3 March 1913 the Hydra and the Attack collided in the Firth of Forth during night manoeuvres. The Hyrda was largely undamaged, but the Attack suffered severe damage to her bows. The collision was caused by a battleship that cut across their bows, forcing the two destroyers to alter course to avoid a much more serious collision.
In July 1914 she was one of twenty destroyers in the First Flotilla of the First Fleet, which contained the more modern battleships. At the time the Flotilla contained all of the Admiralty type Acheron class destroyers.
In August 1914 she was one of twenty I class destroyers in the First Flotilla of what was about to become the Grand Fleet, and was at sea when war broke out. The Flotilla became part of the Harwich force, a swing force that could serve with the Grand Fleet in the North Sea and in the Channel. As a result the Hydra took part in several of the major engagements of the war, as well as the constant battle against the U-boats.
She was one of the few members of the flotilla not to take part in the battle of Heligoland Bight (28 August 1914)
The Hydra took part in an attempted seaplane attack on the German airship sheds at Cuxhaven on 25 October 1914. She was one of ten destroyers (Faulknor, Acheron, Archer, Ariel, Badger, Beaver, Hind, Hydra, Lapwing and Lizard) that were used to carry out a diversion off the Ems, which flows into the North Sea close to the German-Dutch border. The destroyer force was ignored by the Germans, and the entire raid ended in failure as the seaplanes were unable to reach their targets.
At the battle of Dogger Bank (24 January 1915) she was part of the 1nd Division of the First Flotilla (Acheron, Attack, Hydra, Ariel). This was the same group of ships that had formed the 3rd Division at Heligoland Bight. However this battle was dominated by the battlecruisers, and the destroyers had little to do.
On 15 February 1915 it was decided to move the First Flotilla to Rosyth, as part of a larger re-organisation of the destroyer force that was designed to free up some of the older River class boats for service as escort vessels in the Channel. The Hydra wasn’t in the first batch to make the move, but does appear to have made the move by the summer of 1915.
On 21 February 1915 a submarine was spotted 2 miles off the Sunk Light Vessel, and the Hydra was sent to patrol the area.
Destroyers were often in great demand. On 26 February 1915 Hydra and Lizard arrived at Portsmouth escorting the ammunition ship Race Fisher. Admiral Meux, at Portsmouth, was briefly given permission to detain them for use as escorts for the cross channel troop ships, but they were then immediately ordered to escort their convoy on to Devonport. At Devonport they were ordered to escort a ship carrying the Mediterranean Armoured Car Squadron until it was 100 miles out to sea, then to go to Liverpool, from where they were to escort an auxiliary warship to Rosyth, which was now the flotilla’s base. As a result the Hydra had almost circumnavigated the country within a couple of weeks!
In June 1915 she was one of twenty one destroyers in the First Flotilla at Rosyth, made of the original I class boats and one flotilla leader, so she had officially made the move by then.
In September 1915 the Hydra took part in a mine laying operation in the North Sea. On 11 September, during this operation, she collided with the scout cruiser HMS Fearless, with the loss of two men on the Fearless and one on the Hydra.
On the eve of Jutland the Hydra was with the part of the First Destroyer Flotilla that was with the battlecruiser fleet at Rosyth. She sailed with the fleet on 30 May as part of Admiral Beatty’s battle cruiser fleet. That fleet put to sea late on 30 May, and moved towards a rendezvous position about seventy miles to the south of the main Grand Fleet.
During the advance east across the North Sea the destroyers were used to guard the flanks of the battle cruiser fleet, while the light cruisers advanced ahead of the fleet. At 2.25pm on 31 May, just after the first contact between Beatty’s cruisers and the German cruisers, the destroyers were ordered to form an anti-submarine screen heading S.S.E. He then followed with his capital ships, in the hope of cutting off the retreat of the German cruisers that had been spotted. The German battlecruisers turned south, and retreated towards the main High Seas Fleet. This chase lasted until around 4.30, when the British spotted the German battleships of the High Seas Fleet, and Beatty was forced to abandon his attack and turn north to run towards the battleships of the Grand Fleet.
The two main fleets finally came together at about 6.30pm on 31 May. By this point the battleships of the German High Seas Fleet were heading north, while the battleships of the Grand Fleet were forming a line running roughly east to west in front of them. For a few minutes the British were able to concentrate their fire on the leading ships of the German line, but the Germans then carried out their famous sixteen point turn, and within a few minutes were heading away south into the North Sea mist. However Admiral Scheer then mis-judged the British movements, and turned back east in the hope that he could pass behind the main British force. Just after 7pm the Germans found themselves steaming straight towards Jellicoe’s battleships, and by 7.15 the bulk of the Grand Fleet was finally able to open fire on the Germans. Once again Scheer was forced to reverse course. During this phase of the battle the destroyer flotillas struggled to keep up with the fast moving battleships and rather disappear from the narrative. After more confused manoeuvres the two fleets came into range of each other for a third time after 8pm, but the Germans turned away for a third time, and disappeared into the mists by 8.35.
Jellicoe was unwilling to risk a night battle, and at 9.17 ordered the fleet into its night cruising formation. The battleships formed up into lines in their divisions, with the destroyers following behind. The entire formation began to move south in an attempt to keep between the Germans and their home bases. By 10pm the destroyer flotillas were in line, with the 12th Flotilla at the eastern (left) end of the line, then the combined 9th and 10th Flotillas, 13th Flotilla, 4th Flotilla and finally the 11th Flotilla at the western (right) end of the line. The 1st Flotilla was still with the battlecruisers, so missed the night action.
Until June 1916 the entire class had been part of the 1st Destroyer Flotilla. In June the class was split, with some remaining with the flotilla and others joining the 3rd Battle Squadron, which had been moved south to the Thames.
This arrangement lasted until November, when the ships that were still with the 1st Flotilla were split – two went to Dover, two to Portsmouth and the rest, including the Hydra to the 2nd Destroyer Flotilla at Devonport. She remained with the 2nd Flotilla into August 1917.
At the start of December 1916 the Hydra and Lyra were escorting troop transports from Liverpool to Devonport, where they were needed to help search for U-boats operating in the Channel.
In January 1917 she was one of fourteen destroyers in the Second Destroyer Flotilla at Devonport.
The difficulties of attempting convoy escort with short range destroyers was demonstrated towards the end of January. On 25 January 1917 the Hydra was one of five destroyers that was sent from Devonport to meet up with a convoy coming from Australia, but the destroyers were forced to take shelter from bad weather in the Scillies. Luckily another group of destroyers happened to be at the rendezvous point having escorted an outbound convoy, so an escort was provided.
In June 1917 she was one of seventeen destroyers in the Second Destroyer Flotilla at Devonport.
On 7 August 1917 the Hydra was one of six destroyers that was leaving Lough Swilly to escort a troop convoy led by the Orama when a periscope and conning tower was spotted. Between them the destroyers dropped 13 depth charges in the area, but the submarine, possibly U-44, survived the attack.
Towards the end of the war the surviving Acheron class ships moved to the Mediterranean. The Hydra was still recorded at Devonport in August 1917, but had joined the 5th Destroyer Flotilla in the Mediterranean by September.
In January 1918 she was part of the destroyer force in the Mediterranean. When the Goeben and Breslau made their final sortie into the Aegean on 19-20 January the Hydra was away from the Aegean, on her way between Malta and Milo (Sicily).
In June 1918 she was part of the large Fifth Destroyer Flotilla at Brindisi.
In November 1918 she was part of the large Fifth Destroyer Flotilla at Mudros.
In November 1919 she was in the hands of a care and maintenance party in the Portsmouth Reserve. She was sold to be broken up in May 1921.
The Hydra was awarded battle honours for Dogger Bank and Jutland
War Service
August 1914-September 1916: 1st Destroyer Flotilla, Grand Fleet
November 1916-August 1917: 2nd Destroyer Flotilla, Devonport
September 1917-June 1918: 5th Destroyer Flotilla, Mediterranean
July-August 1918: 5th Destroyer Flotilla, Brindisi
December 1918: Aegean Squadron
Displacement (standard) |
778t |
Displacement (loaded) |
990t |
Top Speed |
27 knots |
Engine |
3-shaft Parsons turbines |
Range |
|
Length |
246ft oa |
Width |
25ft 8in |
Armaments |
Two 4in BL Mk VIII guns |
Crew complement |
70 |
Laid down |
7 February 1911 |
Launched |
19 February 1912 |
Completed |
June 1912 |
Sold |
May 1921 |
 British Destroyers From Earliest Days to the Second World War, Norman Friedman. A very detailed look at the design of British destroyers from their earliest roots as torpedo boat destroyers, though the First World War and up to the start of the Second World War, supported by vast numbers of plans and well chosen photographs [read full review]