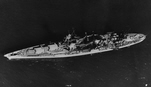
Aerial View of USS Louisville (CA-28)
|
|
The battle of Namur (1-2 February 1944) saw the US Marines capture the most strongly defended island in the northern part of Kwajalein Atoll, completing the conquest of the northern part of the Atoll.
Roi and Namur were to be attacked by the Northern Attack Force (Task Force 53) under Rear Admiral Richard L. Conolly and the Northern Landing Force, made up of the 4th Marine Division (Major General Harry Schmidt).
Admiral Conolly's attack force consisted of three old battleships, 2 heavy cruisers, 2 light cruisers 10 destroyers, 2 high speed transports (APDs), 3 escort carriers, 12 LCIs and 4 mine sweepers.
Namur was a heavily wooded island in 1944, and was around 800 yards long north-south and 900 yards from west to east. The ocean side was unsuitable for landings, but at high tide the reefs on the lagoon side were under water.
Roi and Namur were connected by a beach on the lagoon side and a causeway half way between the atoll and the ocean.
There was a battery of two 12.7cm dual purpose guns at the north-eastern corner of Namur. There was a 37mm position at the south-eastern tip of the island and another on the centre of the east coast. There were also a number of 13.2mm single mount dual purpose guns along the ocean coast, three 20mm AA guns to the north-west and one on the south coast. There was a concrete block house in the centre of the east shore. The guns helped defend three strong points, stretched out along the ocean coast. There were probably around 3,500 Japanese personnel on Roi and Namur, but it isn’t clear how many of them were effective combat troops. There were probably 345 fully effective troops, 2,150 partially effective air force personnel and around 1,000 or so ineffective personnel.
The plan was to capture a number of outlying islands on D-Day, then invade Roi and Namur from the lagoon side on D+1 (1 February 1944). Namur was to be attacked by the 24th Regimental Combat Team, which was to land two regiments side by side on Green Beaches 1 and 2. A wave of LCI(G)s and armoured LVTs would lead the way, with the troops following in amphibious tractor.
On 29 February TG 58.2 (Essex, Intrepid and Cabot) attacked Roi-Namur, where the Japanese still had 92 aircraft. The carrier attack quickly eliminated the threat, and no Japanese aircraft were in the air after 0800. The same group attacked again on 30 January.
The naval bombardment began at 0651 on 31 January when the Biloxi and Maryland opened fire. The landings were also supported by the battleships Tennessee and Colorado, the heavy cruiser Louisville, the light cruiser Santa Fe, the escort carriers Sangamon, Suwanee and Chenango, seventeen destroyers, one destroyer escort and three mine sweepers. The gun fire stopped at 0715 to allow for an air strike, and resumed eight minutes later. A second air strike came in at 0825, followed by more naval gunfire. The heavier ships then concentrated on Namur. At 1210 Admiral Conolly sent a signal that gained him the nickname - Close-in Conolly' - Desire MARYLAND move in really close this afternoon for counter battery and counter blockhouse fire, using pointer fire for both main and secondary batteries.
All of this helped cover the capture of the five islands nearest to Roi and Namur - Jacob, Ivan, Albert, Allen and Abraham - all of which were used as artillery bases during the main invasions.
At around 1500 nine dive bombers and nine torpedo bombers from the Suwannee attacked Sally Point, the south-eastern corner of Namur, to help the landings on Albert and Allen.
Namur was to be invaded by the 24th Marine Regimental Combat Team, which was to land two battalions side by side on Green Beach 1 and Green Beach 2, on the southern, lagoon side, of the island. The first wave would be made up of LVT(A)s, followed by the troops in LVTs. The attack would be supported by LCI(G) gunships. The original plan was for the troops to transfer to LSTs on 31 January and then from the LST to the LVTs on 1 February, all outside the lagoons. This was changed after the chaos on D-Day, and the LSTs moved into the lagoon before disembarking the LVTs.
At 0645 the 1st and 2nd Battalions of the 14th Marines (Artillery) opened fire from their nearby islands. At 0710 the Tennessee, Colorado, Louisville, Mobile, Morris and Anderson opened fire on Namur. The 24th Marines prepared to embark on the LVTs of the 10th Amphibious Tractor Battalion, which had taken part in the chaotic actions of the previous day. Only 62 of their 110 LVTs were ready for action on 1 February. A number of LVCPs were added to the landing force, but these needed deeper water, so the landings plans had to be altered. The attempts to get the troops onto the LVTs and LVCPs were chaotic, and the order to land wasn't given until 1112, two hours behind schedule. Even this was too early for the 24th Marines, who still weren't really ready to land.
The troops were led in by LCI(G) gunboats, followed by LVT(A)s. The infantry came next, and were followed by tanks in LCMs.
The first troops landed at 1145, when the 2nd Battalion landed on the right. The 3rd Battalion, on the left, landed at 1200. The LVT(A)s had been ordered to land and advance 100 yards inland, but instead they stopped offshore, causing congestion.
Company I, 3rd Battalion, landed on the far left, nearest to Roi. Company K, 3rd Battalion was to its right. Company E, 2nd Battalion, was next, with Company F, 2nd Battalion, on the far right.
The 3rd Battalion had the easiest start to the fighting. Part of Company K was taken to capture the spit of land between Roi and Namur, while the rest of Company K and Company I advanced to their first target, the 0-1 Line, by 1400. They then paused and prepared for a coordinated attack across the entire line, timetabled for 1630. By this point the line was held by Company I and Company B, which had replaced Company K. There was little organised resistance on this flank, but plenty of fire from isolated Japanese positions.
The 2nd Battalion also made good progress at front. Sally Point, the south-eastern corner of the island, had been expected to be a problem, but any weapons there had been knocked out by the preliminary bombardment. By 1300 the battalion was close to the 0-1 line.
The advance was temporarily brought to a halt when a massive explosion destroyed a building in Company F's zone. A Marine demolitions group had attempted to blow up a possible gun position, but it turned out to have been the Japanese torpedo warhead magazine. The resulting explosion and the falling debris killed 20 and wounded 50-100 men, half of the 2nd Battalion's entire casualties for the day. The explosion and its aftermath also disrupted any plans for a coordinated attack.
By the time the attack began at 1630 the Japanese had recovered from their initial shock, and were able to put up more fierce resistance. The 3rd Battalion on the left attacked on time, but made slow progress. On the right the explosion delayed the attack until 1730, by which time Company C had replaced Company E. Poor communications meant that part of five companies took part in the attack on the right. A blockhouse on the right of the line slowed down the right-wing of the attack. Even so, a handful of tanks managed to briefly reach the north shore before retiring, and some infantry reached within 100 yards of the north coast.
The nastiest part of the battle came overnight on 1-2 February. There were still hidden Japanese troops across most of the island, and they now emerged from their hiding places to attack all across the American rear. There was one organised counterattack at daybreak on 2 February, when about 100 Japanese troops attacked the gap between Company I and Company B. It took 35 minutes to repel this attack.
The attack on the left resumed at 0900 on 2 February, now supported by the division's medium tanks. On the right the attack began at 1000, delayed by the slow arrival of the light tanks. The 3rd Battalion reached the north-western tip of the island at 1100. By 1215 the north-eastern tip had also been taken, and the island was considered to be secure. Late in the battle, while directly commanding the attack on one of the last Japanese positions, Colonel Dyess of the 1st Battalionwas killed. General Schmidt declared the island to be secured at 1418.
Between them these two attacks cost the Americans 190 dead and 547 wounded, while the Japanese lost 3,500 dead and 264 captured
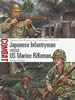 Japanese Infantryman versus US Marine Rifleman: Tarawa, Roi-Namur and Eniwetok, Gregg Adams.
Looks at the three of the island attacks during the US invasion of the Gilbert and Marshall Islands, showing how difficult it was to defend these small flat atoll islands against the massive concentration of firepower the Americans were able to bring to bear combined with the training and high morale of the attacking US Marines, especially when the Americans were willing to bypass the most strongly defended islands in the Marshalls. Good material on the types of Japanese troops to be found on the islands, their plans for defending them and why they failed (Read Full Review)
Japanese Infantryman versus US Marine Rifleman: Tarawa, Roi-Namur and Eniwetok, Gregg Adams.
Looks at the three of the island attacks during the US invasion of the Gilbert and Marshall Islands, showing how difficult it was to defend these small flat atoll islands against the massive concentration of firepower the Americans were able to bring to bear combined with the training and high morale of the attacking US Marines, especially when the Americans were willing to bypass the most strongly defended islands in the Marshalls. Good material on the types of Japanese troops to be found on the islands, their plans for defending them and why they failed (Read Full Review)