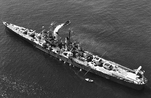
USS Denver (CL-58)
from above
|
|
The battle of Empress Augusta Bay (2 November 1943) was a night-time victory for the US Navy that defeated an attempt by the Japanese navy to interfere with the landings on Bougainville. The Americans chose to land in Empress Augusta Bay, on the western side of the island, because it was weakly defended and inaccessible by land. Although the landings themselves didn't take place until 1 November, the naval campaign began a few days earlier, and the invasion fleet sailed on 31 October, while other elements of the American fleet carried out pre-invasion bombardments of Japanese positions all around the island.
By chance on 30 October Admiral Sentaro Omori, with Cruiser Division 5, normally based at Truk, was visiting Rabaul with his two heavy cruisers. The local commander wanted these ships to return to Truk, but when an American Task Force was detected sailing up the slot Admiral Koga, the commander at Truk, decided to sent Omori with any other elements of the Eighth Fleet present at Rabaul to attack this fleet. At 10.00 on 31 October Omori, with the heavy cruisers Myoko and Haguro, the light cruisers Sendai and Agano, and two destroyers, was ordered into the slot to intercept this task force.
In fact this force, Admiral Merrill's Task Force 39, had left the slot to bombard Japanese positions around the Buka passage, at the northern tip of Bougainville, and the two fleets missed each other. At 2.30pm Omori learnt that Merrill was off Buka, and returned to Rabul, arriving at 11.00pm on 31 October. On his arrive he was informed that American troops had landed in Empress Augusta Bay. Admiral Samejima, the commander at Rabaul, added four destroyers to Omori's fleet and ordered him to rendezvous with five transport ships carrying 1,000 troops and then escort them to Empress Augusta Bay, where they were expected to launch a counterattack.
At 17.00 on 1 November Omori left port for the second time. The rendezvous was delayed until 20.30. The combined force was then forced to evade an American submarine, before at 21.20 a single American aircraft bombed the fleet. Omori decided that the transport ships were too vulnerable, and would have to be sent back, while he continued on in an attempt to catch the American transport ships believed to be in the bay.
While the Japanese were slowly making their way south-east from Rabaul towards Bougainville Admiral Merrill, with Task Force 39, was resting off Vella Lavella, but he was soon informed of the location of the Japanese fleet by Army reconnaissance aircraft, and by 23.15 on 1 November he was steaming north to prevent Omori from entering the bay. The transport ships had actually been moved away, but the Japanese would still have been able to bombard the beaches and prevent reinforcements reaching the newly landed troops. Merrill sailed in a long line, with his four light cruisers 1,000 yards apart and a destroyer division at each end of the fleet. As the two fleets closed the Japanese were sailing in cruising order, with the two heavy cruisers in the centre and two flanking divisions, each made up of a light cruiser and three destroyers.
The battle began at 1.30am on 2 November when American aircraft attacked the Japanese fleet, hitting the Haguro, opening up her side plating and slowing the entire formation by two knots. Ten minutes later a float plane from the Haguro reported sighting one cruiser and three destroyers – Omori would be badly let down by his reconnaissance forces during the battle, which first underreported the size of the fleet facing him, then reported sighting non-existent troop transports, then overestimated the size of the American force – until 1950 Omori remained convinced that he had faced seven heavy cruisers and twelve destroyers!
Omori turned towards the reported cruiser, but a few minutes later his scout plane claimed to have sighted transports unloading troops in the bay – probably a misidentification of three minelayers and a destroyer that had been laying a protective minefield across the entrance to the bay. Omori turned towards the reported transport ships.
The Japanese ships appeared on American radar at 2.27am. Merrill formed his fleet into three columns, and prepared to send his two destroyer divisions to make torpedo attacks on the Japanese. At 2.31 Burke's destroyers were sent to make their attack, then at 2.39 Merrill ordered the cruisers to reverse direction, so that they would be sailing south. His aim was to force the Japanese to move west and engage them at 16,000-20,000 yards to reduce the danger from the excellent Japanese torpedoes. The rear destroyer division became the new van divisions, with orders to attack the Japanese southern flank as soon as possible.
At 2.45am Omori received a more accurate report of the American position and decided to turn right and sail to the south-west. This allowed him to move from cruising order to battle formation, and engage the American cruisers, but it was the Americans who opened fire first, at 2.46am. The first few volleys were the most effective of the day. The light cruiser Sendai was hit several times. Her rudder was jammed and a number of fires broke out. The destroyers Samidare and Shiratsuyu collided while attempting to avoid 6in shells, and were forced to retreat from the fight. At the same time the Japanese shells fell short.
At 2.51 Merrill ordered his cruisers to turn onto a course of 200 degrees (just to the west of south) and make smoke. This moved probably contributed to the inaccuracy of the Japanese shellfire at this stage, and also caused the two Japanese heavy cruisers to lose contact with the Americans. They sailed in a large 360 degree loop in an attempt to find the Americans, with the southern flanking force (Admiral Osugi) following. During this manoeuvre the destroyer Hatsukaze attempted to run between the two heavy cruisers, collided with one and was heavily damaged (3.07).
While the Japanese were making their full turn Merrill began a massive figure of eight manoeuvre, designed to make it harder for the Japanese guns to hit, and to move his cruisers away from Destroyer Division 46. This move did reduce the amount of hits suffered by the Americans to three 8in shells which struck the Denver at 3.20-3.25 but failed to explode, but it also meant that the Americans failed to score any hits themselves.
At around 3.27 three Japanese shells fell short of the American cruisers, which then disappeared from view (probably into smoke). Omori believed that these shell splashes had actually been torpedo hits and that the three cruisers had been sunk, but he still believed that he faced four heavy cruisers, and with one of his one cruisers sinking and three destroyers damaged he decided to withdraw, issuing the order at 3.37.
This ended the main cruiser battle. The two American destroyer divisions were engaged for another hour, but without having much impact. DesDiv45 (Burke) was scattered after the torpedo attack and out of action for an hour. At 3.49am it fired at the Sendai, then attempted to catch the Samidare and Shiratsuyu, before playing a part in the sinking of the Hatsukaze.
DesDiv46 (Austin) was scattered by the first American 180 degree turn. The Foote ran into a Japanese torpedo aimed at the cruisers, and her stern was blown off. She was then only narrowly missed by the Cleveland. At 3.20 the Spence was hit close to the waterline by a shell, which allowed salt water into one of the fuel tanks, badly reducing her speed. The rest of the division then attacked the Sendai, Samidare, Shiratsuyu and Hatsukaze in the same order as Burke's division, sharing in the sinking of the Hatsukaze.
By 5.00am the scattered American fleet was back together, ready to repel a Japanese air attack. 18 Vals and 80 Zeros had been detected leaving Rabaul, and eventually over 100 aircraft attacked the fleet. Poor conditions prevents a strong air cap being put over the fleet, and a mixed force of eight Hellcats, one Marine Corsair, three Army Lightnings and four RNZAF Warhawks managed to shoot down eight Japanese aircraft, while the task forces anti-aircraft guns claimed 17. The Japanese attack was a failure – only two hits were scored, both on the Montpelier's starboard catapult, wounding one. More air attacks were planned, but the 5th Air Force then launched a major raid on Rabaul which prevented the Japanese from making any more air attacks.
The battle of Empress Augusta Bay was a clear American victory, and showed that the Japanese were beginning to lose their advantage in night engagements that had led to some crushing victories earlier in the war. The remaining Japanese naval threat to the Bougainville landings was removed by a series of heavy carrier-borne assaults on Rabaul, giving the Americans possession of the sea around the island. The only worrying feature of the battle for the Americans was the poor accuracy of their 6in guns – of more then 4,000 shells fired only about 20 scored hits.
Cruiser Division 5: Rear Admiral Omori
Heavy Cruisers Myoko and Haguro
Screen, Left Flank: Rear Admiral Matsuji Ijuin
Light Cruiser: Sendai
Destroyers: Shigure, Samidare and Shiratsuyu
Screen, Right Flank: Rear Admiral Morikazu Osugi
Light Cruiser: Agano
Destroyers: Naganami, Hatsukaze and Wakatsuki
Task Force 39, Rear Admiral A. Stanton Merrill (Montpelier)
Van Destroyers: Desdiv 45, Captain Arleigh A. Burke
Charles F. Ausburne, Dyson, Stanly and Claxton
Main Body: Crudiv 12, Rear Admiral Merill
Montpelier, Cleveland, Columbia and Denver
Rear Destroyers: Desdiv 46, Commander B. L. Austin
Spence, Thatcher, Converse and Foote