 'L' Class destroyer HMS Laurel
 |
|
HMS Laurel (1913) was a Laforey class destroyer that served at Harwich from 1914-March 1917 then at Devonport from April 1917 to the end of the war, fighting at Heligoland, Dogger Bank and Jutland.
The Laurel was laid down at White on 17 August 1912, launched on 6 May 1913 and commissioned in March 1914.
In July 1914 she was one of thirteen Laforey or L class destroyers that formed the Third Flotilla, part of the First Fleet of the Home Fleet, the formation that contained the most modern battleships.
In August 1914 she was one of sixteen L class destroyers in the Third Flotilla, now part of what was about to become the Grand Fleet. At the outbreak of war the flotilla was at Harwich. The Laurel would be based at Harwich until March 1917, although the flotilla was renumbered as the Ninth in October 1915.
The Laurel formed part of the 4th Destroyer Division during the battle of Heligoland Bight (28 August 1914). She fired the first shots of the battle at around 0700, targeting the German destroyer G.194. Her division clashed with a German light cruiser (Mainz), but were unable to sink her. During the battle she was hit by a salvo of 10.5cm shells from the German cruisers. One hit the engine room, killing four. One hit the forward 4in gun, detonating a shell in the ready rack, killing most of the gun crew. One hit the aft-funnel and wounded the captain. In total she suffered eleven dead and eleven wounded. Luckily the damage ended up causing her to produce such a smoke screen that she was hidden from the Germans and was able to move away slowly. She had to be towed back to base by the Amethyst. During the battle the Laurel fired 305 shells and 2 torpedoes (at the Mainz).
On the night of 2-3 November 1914 the Laurel, Legion, Lennox and Lysander, led by the Undaunted, were at sea after a patrol off Terschelling, and passed just behind the German raiding force heading for Yarmouth, but were too far off to detect the Germans. However once the Germans were detected the Undaunted and her destroyers were ordered to intercept, and at about 9.05am they spotted Admiral Hipper’s light cruisers. The British turned north to escape from the more powerful force, and was then ordered to try and follow the Germans. However by this point the two forces had lost touch with each other, although they were both heading east on parallel courses. By noon the Undaunted’s division was the only British force anywhere near the Germans, and were only fifteen miles to their north-west, but once again they failed to come into contact, and at 12.37 the British turned back.
1915
The Laurel took part in the battle of Dogger Bank (24 January 1915). She was part of the 2nd Division of the Third Flotilla during the battle (Laurel, Liberty, Laertes and Lucifer). However because of fog they were some way behind Admiral Beatty’s battlecruisers when they entered the battle, and as the battle soon developed into a chase with battlecruisers attempting to catch the retreating Germans the destroyers had little to do.
On 30 January U.21 sank a series of ships close to Liverpool. In response the Admiralty ordered the Commodore (T) to send a light cruiser and twelve destroyers to the Irish Channel to deal with the new threat, and he chose to send the Undaunted (Captain F.G.St. John) and eight (soon increased to twelve) L class destroyers (Laforey, Liberty, Landrail, Lysander, Lawford, Lydiard, Lucifer, Lookout, Loyal, Laurel, Laertes and Llewellyn). This force left Harwich at 10.50pm on 30 January, and by the morning of 31 January reached Milford Haven. At about the same time U.21 had clashed with the armed yacht Vanduara and been forced to submerge. Captain St John sent four of his destroyers to the position reported by the Vanduara, but the report didn’t reach him for an hour, and the yacht had reported her position incorrectly, so they found nothing. The Captain then set up a patrol scheme for his four divisions of destroyers (the 12 L class and four from Scapa Flow). On each day one division would rest at Milford, one would patrol Liverpool Bay, one would sweep from Liverpool to Milford and the last from Milford to Liverpool. This routine was carried out into February, and the flotilla reported that up to nine submarines were active in the Irish Sea. However there had only ever been one, U.21, and she returned home after the clash with the Vanduara, so there were none to find.
Captain St. John’s force was still partly based at Milford Haven when the Canadian Division was transported to France from Avonmouth, and he was given the task of escorting it on the first stage of the trip. The Laetes led a division of destroyers in a sweep of the Bristol Channel on 7 February to cover a planned sailing on the night of 7-8 February, but that was cancelled. On 8 February her division swept both sides of the Bristol Channel and reported three submarines (once again none were operating in the area). The first batch of transport ships sailed that night, and an escort of eight destroyers was assigned to them, but the weather was so poor that the two groups of ships never managed to find each other, and the troop transports safely made their way to France without any escort. Three more transports sailed on 9-10 February, this time with an escort. On the night of 10-11 February a batch of five ships sailed, escorted by the Laertes division, and a final batch of six on 12-13 February, this time escorted by the Laertes and Laforey divisions, a total of eight destroyers. Once they were past the danger zone the destroyers left the troop transports to head for Portsmouth, at the start of the trip back to Harwich.
On 27 March 1915 Laurel, Liberty, Leonidas and Lucifer were sent to patrol between the Mass and the North Hinder Light Vessel, to protect the Great Eastern Railway Company steamers which were still operating on the Harwich to Rotterdam route. The destroyers spotted a submarine at 4pm on 28 March, and spent the night attempting to keep her submerged. Six M class destroyers (Mentor, Manly, Morris, Milne, Mastiff and Murray) were sent to help, but early on 29 March the entire force was recalled to deal with a possible sortie by a German battlecruiser squadron. However it was soon discovered that the battlecruisers had returned to port, so the destroyers were sent back to patrol the same area. At 8.30am on 30 March the destroyers (by now raised to a total of 22) spotted U.24, but she dived and escaped. The patrols lasted until 5 April.
On 14 June the Laurel and Liberty went from Devonport to Queenstown, Ireland, to escort the boys’ training ship Sutlej back to Devonport.
On 17 June the L class destroyers were finally ordered back to Harwich, and the Laurel departed on 18 June.
On 11-13 July 1915 the Laurel, Lucifer, Liberty and Leonidas were sent to patrol just outside Dutch territorial waters off the Texel, in response to rumours that several German liners were about to attempt to dash from Rotterdam to Emden. This was the one point where they were likely to have to leave Dutch waters, but in the end the rumours turned out to be false and the destroyers returned to port without incident.
In late July 1915 at least part of the flotilla (Leonidas, Legion, Laurel, Landrail and Liberty) was sent to Devonport to take over the task of escorting transports on the first stage of their voyage to the Dardanelles.
At the start of August 1915 the Leonidas, Legion, Laurel, Fury, Landrail and Liberty were sent to join the Laverock and Louis at Queenstown, to serve under Admiral Bayly while he hunted for two U-boats that were known to be heading past the Fastnet rock on their way to the Mediterranean. This gave Bayly eight destroyers. Four were used to patrol an area west of Fastnet, patrolling in line abreast supported by the cruiser Adventure, the other four and the cruiser Tipperary operated in a series of individual boxes to the south-west of Fastnet. The first group were in place by 6pm on 8 August and the second by midnight. They remained in place until 1pm on 9 August then returned to port, without sighting either U-boat. In fact the intelligence had been good but the timing poor, as U-35 passed through the exact same area on 10 August on her way south, and two more passed through the area just after the destroyers had returned to port.
On 16 August 1915 the Laurel, Lysander, Lookout and Llewellyn formed part of the support force for Operation B.Y., the mining of the Amrum Bank exit from the Heligoland Bight. The operation itself was to be carried out by the minelayer Princess Margaret supported by two divisions of destroyers, while the support force waited 30-50 miles to the west. However the escort force ran into German destroyers and the operation was abandoned. The support force never came into contact with the enemy.
On 23 August 1915 twelve of the Harwich destroyers (Laurel, Lydiard, Legion, Linnet, Lookout, Morris, Murray, Moorsom, Milne, Melpone, Minos and Manly) were attached to the Dover Patrol for a bombardment of Zeebrugge by a force of monitors. At the time it was believed that this operation had destroyed the first lock on the canal to Bruges and destroyed two U-boats, but in fact it did little damage.
On 30 August 1915 two merchant ships hit mines near the Longsand Light Vessel, revealing the existence of a new minefield. The Laurel, Linnet, Lookout and Lysander were sent out from Harwich to patrol the area, but didn’t find anything and returned to port on the following morning.
In October 1915 the Third Flotilla became the Ninth Flotilla, but it remained based at Harwich. The Laurel remained at Harwich until March 1917.
At the end of October 1915 the Lance, Lysander, Laurel, Lassoo and Loyal took part in a sweep across the German Bight led by Commodore Tyrwhitt. No German ships were spotted during the sweep, and the force returned to Harwich on the afternoon of 1 November.
1916
In January 1916 she was one of eighteen L class destroyers in the Ninth Flotilla at Harwich, but was undergoing repairs at Devonport. The Ninth was essentially the old Third Flotilla given a new number. The flotilla was filled out with the flotilla leader HMS Lightfoot, the light cruiser HMS Undaunted and the depot ship HMS Dido.
On 24-26 March 1916 the Laurel was one of eight Laforey class destroyers (Laforey, Liberty, Llewellyn, Laurel, Laertes, Lassoo, Laverock and Linnet) that took part in the attempted seaplane raid on a Zeppelin base that was believed to be at Hoyer, on the west coast of Schleswig, shielded by the island of Sylt. The seaplanes took off early on 25 March, but discovered that there was no base at Hoyer. One was found further inland at Tondern, but only one aircraft found it, and her bombing gear jammed. Only two of the seaplanes returned to the fleet, and Commodore Tyrwhitt ordered his destroyers to sweep towards the German coast in an attempt to find the missing three aircraft. No sign of the aircraft was found, but the destroyers were then attacked by German aircraft, and in the confusion the Laverock rammed the Medusa. The cruiser Lightfoot, escorted by the Laertes and Lassoo attempted to tow the Medusa to safety, but she eventually had to be abandoned because of a fierce gale. The Undaunted them rammed the Cleopatra, slowing the fleet down once again. The German High Seas Fleet did put to sea, but the storm was so fierce that they soon returned to port, and the British were able to retire back to base.
On 22 April eight L class destroyers (Laforey, Lennox, Lark, Lookout, Lance, Laurel, Llewellyn and Lucifer) were sent from Harwich to Sheerness to escort minelayers that were to take part in an upcoming barrage operation along the Flanders coast. A large barrage of mined nets was laid off Zeebrugge on the morning of 24 April.
However British plans were soon to be disrupted, first by the news of the Easter Rising in Dublin, and then by reports that the High Seas Fleet was about to sortie. This was indeed true, and marked the start of the Lowestoft Raid. The British reacted by ordering the Grand Fleet to sea, and deploying the Harwich Force to defend the east coast while the fleet was on its way south. Plans to patrol the newly laid barrage had to be abandoned. Late on 24 April the eight destroyers that had escorted the minelayers were ordered to leave the Nore to join the rest of the Harwich flotilla, but they were given an outdated rendezvous point and as a result when the Germans attacked Lowestoft, the eight were just leaving the Thames. They were then ordered to head north, and did at least force UB-18 to abandon a possible attack on three British light cruisers and dive. However at 8.50am they were ordered to return to base, after playing a very limited role in the days actions.
Jutland
On the eve of Jutland the Laurel was one of four destroyers from the Ninth Destroyer Flotilla that were with the battlecruiser fleet at Rosyth. She sailed with the fleet on 30 May with the combined Ninth and Tenth Flotillas, which between them contained two Talisman class destroyers, two M class destroyers and four Laforey class destroyers.
Admiral Beatty’s battle cruiser fleet put to sea late on 30 May and moved towards a rendezvous position about seventy miles to the south of the main Grand Fleet.
During the advance east across the North Sea the destroyers were used to guard the flanks of the battle cruiser fleet, while the light cruisers advanced ahead of the fleet. At 2.25pm on 31 May, just after the first contact between Beatty’s cruisers and the German cruisers, the destroyers were ordered to form an anti-submarine screen heading S.S.E. He then followed with his capital ships, in the hope of cutting off the retreat of the German cruisers that had been spotted. The German battlecruisers turned south, and retreated towards the main High Seas Fleet.
During the battlecruiser action, the four Laforey class destroyers from the Ninth Flotilla attempted to get into position to attack the Germans, but in doing so ended up getting between the Princess Royal and Tiger and their targets. In an attempt to reach maximum speed they produced a great deal of smoke and obscured the view from the battle cruisers, but their commander decided to stay where it was in the vague hope of launching a torpedo attack.
At about 4pm Beatty ordered the Thirteenth Flotilla to launch an attack on the German battlecruisers. Turbulent, Termagant, Morris and Moorsom all joined this attack. German destroyers came out at the same time, originally with the aim of attacking the fast battleships of the British Fifth Battle Squadron. The result was a rather confused melee, in which the German destroyers V-27 and V-29 were sunk, but so were the Nomad and Nestor. This destroyer battle ended at 4.43 when Admiral Beatty recalled the destroyers after the German battleships of the High Seas Fleet were sighted to the south. Beatty was forced to turn north and begin his own retreat back towards Jellicoe and the Grand Fleet. During this part of the battle the Queen Mary was destroyed with the loss of most of her crew. The Laurel rescued seventeen survivors, one of whom later died of his wounds.
The two main fleets finally came together at about 6.30pm on 31 May. By this point the battleships of the German High Seas Fleet were heading north, while the battleships of the Grand Fleet were forming a line running roughly east to west in front of them. For a few minutes the British were able to concentrate their fire on the leading ships of the German line, but the Germans then carried out their famous sixteen point turn, and within a few minutes were heading away south into the North Sea mist. However Admiral Scheer then mis-judged the British movements, and turned back east in the hope that he could pass behind the main British force. Just after 7pm the Germans found themselves steaming straight towards Jelicoe’s battleships, and by 7.15 the bulk of the Grand Fleet was finally able to open fire on the Germans. Once again Scheer was forced to reverse course. During this phase of the battle the destroyer flotillas struggled to keep up with the fast moving battleships and rather disappear from the narrative. After more confused manoeuvres the two fleets came into range of each other for a third time after 8pm, but the Germans turned away for a third time, and disappeared into the mists by 8.35.
Jellicoe was unwilling to risk a night battle, and at 9.17 ordered the fleet into its night cruising formation. The battleships formed up into lines in their divisions, with the destroyers following behind. The entire formation began to move south in an attempt to keep between the Germans and their home bases. By 10pm the destroyer flotillas were in line, with the 12th Flotilla at the eastern (left) end of the line, then the combined 9th and 10th Flotillas, 13th Flotilla, 4th Flotilla and finally the 11th Flotilla at the western (right) end of the line.
The key moment of the night actions came at around 11.30, when the High Seas Fleet finally attempted to pass behind the Grand Fleet and ran into the British destroyers. The Germans would make contact with the 4th Destroyer Flotilla, which was towards the right of the British line. There was then a seven mile gap to the 13th Flotilla, with the 9th and 10th Flotilla close by, and the 12th Flotilla to their rear.
In a series of clashes the Germans inflicted heavy damage on the 4th Flotilla, but instead of rushing to their aid, the 13th Flotilla, which was next in line, believed they were the target of the gunfire, and that there were friendly ships between them and the Germans preventing a torpedo attack. The flotilla leader Captain Farie ordered the flotilla to turn away to the east to get out of range, but he failed to signal the move, so only two of the flotilla followed him. His move also forced the 9th and 10th Flotillas and the 12th Flotilla to turn to port to get out of the way. As a result the British destroyers were no longer in the correct place when the High Seas Fleet passed behind the Grand Fleet. As a result the Germans were able to move past almost without being detected and the one clash that did occur was with two cruisers so didn’t cause any alarm.
By the time this confusion ended the remaining seven boats from the 9th and 10th Flotillas had been joined by one ship from the 4th and five from the 13th. This force of twelve destroyers was led south-west in an attempt to find the German van, but most of his force passed in front of the Germans without spotting them. Two boats from the 13th, the Pelican and Petard did spot the Germans, but the Petard had fired all of her torpedoes, so was unable to take advantage, while the Pelican was out of position for an attack.
After Jutland
On 3 September a submarine was detected operating between Beachy Head and Cap d’Antifer. Lark and Laurel were ordered to hunt for her, but with orders to reach Portsmouth by 4pm on the following day, ready for their next duty. Neither ship spotted anything during their brief hunt.
On 5 September 1916 the Lark and Laurel came from Harwich to escort the Princess Victoria from Cherbourg to Portsmouth with a cargo of part of a shipment of £40 million work of gold. The gold was on its way from France to the United States. Once that duty was over they were ordered to join the Newhaven destroyers in another hunt for submarines.
In October 1916 she was one of twenty L class destroyers in the Ninth Destroyer Flotilla at Harwich, along with the Lightfoot and Undaunted.
On the night of 26 October 1916 the Laforey division (Laforey, Laurel, Lucifer and Liberty) were sent to Dunkirk, arriving at about 2200, to protect against a possible attack on nearby coast by German naval forces. However that night the Germans attacked the light forces protecting the Dover Barrage. As the Laforey’s division was making the crossing they came very close to the German 18th Half Flotilla of destroyers, and were spotted from the German boats, but failed to notice their enemies.
At 2255 the Laforey division was ordered to put out to sea and patrol between the South Goodwin Light Vessel and 9A buoy on the barrage. As they approached the area of the buoy flashes of gunfire were seen, probably from a clash between the Germans and the Tribal class destroyer Viking, but they were unable to make contact. At 0050 on 27 October Lucifer and Laurel were detached to search to the north, but at 0100 an order to return to the Downs was received. This was actually meant for the Lawford’s division, which had left the Downs against orders (having misjudged an earlier message), but had been sent to the Laforey by mistake. The Laforey’s division thus made their way to the Downs, where their arrival must have been something of a surprise. At about 0300 they were ordered to spread out along the line of the barrage to search for any disabled drifters.
1917
In January 1917 she was one of twenty L class destroyers in the Ninth Flotilla, along with the Lightfoot and Undaunted.
On 25 February 1917 the Lance, Landrail, Lochinvar, Laverock and Laurel were patrolling around the buoys on the Dover Barrage when the Germans raided into the Dover Straits. The Lochinvar clashed with one German destroyer from a force that was hoping to bombard Dover, and with any chance of surprise gone this part of the German force retired.
In April 1917 the Laurel became part of the Fourth Destroyer Flotilla based at Devonport, and she was based there for the rest of the war.
At the end of April 1917 the Navy carried out a trial convoy, from Gibraltar to Britain. The convoy left Gibraltar on 11 May, and met with its first destroyer escort on 18 May. On 19 May the Laurel was part of the escort, which was provided by the 4th Flotilla. The convoy reached port safely on 20 May, and this first convoy was judged to be a success, playing a role in the wider introduction of convoys.
1918
In January 1918 she was one of forty destroyers in the Fourth Destroyer Flotilla at Devonport, which was now made up of a mix of various types.
In June 1918 she was one of fifty destroyers in the Fourth Destroyer Flotilla at Devonport, made up of a mix of types.
In November 1918 she was one of forty destroyers at Devonport.
In November 1919 she was in charge of a care and maintenance party in the Nore Reserve.
The Laurel was awarded battle honours for Heligoland (28 August 1914), Dogger Bank (25 January 1915), Jutland (31 May 1916) and the Belgian Coast 1914/1916
Commanders
-August 1914-: Frank Forester Rose
War Service
July 1914-June 1915: 3rd Flotilla, 1st Fleet (Harwich Force)
July-September 1915: 3rd Flotilla, Harwich
October 1915-March 1917: 9th Flotilla, Harwich
April 1917-December 1918-: 4th Flotilla, Devonport
Displacement (standard) |
965t-1010t |
Displacement (loaded) |
1150t-1300t |
Top Speed |
29 knots |
Engine |
2-shaft Parsons turbines |
Range |
|
Length |
268ft 10in oa |
Width |
27ft 8in |
Armaments |
Three 4in/ 45 cal QF Mk IV guns |
Crew complement |
73 |
Laid down |
17 August 1912 |
Launched |
6 May 1913 |
Completed |
March 1914 |
Sold for break up |
November 1921 |
 British Destroyers From Earliest Days to the Second World War, Norman Friedman. A very detailed look at the design of British destroyers from their earliest roots as torpedo boat destroyers, though the First World War and up to the start of the Second World War, supported by vast numbers of plans and well chosen photographs [read full review]
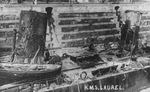 Damage suffered by HMS Laurel at Heligoland (1 of 2)
 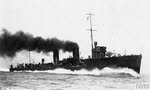 HMS Laurel from the right