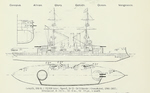
HMS Goliath was a Canopus class pre-dreadnought battleship that served off the east coast of Africa and on the Dardanelles in the early years of the First World War. Like the rest of her class, at the start of August 1914 she joined the 8th Battle Squadron of the channel fleet, helping to cover the passage of the BEF to France. She remained with the channel fleet for longer than her sister ships. In late August she was used to ship the Plymouth battalion of Marines to Ostend.
In September she was dispatched to the East Indies station, to help escort the Indian army to the Middle East and east Africa. On 30 October she arrived at Mombasa with the Indian Army expedition to German East Africa, but she then needed repairs before she could continue, forcing the expedition to proceed without the support of her guns. By 28 November she had been repaired and was able to take part in the bombardment of Dar-es-Salaam, but she then needed to go to the Cape for a further refit.
She was repaired by 25 February 1915, when Admiral King-Hall sailed in her from the Cape to German East Africa. She reached Mafia Island, off the Rufiji Delta, on 7 March. Admiral King-Hall wanted to keep her at Mafia Island, to guard against the danger of a breakout by the Königsberg, a series danger during a period of high tides, but on 25 March he was ordered to shift his flag, and she was ordered to go to the Dardanelles.
Her journey took her through the Suez Canal, where she was initially expected to stay for a time, but on 12 April she was ordered to proceed directly to the Aegean, where she was needed to support the Gallipoli landings. On 25 April she formed part of the First Squadron, used to support the landings at the tip of the peninsula. On the next day she was used to help the evacuation of “Y Beach”, the only one of the initial landings to fail. On 29-30 April she was briefly detached to defend the Suez Canal against an expected Turkish attack, but was recalled when French ships were sent to Suez.
On the night of 12-13 May, HMS Goliath and HMS Cornwallis were chosen to support French troops on the right of the Allied line. The Goliath anchored off Morto Bay. On the same night, Lieutenant-Commander Firle, a German officer serving with the Turkish fleet, got permission to take the destroyer Muavenet-I-Miliet (600 tons, top speed 33 knots, armed with three torpedo tubes, built in 1909) through the straits to attack the Allied battleships. Aided by the fog, he got within torpedo range of the Goliath before he was spotted and challenged. He first three torpedoes, and then escaped to safety.
The first torpedo hit the Goliath by her forward 12in turret. She then began to list to port. The second torpedo hit by the forward funnel. The ship continued to turn over, and was nearly on her beam ends when the third torpedo hit near her aft 12in turret. She then turned turtle, floated upside down for a couple of minutes and then sank bows first. Of the 750 men then serving on her, 570, including Captain Shelford, were lost.
Displacement (loaded) |
14,300t |
Top Speed |
18kts |
Armour – belt |
6in |
- bulkheads |
10-6in |
- barbettes |
12in |
- gun houses |
8in |
- casemates |
6in |
- conning tower |
12in |
- deck |
2in-1in |
Length |
421ft 6in |
Armaments |
Four 12in guns |
Crew complement |
682 |
Launched |
23 March 1898 |
Completed |
March 1890 |
Captains |
T. L. Shelford (1915) |
Torpedoed |
13 May 1915 |
 British Battleships 1889-1904 New Revised Edition, R A Burt. Magnificent study of the Royal Navy's pre-dreadnought battleships, amongst the most powerful ships in the world when built, but seen as obsolete by the outbreak of war in 1914. Traces the development of the 'classic' pre-dreadnought design and the slow increase in the power of the secondary armament, leading up to the all-big gun ships that followed. [read full review]