 Sopwith F.1 Camel N6332
 |
|
The Sopwith Camel was probably the most famous British aircraft of the First World War and was an extremely agile if difficult to fly dogfighter that helped the British overcome a period of German dominance over the Western Front in 1917 then fought on to the end of the war, still holding its own against newer German designs.
Late in 1916 the Germans began to receive Albatros and Halberstadt fighters armed with twin synchronised machine guns. These aircraft outgunned the single gun fighters of the RFC and RNAS, and outperformed even the newly arrived Sopwith Pups and Sopwith Triplanes. It was clear that what was needed was a British aircraft armed with the same two guns. A design team at Sopwith, led by Herbert Smith, began work on an aircraft to satisfy that need, producing what became the Camel.
The new aircraft was similar to the Sopwith Pup, but with a deeper fuselage. The engine, guns, pilot and fuel tanks were all placed in the first third of the aircraft, which made it very agile. The twin machine guns were placed under a humped fairing, which probably gave the aircraft its nickname of ‘Camel’. For some time the aircraft was officially known as the Sopwith F.1, but it did later officially become the Camel.
The first prototype was cleared by the Sopwith Experimental Department on 22 December 1916. This aircraft was powered by a 110hp Clerget 9Z engine. It had equal chord wings, with a single piece upper wing with no cut-out. This was done in an attempt to speed up production, and as a result the upper wing had no dihedral whiel the lower wing had twice the amount of dihedral used on the Pup. Production aircraft kept the flat upper wing, but it was built in three parts.
The second prototype was designated as the F.1/1. This had tapered wings, which tapered both in chord and thickness. It also had a rectangular cut-out in the upper wing of the centre section. This aircraft was tested with a 130hp Clerget engine at Martlesham in May 1917, but its performance was worse than the normal Camel, with a higher landing speed and worse manoeuvrability. Production aircraft used the equal chord wing.
There is no official record of an F.1/2, but it may been an aircraft seen in early Sopwith photos with the original ailerons, a one piece upper wing but with a cut-out in the upper wing and a windscreen.
Prototype F.1/3 was built under Licence No.6 and became the basis of the production aircraft. It had an un-tapered upper wing, a windscreen, the original short ailerons and modified metal panels behind the engine cowling.
It was tested at Martleham Heath in March 1917, when it was powered by a 130hp Clerget 9B engine.
In May 1917 it became the first Camel to get the 110hp Le Rhone 9J Engine.
In July 1917 it had a 130hp long-stroke Clerget engine, possibly the Clerget 9Bf.
The Navy also ordered two prototypes, N517 and N518.
N517 was tested at Brooklands on 26 February 1917.
N518 was tested in May 1917 when it had the first example of the 150hp A.R.1 Rotary Engine. (Admiralty Rotary). This was later renamed as the B.R.1 after its designer, Lt. W. O. Bentley (later to found the Bentley car company). This was the first production engine to use aluminium in the cylinders and pistons.
A wide range of experiments were carried out on the Camel. This included giving it a larger vertical tail or self sealing fuel tanks. Some were used to test the idea of launching from lighters (flat barges) being towed at sea, using the speed of the towing ship to help the aircraft take off. This technique did enter service, and at least one Zeppelin was shot down by a lighter launched aircraft. The Camel was also used to test the idea of carrying fighters on airships, so they could be launched at high altitude to intercept Zeppelins.
Production Aircraft
Production aircraft kept the flat upper wing, but it was constructed in three pieces. The lower wing had double the dihedral of earlier Sopwith designs. There were ailerons on the upper and lower wings, and these were longer on production aircraft than on the prototypes.
The majority of Camels were powered by either the 130hp Clerget rotary engine, 110hp Le Rhone rotary engine or 150hp BR1 Bentley radial engine. The first two types were normally used by the RFC, where they were known as the Clerget Camel and Le Rhone Camel. Some effort appears to have been made to make sure each squadron used a single engine type, but there are several squadrons that are known to have operated both (although not necessarily at the same time). The Bentley powered aircraft were used by the RNAS.
The Camel was of fairly conventional construction for the period, with a wooden framework and fabric covering.
The horizontal tail was fixed in place, unlike earlier Sopwith machines which had included gear to adjust its angle.
The Camel could carry a carrier for four bombs, which could carry four 20lb Cooper, 20lb Hales or 16lb H.E.R.L. bombs or two 40lb Phosphorous bombs. It could also carry one 112lb H.E.R.L bomb on a different type of carrier, and on at least one occasion was used with two 50lb bombs.
The Camel was armed with two .303in Vickers guns, installed close together under the famous ‘hump’. At first both guns were feed their ammo from the right, which caused some problems. Towards the end of 1917 left hand feed guns appeared, allowing the Camel’s guns to be loaded from opposite sides.
Some two seat training aircraft were produced to try and compensate for the difficult of moving from more docile aircraft to the volatile Camel.
Engines
The Camel was used with a range of different engines, each of which required different synchronising gear, so swapping the engine also meant the synchronising gear had to be changed.
Le Rhone powered aircraft had a better climbing performance but slightly slower level speed than Clerget powered engines.
In August 1917 aircraft B3881 (from a Sopwith batch) was tested with a 100hp Gnome Monosoupape engine, to provide an alternative to the Le Rhone and Clerget engines in case of any shortage of those types. Performance wasn’t that different to the other engines, and tests of it armed with machine guns were carried out, but this type never seems to have reached combat units. Some may have been produced for training units, but details are rare.
In November 1917 one aircraft was tested at Martlesham with a 150hp Gnome Monosoupape engine. This version performed well, but wasn’t adopted for British service. Later in 1918 the United States Air Service attempted to this engine to some of their Camels, but the match doesn’t appear to have been a success.
The most powerful rotary engine to be installed in a Camel was the 170hp Le Rhone 9R. This was first installed in Camel B3891 by the French. It was later tested in Britain in F6394, although not until February 1919. Performance was reported to be no better than on the Bentley Camel, and by then the Camel was being phased out in favour of the Sopwith Snipe.
Production
A total of 5,695 Camels were ordered from nine different companies, of which 5,495 were built.
Boulton & Paul |
1675 |
Ruston Proctor |
1574 |
Clayton & Shuttleworth of Lincoln |
550 |
Sopwith |
500 |
Nieuport of London |
400 |
Hooper and Company |
271 |
Portholme Aerodrome |
250 |
March, Jones & Cribb |
175 |
British Caudron |
100 |
The first War Office contract went to Ruston Proctor and Co on 22 May 1917, and was for 250 Camels to be powered by a 130hp Clerget engine. Ruston Proctor had already produced the 1 ½ Strutter, and would end up building about 1,574 Camels. Their first aircraft was finished in June 1917, and their highest production came in May 1918 when they built 128. Their aircraft came in the following batches - B2301-B2550 (250), B5551-5650 (100), B7281-7480 (200), C8201-C8300 (100), D1776-D1975 (200), D8101-D8250 (150), E1401-E1600 (200), E7137-E7336 (200), F2008-F2082 (74), F3968-F4067 (100)
Sopwith themselves received an Admiralty order (with the first deliveries on 7 May 1918) and a War Office production contract on 8 June 1917 and produced aircraft in three batches – N6330-N6379 (50), B3751-B3950 (200) and B6201-B6450 (250), for a total of 500 production aircraft. The Clerget 9B was the preferred engine for their aircraft with the Le Rhone 9J as an acceptable alternative. In addition some went to the RNAS where they got the B.R.1 engine.
Boulton & Paul produced 1575 aircraft, making them equal to Ruston Proctor. Their aircraft came in several batches - B5151-B5250 (100), B9131-B9330 (200); C1601-C1700 (100), C3281-C3380 (100); D6401-D6700 (300), D9381-D9530 (150); F1301-F1550 (250); F1883-F1957 (75); F6301-F6500 (200); H2646-H2745 (100).
British Caudron of London received orders for two batches - C6701-C6800l (100) and H3996-H4045, but the second batch was cancelled.
Clayton & Shuttleworth of Lincoln produced about 550 in the following batches: B5651-B5750 (100); B7181-B7280 (100); D3326-D3425 (100); D9581-D9680 (100); E4374-E4423 (50); F3096-F3145 (50); F4974-F5073 (100, only half delivered). The Le Rhone was specified for these aircraft although some got Clerget engines.
Hooper and Company of London received orders for 320 aircraft (delivering 271), to be powered by an 110hp Le Rhone 9J engine although some got the Clerget engine. They came in five batches, although production probably ended early in the last batch. Serial numbers covered were B5401-B5450 (50); C1551-C1600 (50); F2083-F2182 (100); H734-H883 (50); H7343-H7412 (70, probably stopped with the 21st, H7363)
Portholme Aerodrome was given a contract on 2 June 1917 for B4601-B4650 (50). This was later expanded to include B7131-7180 (50), D9531-D9580 (50), E5129-5178 (50) and F1958-F2007 (50), for a total of 250 aircraft
March, Jones & Cribb of Leeds produced 175 aircraft in two batches, C8301-C8400 (100); F5174-F5248 (75). These were to be powered by the 110hp Le Rhone 9J engine although some got the Clerget instead.
Nieuport of London produced 400 aircraft in four batches - C1-C200 (200); F3196-F3245 (50); F3918-F3967 (50), F8496-F8594 (100)
By the end of June 1917 a total of 135 Camels had been delivered to the RNAS and RFC. 471 aircraft passed inspection in April-June 1917, and another 719 in the second half of 1917 for a total of 1,325 aircraft. By the end of 1917 3,450 F.1s had been ordered, and production sped up dramatically in 1918.
Sopwith TF.1 Camel (Trench Fighter)
Although the Camel could be an effective ground attack aircraft, this was also a very risky operation. During the battle of Cambrai those squadrons involved in ground attack suffered about 30% casualties for each day they performed that role, an unacceptable loss rate. Sopwith produced two aircraft in an attempt to solve this – the Salamander, which was based on the upcoming Snipe and single example of the Sopwith TF.1 Camel.
The TF.1 was produced by 19 February 1918 when it was recorded as being complete. It was powered by a 110hp Le Rhone engine. It carried three Lewis guns, one forward firing one on an Admiralty Top Plane mounting on the upper wing and two downward firing Lewis guns that poked out of the bottom of the cockpit. The idea was that these guns would allow for a long attack run along a trench. A sheet of armour was installed on the base of the fuselage, running from just behind the engine to the back of the fuel tank behind the cockpit.
The sole TF.1 flew to France on 7 March 1918, but was soon back in Britain, and the type didn’t enter production. However some of the ideas tested on the TF.1 were later used on the Sopwith Salamander.
The 2F.1 was a dedicated naval version of the Camel, with a fuselage that could easily be split into two just behind the wings to allow it to be stored on smaller warships. Although it was produced in much smaller numbers than the standard F.1 it was used by a large number of RNAS units, and the RAF squadrons that replaced them in 1918.
Combat Performance
The Camel was a very different aircraft to fly to previous Sopwith aircraft. The Pub hadn’t been very agile, but had been able to maintain its altitude during the twists and turns of combat. The 1 ½ Strutter was reliably stable. In contrast the Camel was very agile, but also very difficult to master. It could be thrown into a very tight turn, but the powerful engine torque meant that the nose rose in a left hand turn and dropped in a right hand turn, requiring use of the rudder to correct it, and the line between a tight turn and a spin was very fine. However those pilots who mastered its characteristics found it to be a very agile, manoeuvrable fighter, able to hold its own against more modern German aircraft throughout 1918.
The key to the Camel’s performance was that most of the weight was concentrated in the nose, with the engine, guns, pilot and fuel all well forward. It also had large, sensitive ailerons. However later in the war its relatively low top speed became a problem as it was slower than some Allied bombers. However in it main role this didn’t matter too much, as the Germans had to tackle the Camels if they wanted to shoot down the observation aircraft they were often protecting.
The Camel was most famous as a dog fighter, using its supreme agility to make up for its relative lack of speed. However it was also used as a ground attack aircraft, and could carry a reasonable bomb load for a fighter of its period.
The Camel was flown by a number of successful aces, with the highest scoring being Captain D. R MacLaren, who scored 54 victories while serving with No.46 Squadron, all with the Camel. He was followed by Major W.G. Barker, who scored 46 Camel victories from his total of 50, all while flying Camel B6313, which thus became the most successful individual aircraft. Ray Collishaw, the most successful Canadian ace of the war (and high ranking RAF officer of the Second World War scored 22 of his 62 victories on the Camel. However Camel pilots by no means dominate the list, and many of the most successful British aces of 1917-1918 flew the rival RAF S.E.5. which was significantly faster than the Camel, and also less demanding to fly.
The Camel was followed into service by the Sopwith Snipe, which entered combat in October 1918 and saw two months of combat. After the war the Camel was quickly phased out in favour of the faster and more stable Snipe, which became the RAF’s standard fighter throughout the early 1920s. Only two Camels, both F.1s, made it onto the civil register so the type quickly disappeared.
The Camel was used by twenty three squadrons of the RFC and RNAS, as well as by the Australian Flying Corps, Belgian, Greek, USAS and US Navy. The Camel was credited with 1,294 victories on the Western Front (some sources give a total of 1,400).
Combat Units - RNAS
The RNAS was the first service to get the camel. The first aircraft were delivered in May 1917, and the first operational sortie was flown by a Camel of No.4 Squadron RNAS (based at Bray Dunes near Dunkirk) on 4 June 1917. During this sortie Ft Cdr Alexander MacDonald Shook claimed an Albatros D III destroyed and a two-seater out of control.
One of the first large scale battles saw five Bentley powered aircraft from No.4 Naval Squadron intercept a force of sixteen Gothas returning from a raid on Harwich on 4 July 1917. One Gotha was claimed shot down in flames and another driven down out of control.
By the end of July 1917 Nos.3, 4 and 6 Naval Squadrons had been equipped with the Camel. In July-September it replaced the popular Sopwith Triplane at No.8 (Naval) Squadron and No.9 (Naval) Squadron, and in August No.10 (Naval) Squadron. No.1 Squadron and No.12 Squadron also operated the Camel on the Western Front.
Most of the time the RNAS squadrons operating the Camel on the Western Front came under the control of the R.F.C.
13 Naval Squadron gained the Camel in September 1917. This unit had been formed at Dover as a seaplane flight. It had then moved to Dunkirk, becoming the Dunkirk Seaplane Defence Flight. It soon began to run into German fighters, and converted to the Sopwith Pup. By the time the Camel arrived it had been renumbered as 13 Naval Squadron. In the RAF it became No.213.
No.16 Squadron, RNAS, used the F.1 alongside Handley Page O/400 bombers as part of the Independent Air Force. It became No.216 Squadron, RAF, in 1918.
Seaplane Base, RNAS Dunkirk, operated two Camels to escort their Curtiss H.12 Large America seaplane in 1917.
Most RNAS aircraft were powered by the B.R.1 engine, although they also used the Clerget camel.
RNAS Stations at Dover, the Isle of Grain, Manston, Felixstowe and Great Yarmouth also operated the Camel.
A few went to the Grand Fleet and the Northern Patrol where they were carried on larger warships.
Combat Units - RFC
The first RFC squadron to get the Camel was No.70, which had replaced its 1 ½ Strutters by late July 1917 (although it scored its first victory with the new type on 27 June). No.45 Squadron was next to convert to the type, and by the time the RFC was merged into the new RAF Nos.3, 28, 43, 45, 46, 54, 65, 70, 71 (No.4 Squadron, Australian Flying Corps from 20 January 1918), 73 and 80 Squadrons had received it as day fighters and Nos.151 and 152 as a night fighter.
No.70 Squadron’s first victory came on 27 June 1917 when Captain C.F. Collett claimed an Albatros D V. The second victory had to wait for fifteen days and saw N.W.W. Webb force an Albatros C X to land on the British side of the lines. The pace of the fighting soon sped up, and on 17 July the squadron claimed five victories in a clash with von Richtofen’s Flying Circus. The RFC only operated the Camel for nine months before it was merged into the new RAF.
Combat RAF
In April 1918 the RFC and RNAS merged into the new RAF. The RFC squadrons kept their original numbers, but the Naval squadrons were renumbered in the 200s, producing Nos.201, 203, 204, 208, 209 and 210 squadrons. The RFC Camel squadrons moved across with their original numbers (perhaps a sign of things to come and the inter-war RAF’s somewhat dismissive attitude to naval aviation). The Camel was used by the RAF on all fronts to the end of the war, although if the fighting had gone on into 1919 it would probably have been replaced with the Snipe. On 31 October 1918 the RAF had 385 Bentley Camels, 1,342 Clerget Camels and 821 Le Rhone or Monosoupape Camels, so the type would probably have lingered on for some time.
Home Defence
The Camel was converted into a special model for home defence duties. The main problem with the standard Camel was that the flash from the two guns blinded the pilot at night. In order to solve this a pair of Foster gun mountings were installed on the centre section, each carrying a Lewis gun. As well as solving the flash problem, this also allowed the use of the various types of special anti-Zeppelin ammo, which didn’t perform in quite the same way as standard ammo, causing problems with synchronisation gear. The pilot’s cockpit was moved back to allow him to use the new guns. The reliable 110hp Le Rhone engine was installed.
The Camel was first used on home defence duties in August 1917, and by the end of the war Nos. 37, 44, 50, 61, 78, 112, 143, 212 and 273 Squadrons had all used it on home defence duties.
Italy
Nos.28, 45 and 66 were all sent from France to Italy in the aftermath of the Italian defeat at Caporetto.
No.28 Squadron had spent eighteen months in Britain as a training unit before being set to France in October 1917. However before it entered combat it was sent to Italy, arriving at Milan in November. It spent the rest of the war operating its Camels over the north-east of Italy.
No.45 Squadron operated in France from October 1916, and converted to the Camel during 1917. In November it took them to Italy, where it operated until September when it returned to France.
No.66 Squadron operated in France from March-October 1917. It then converted to the Camel and moved to Italy in November, where it spent the rest of the war operating in the north-east.
Major W.G. Barker uses a Camel with No.139 Squadron in Italy
The RNAS also operated the Camel from Italy, although its aircraft were probably 2F.1s. RNAS Otranto was formed in 1917 and became Nos.224 and 225 Squadron, RAF. RNAS Taranto was also formed in 1917 and became Nos.226 and 227 Squadrons, RAF. All four squadrons used the Camel during 1918
Eastern Mediterranean
In December 1918 No.17 Squadron was equipped with twelve D.H.9s and six Camels. A flight was sent to Batum to support the White Russians while B and C Flights went to Constantinople, which was under Allied occupation at the time. The squadron disbanded in November 1919.
No.47 Squadron operated the Camel from April-October 1919, when it was based in southern Russia aiding the White Russians. In October it became A Squadron, RAF Mission.
No.150 Squadron operated the Camel from May 1918 to September 1919, alongside a number of other types. It was based at Salonika and provided air support for the Allied armies fighting the Bulgarians on that front. The squadron remained in Macedonia for almost a year after the war, before being disbanded on 18 September 1919.
No.221 Squadron used the Camel alongside the D.H.4, probably while based at Stavros on the Aegean, and possibly when the squadron moved to southern Russian to support the White Russians.
The RNAS also operated the 2.F1 Ship Camel in the Eastern Mediterranean, with what became Nos.220, 222, 223, 224, 225 and 226 Squadrons.
Mesopotamia
No.72 Squadron was formed in July 1917 at the Central Flying School, and departed for Mesopotamia in December 1917. It assembled at Basra on 2 March 1918, but was then split into several detachments which were used to provide fighter cover and reconnaissance for various army units. It used a variety of aircraft, including the Camel.
US Service
Four squadrons of the US Air Service operated the Camel, with No.17 Aero Squadron using the Le Rhone Camel and 41st, 148th and 185th Aero Squadrons using the Clerget Camel.
Nos.17 and 148 Squadrons were both filled with pilots who had trained on the Sopwith Camel in Britain, and both squadrons served with the RAF from the summer of 1917 until the end of October. The 185th Aero Squadron entered combat under US control in late October. The 41st Aero Squadron was about to enter combat when the war ended.
The 17th Aero Squadron was formed at Kelly Field in 13 May 1917 before moving to Europe, where both its support personnel and pilots gained experience serving with individual British squadrons on the Western Front. The squadron then came together on the Dunkirk front, where it flew its first operation on 15 July 1918. From 18 August to 20 September 1918 it was based at Auxile-le-Chateau as part of the 3rd Brigade of the RAF, and supported the advance on Cambrai. After the Germans retreated on that front the squadron moved to Doullens and supported the British 3rd Army. It used its Camels as fighters and ground attack aircraft, and claimed 64 victories at a cost of 24 casualties. On 28 October it was withdrawn from the British front and moved to the American 2nd Army, but the war ended before it could enter combat.
The 148th Aero Squadron was formed at Kelly Field on 11 November 1917 and at first followed a similar path to the 17th. However the airmen who had come across the Atlantic with the squadron soon went to other units, and the 148th gained American pilots with combat experience with the British. It also came together on the Dunkirk front, and entered combat on 20 July 1918. The squadron took part in the advance from Albert to Le Cateau then Le Quesnoy. On 28 October it was ordered to move the American front, ending its active part in the war. The squadron claimed 66 victories at a cost of only 11 casualties, impressively low for a unit that was often involved in ground attack missions.
The 185th Aero Squadron served with the US First Pursuit Group (or at least under its control), but only entered combat in late October. On 22 October it was ordered to be on alert to guard against any German bombers which crossed the US front lines, including at night when it was to keep two aircraft on alert at all times (with each pair of aircraft serving a one hour spell).
The 41st Aero Squadron was initially equipped with the Spad VII while it was forming up, but used the Camel in 1918-19. It was about to go operational with the US Second Army when the war ended and never saw combat. It did serve with the Third Army as part of the Army of Occupation in Germany in April-May 1919, then returned to France.
In June 1918 the USAS purchased 143 Clerget powered Camels, and then gave Boulton & Paul the task of fitting them with a 150hp Monosoupape engine. One American Camel with the 150hp engine was tested at Martlesham in October 1918, but it proved to be 82lb heavier than a British Camel that had been tested with the same engine in December 1917 and its performance was poorer than both that aircraft and standard Camels. The end of the war meant the project was abandoned.
The US Navy operated at least six F.1s. Two are known to have served on USS Texas and one on USS Arkansas. They were flown from ship-borne platforms and had jettisonable wheels. At least one had a hydrovane in front of the main landing gear and Grain flotation gear between the front of the lower longerons.
Belgium
Four escadrilles of l’Aviation Militaire Belge received the Camel. Up to 36 aircraft were sent, and some were still in use as late as 1922.
Stats
F.1
Engine: Clerget rotary
Power: 130hp
Crew: 1
Span: 28ft
Length: 18ft 9in
Height: 8ft 6in
Empty Weight: 962lb
Loaded Weight: 1,482lb
Gross Weight:
Maximum Speed: 108mph at 6,500ft; 104.5mph at 10,000ft
Cruising Speed:
Climb rate: 6m 40s to 6,500ft
Ceiling: 18,500ft
Range:
Guns: Two fixed forward firing 0.303in Vickers gun
Bomb load: Four 20lb Cooper bombs
F.1
Engine: Le Rhone rotary
Power: 110hp
Crew: 1
Span: 28ft
Length: 18ft 8in
Height: 8ft 6in
Empty Weight:
Loaded Weight: 1,422lb
Gross Weight:
Maximum Speed: 111.5mph at 15,000ft
Cruising Speed:
Climb rate: 5m 10s to 6,500ft
Ceiling: 24,000ft
Range:
Guns: Two fixed forward firing 0.303in Vickers gun
Bomb load: Four 20lb Cooper bombs
F.1 (Bentley)
Engine: B.R.1 rotary (best version)
Power: 150hp
Crew: 1
Span: 28ft
Length: 18ft 6in
Height: 8ft 6in
Empty Weight:
Loaded Weight: 1,470lb
Maximum Speed: 121mph at 10,000ft; 114.5mph at 15,000ft
Cruising Speed:
Climb rate: 4m 35s to 6,500ft
Ceiling: 22,000ft
Endurance: 2hr 30min
Range:
Guns: Two fixed forward firing 0.303in Vickers gun
Bomb load: Four 20lb Cooper bombs
 Sopwith Camel Aces of World War 1, Denes Bernad. The Sopwith Camel is probably the most famous British aircraft of the First World War. This book looks at the careers of the fighter aces who captured the imagination of the British public and provided some relief from the gloom of the Western Front [see more]
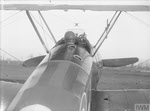 Rear view of Sopwith F.1 Camel Cockpit
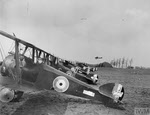 Sopwith F.1 Camels, Not of No.32 Squadron
 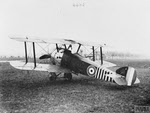 Sopwith F.1 Camel of Major William George Barker
  Sopwith F.1 Camel on Lighter H3
 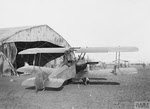 Home Defence Sopwith F.1 Camel of No.51 Squadron